


In general, a finder scope is a very small telescope that rides piggyback on the main telescope. Its purpose is simple: to aid in aiming the main telescope toward objects of interest. By virtue of low magnification and a wide field of view, the finder scope allows you to see more of the sky than you can through the main telescope. This wider field of view allows you to locate objects of interest easily, so you can study them at higher magnifications with the main telescope.
Once you locate an object of interest in the sky with the finder scope, center it on the finder scope crosshairs by adjusting the position of the telescope. Now, when you look in the main telescope - voila! - the object will be waiting right there for you in the telescope eyepiece. This method can be used whether the object of interest is a crater on the relatively close-by Moon, or a faint galaxy tens of millions of light years distant.
Types of Telescope Aiming Devices and Finder Scopes
Orion offers three main types of aiming devices: achromatic finder scopes, reflex sights, and bracketed green laser pointers. Within these three main categories of aiming devices, there are also different models of finder scopes and reflex sights available with specialized features and functionality. You can use just one of these aiming tools to help point your telescope, but many amateur astronomers have found that having more than one aiming device on the same telescope can make aiming easier than using a single device.
Let's take a moment to find out what the major differences are between the different types of aiming devices:
Achromatic Finder Scopes
An achromatic finder scope is itself a miniature refracting telescope that uses glass lenses to gather and focus light. Most offer modest magnification on the order of 5x to 10x, and a field of view of 5� or more. A 6x30 finder scope is a common model. The 6 is the magnifying power, while the 30 represents the diameter, or aperture, of the main lens, in millimeters.
Different models of achromatic finder scopes are equipped with different features which can help to make aiming a telescope more accurate, more comfortable, and more convenient.
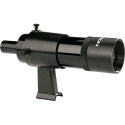
Straight Finder Scopes
Standard straight finder scopes are the simplest design of magnified aiming device. They transmit light gathered by the objective lens through the finder scope barrel to the eye lens, which sticks straight out the back of the finder barrel. You just peer into the eye lens to see a wide-field magnified view of where the finder scope is pointing, and therefore where the telescope is pointing.
Beginners are often surprised that the image in a standard finder scope is upside-down (rotated 180�). That's normal (though perhaps not ideal) for any refractor used without a correcting prism. It's not that big of a deal, however, since all you're trying to do is center the object on the crosshairs. Whether it's upside down or not doesn't much matter, though it does make navigation by star-hopping a little trickier.
Right-Angle Correct-Image Finder Scopes
Unlike standard straight finder scopes, specialized right-angle correct-image designs employ a right-angle prism to bend the path of gathered light 90� and correct the inverted (upside-down) view. The benefits of such a finder scope are twofold. Many astronomers prefer the right-angle positioning of the eye lens as a more comfortable alternative to straight finders, especially when trying to locate a celestial object that is near the zenith of the night sky, straight overhead. The correct-image view makes it easy to make accurate position adjustments of the main telescope, since the view in the finder matches the naked-eye view of the sky.
Illuminated Reticles and Standard Cross Hairs
All finder scopes feature some type of cross hair reticle which is visible when you look through the finder scope. Using the cross hair pattern, you can easily center an object of interest in the finder scope's field of view, so it will be visible in the eyepiece of the main telescope the finder is aligned with.
Some achromatic finder scopes have standard black cross hair reticles, while other so-called "illuminated reticle" models feature a small red LED light which illuminates the cross hairs for easier detection at night. On especially dark nights, it can prove difficult to see standard black cross hairs against the dark background of the black sky. Orion Illuminated Reticle Finder Scopes employ double cross hairs which form a small box around the center of the finder field of view. Centering an object is as easy as placing it in the illuminated box! Illuminated reticle finder scopes require button-cell batteries to power the illuminator.
Focusing the Finder Scope
Most achromatic finder scopes have an adjustment ring that allows the image to be focused for your eyesight. Focusing is done by moving the objective (front) lens in or out by adjusting the knurled ring near the front of the finder. Consult the instruction manual that came with your telescope or finder scope to learn more about focusing.
The Bigger the Finder, the More You'll See
With finder scopes, as with any telescope, the bigger the diameter of the light-collecting lens or mirror (i.e., the aperture), the more you'll be able to see with it. Greater light-grasp translates into being able to see fainter objects and finer detail. So larger, more expensive 8x40 or 9x50 finder scopes garner more light to pull in fainter targets and, more importantly, dimmer stars. Such large-aperture finders are popular add-on accessories for telescopes of 6" and greater apertures.
If the object you're targeting is too faint to be seen in the finder scope, then you have to aim where you think it is and "sweep" the area a little with small circular motions of the main telescope until it appears in the eyepiece. This can require a bit of practice, but the satisfaction of finding a celestial object on your own, without computerized assistance will be worth it!
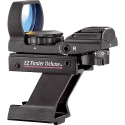
Reflex Sights, or "Red Dot" Finders
A refreshingly simple type of aiming device is called a reflex sight, or "red dot" finder. It is a non-magnifying aiming tool that displays a red, LED-lit bull's-eye pattern or red dot in the center of the finder's field of view. The red dot appears superimposed on the sky, showing exactly where the telescope is pointed (once properly aligned, of course).
While a reflex sight can only be used to locate objects that are visible to the naked eye, its main advantage is that it does not invert or flip the image like a standard finder scope does. It also has a very wide field of view. So it makes star-hopping very easy and intuitive. Using a reflex sight is easy - just look on a star chart, locate a celestial object's position relative to bright nearby stars, or its position within a recognizable constellation or asterism. Move the main telescope to place the reflex sight's red dot on that spot, and, presto, the object is right there in the main telescope's eyepiece.
Like achromatic finder scopes, different types of reflex sights are available. Some especially affordable models offer a single red-dot aiming pattern, while other more deluxe models offer a variety of different reticle patterns and brightness settings which are preferable to many amateur astronomers.
Because standard finder scopes and reflex sights each have their own merits, many amateur astronomers use them both, mounting them side by side on their telescopes.
Green Laser Pointers
Many amateur astronomers enjoy using a green laser pointer to help aim their telescope. To use a laser pointer as an aiming device, a specially designed bracket is required which both holds the pointer and allows it to be aligned with the main telescope. With such a bracket attached to your telescope, a green laser pointer can be used as a high-tech aiming tool.
Bracketed green laser pointers can be used as the main aiming device, but they are also commonly used as a secondary aiming tool in addition to a finder scope and/or reflex sight to help aim the main telescope with precision.
CAUTION: Always use green laser pointers responsibly! Never aim them anywhere near people, animals, moving vehicles, aircraft, or windows.
IMPORTANT NOTE: Remember to power-off the laser pointer once you've completed aiming the telescope at your target celestial object by loosening the ON/OFF collar thumbscrew before you observe through the attached telescope, to both prolong battery life and avoid unintentional pointing of the laser at passing aircraft, animals, etc.
Align then Find
Finder scopes and other aiming devices will only work if they have first been aligned with the main telescope, so the two instruments are aiming at exactly the same spot. That's easy to do.
Aligning Finder Scopes and Reflex Sights
To avoid hassle, align a finder scope or reflex sight while it's still light outside. A good time to perform aiming device alignment is after the telescope has been set up but before the Sun goes down.
First, put a low-power (long focal length) eyepiece in the focuser of the main telescope. Looking into the telescope eyepiece, center a distant stationary object in the field of view - the top of a telephone pole, a treetop, or a chimney on a house. The object should be at least a quarter-mile away to optimize precise alignment of the finder scope. Selecting an even more distant object will improve accuracy. Now, without moving the main telescope, carefully look through the finder scope and see if the object appears in the center of the finder scope's field of view (where the crosshairs intersect). If it does not, use the adjustment screws on the finder scope bracket to adjust the aim of the finder scope until the object is centered on the crosshairs. For reflex sights, use the adjustment knobs to adjust the aim of the red-dot sight until the object is centered in the viewing window. You may want to power on the reflex sight so you can see the red-dot.
Once the object is centered in either the finder scope or reflex sight, look back into the telescope eyepiece and make sure the object is still centered there as well. If it is, you're done. If it is not, repeat the procedure, being careful not to move the main telescope while you're adjusting the position of the finder scope or reflex sight.
When the distant object is centered in both the main telescope and the aiming device, the finder scope or reflex sight is properly aligned and ready to use. Verifying the aiming device's alignment should be one of the steps you go through each time you set up for an observing session. While most of the time an aiming device will retain its alignment, it's a good idea to check before each observing session to avoid frustration if the finder has been inadvertently bumped and misaligned.
Aligning Bracketed Green Laser Pointers
Aligning a bracketed green laser pointer with a telescope is easy to do. It should be done outdoors by aligning on a distant fixed target or a bright star.
First, point your telescope at a target that is 100 feet or further away. Using a low power telescope eyepiece, such as a 25mm focal length eyepiece, look through the telescope, and make sure that the target object is centered in the field of view. Then, turn the green laser pointer on by rotating the knurled metal thumbscrew on the on/off collar clockwise. Finally, use the adjustment thumbscrews of the bracket to adjust the green laser until it is pointing to the same target that the telescope is centered on.
If you have a higher power eyepiece you can repeat the procedure for enhanced precision. The narrower field of view provided by a higher power eyepiece will increase the accuracy of the laser's alignment with the main telescope.
Once the laser points to the same target that the telescope is centered on, the laser is aligned with the telescope. You're ready to use the green laser pointer with the telescope under the night sky.
So, Which Aiming Device is Best?
Deciding which type of finder scope or aiming device best suits your needs depends on a mixture of personal preference and desire for specialized features and functionality. Most telescopes include some type of aiming device right out of the box. Acquiring a different finder scope or aiming device can substantially improve your experience when using a telescope, as they can significantly improve ease-of-use. As you use your telescope, make note of whether or not you feel your current finder scope or aiming device is providing you with a comfortable and effective means of aiming. Chances are good there is a better finder available from Orion that can make pointing your telescope in the right direction a more pleasurable experience.
In closing, let's review the main factors to consider when shopping for an aiming device for your telescope:
o A finder scope or aiming device is used to accurately point the main telescope towards objects of interest
o Different designs of finder scopes and aiming devices provide different features and functionality that can significantly improve your experience
o The different designs available are:
o Straight through magnifying finder scopes with standard cross hairs
o Straight through magnifying finder scopes with illuminated-reticle cross hairs
o Right-angle correct-image magnifying finder scopes with standard cross hairs
o Right-angle correct-image magnifying finder scopes with illuminated-reticle cross hairs
o Non-magnifying reflex sights with a 'red-dot' aiming pattern
o Non-magnifying deluxe reflex sights with multiple aiming patterns and brightness settings
o Bracketed green laser pointers which emit a laser beam to help aim the telescope
o Many amateur astronomers use more than one aiming device on a telescope
o The best aiming device(s) to use depends on you and your personal preferences in the hobby
Remember, Orion is here to help with any questions you have while shopping for a new finder scope or other telescope aiming device. Just send us an email at sales@telescope.com, contact us via live chat, or give us a call Toll-Free at 800-676-1343 and we'll help find the best aiming device for you!

|


")


{entityCount: 6}


