

![]() Orion is proud to partner with BBC Sky at Night Magazine, the UK's biggest selling astronomy periodical, to bring you this article as part of an ongoing series to provide valuable content to our customers. Check back each month for exciting articles from renowned amateur astronomers, practical observing tutorials, and much more!
Orion is proud to partner with BBC Sky at Night Magazine, the UK's biggest selling astronomy periodical, to bring you this article as part of an ongoing series to provide valuable content to our customers. Check back each month for exciting articles from renowned amateur astronomers, practical observing tutorials, and much more!
Getting to the Heart of Pluto
Two years since the New Horizons flyby, Paul Abel reveals how its data is driving new discoveries about the dwarf planet.
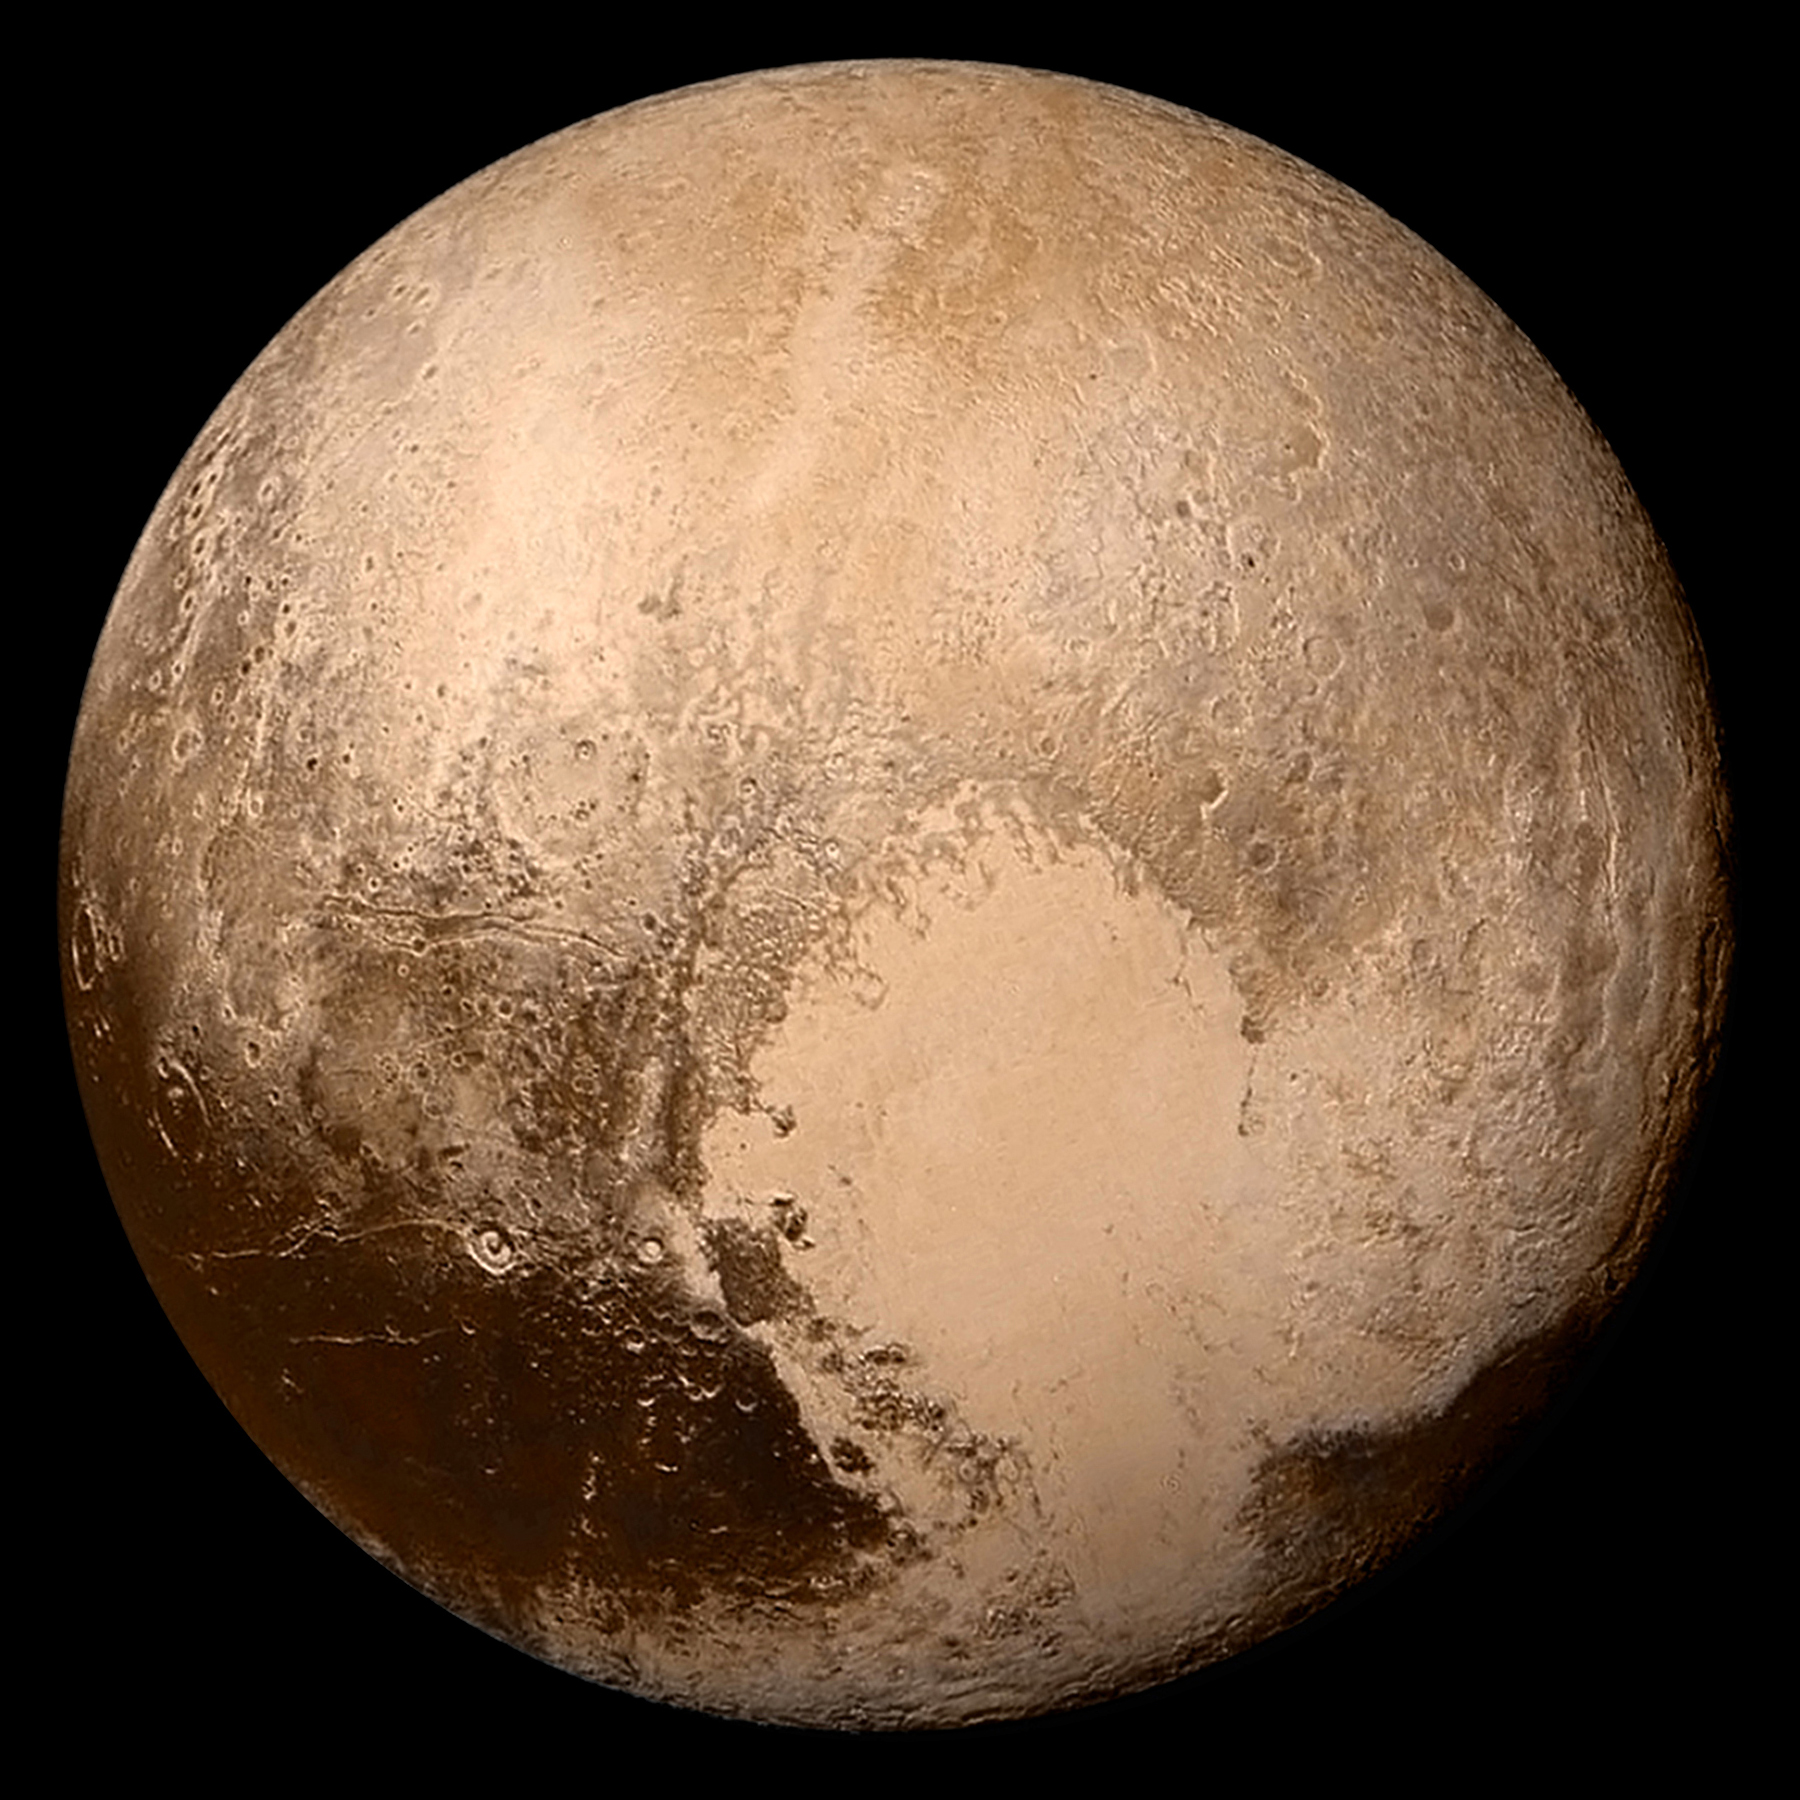
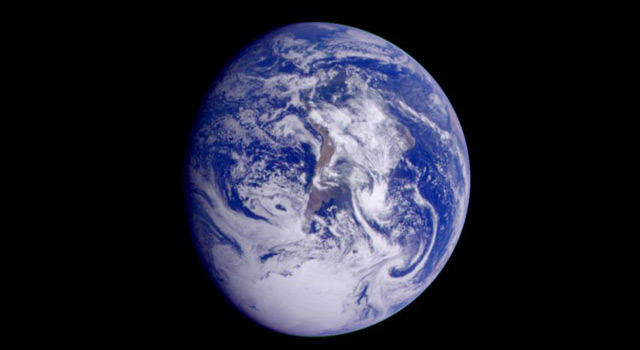
Four images from New Horizons' Long Range Reconnaissance Imager (LORRI) were combined with color data from the Ralph instrument to create this global view of Pluto. (The lower right edge of Pluto in this view currently lacks high-resolution color coverage.) The images, taken when the spacecraft was 280,000 miles (450,000 kilometers) away, show features as small as 1.4 miles (2.2 kilometers), twice the resolution of the single-image view taken on July 13 [2015]. By NASA / Johns Hopkins University Applied Physics Laboratory / Southwest Research Institute — Public Domain
On 14 July, it will be two years since New Horizons made its historic closest approach of dwarf planet Pluto. Nine years after its launch in 2006, the spacecraft became the first robotic emissary from Earth to survey this frozen enigma, which has spent much of humanity's existence lost in the frozen darkness of the outer Solar System.
Back in the summer of 2015 we looked at the history of Pluto and made some predictions about what New Horizons might reveal. Now we return to those predictions and look at the exciting discoveries that have been made about this fascinating sentry of the distant Kuiper Belt.
A patchwork surface
In the decades following its discovery Pluto remained little more than a speck of light, even when glimpsed by the world's largest telescopes. In 2002-03, the Hubble Space Telescope produced the first map of its surface, which provided tantalizing hints of a patchwork body. While there was speculation about the existence of cryovolcanism and stunning surface features in the 2015 feature, and some might have thought the author was — as Patrick might have said — letting his imagination run riot, after the flyby it seemed that more imagination was needed.
Dominating the surface of Pluto is the bright, heart-shaped feature known as the Tombaugh Regio, where New Horizons has discovered evidence of some spectacular geological activity. The western lobe is formed by the Sputnik Planitia, a vast, smooth deposit of bright carbon-monoxide ice. It is some 1,050x800km in size, making it the largest glacier in the Solar System. To the south we have the mountains Hillary and Norgay Montes. Norgay Montes is about 3.4km high and largely made of water-ice. There is evidence of ice flows here, and hints of structures that resemble frozen lakes. The views from the top of these mountains are likely to be quite spectacular.
High-resolution images of the Sputnik Planitia show it to be formed of polygon convection cells. It is thought that nitrogen and carbon-monoxide ice is warmed by heat welling up from inside the cells, and that this ice then flows down to lower levels. The small pits located in the ice could be the result of the sublimation of nitrogen-ice. There are no surface craters here, and this has led scientists to conclude that this part of Pluto's surface must be younger than 10 million years old. Clearly, Pluto is still geologically active.
Other areas of interest include ancient dark terrain like the whale-shaped Cthulhu Regio: its dark red coloration is due to the presence of complex hydrocarbons called tholins. The cratering of this part of the surface would suggest it to be a few billion years old, certainly much older than the Sputnik Planitia.
The New Horizons data provides two possible candidates for cryovolcanism: Wright Mons and Piccard Mons. These two features are the tallest objects on the surface of Pluto, reaching a height of 4km. A series of dark irregular patches on the equator form the Brass Knuckles region. The dark patches are separated by bright ice-covered mountains, which themselves contain deep canyons and valleys. It seems that there is no dull place on the surface of Pluto!
A lively atmosphere
It had long been thought that Pluto's atmosphere would be interesting. Due to its rather elliptical orbit, the general consensus was that the atmosphere would freeze to the surface as Pluto moved farther from the Sun. However, scientists now believe that Pluto may have an atmosphere for most, if not all, of its long year. Pluto has a substantial axial tilt of about 120°, so as it orbits the Sun one pole is kept in shadow while the other remains in direct sunlight. New Horizons has revealed that methane and nitrogen are distributed all over the surface. This means that there is probably enough ice to sublimate and keep the atmosphere from completely condensing on the surface.
This does not mean that the atmosphere is static: indeed it is far more dynamic than we thought. Over Pluto's long history, changes in the axial tilt mean there may have been times when the atmosphere was much more dense than it is now. It has been suggested that the atmosphere may even become dense enough to allow the existence of lakes of liquid nitrogen on Pluto.
After New Horizons made its closest approach, its Long Range Reconnaissance Imager began to observe the dwarf planet and it made a surprising discovery: surrounding Pluto was a notable atmospheric haze. Unexpectedly, this haze seemed to be composed of several different layers. It is thought to be due to the interaction of Pluto's atmosphere with sunlight. Although the Sun is weak from this far away, it is still sufficient to break up methane in the upper atmosphere, allowing more complex hydrocarbons to form. These slowly fall to colder, lower altitudes, forming the haze. The Sun's ultraviolet rays convert them into compounds called tholins, the compound responsible for the dark coloration on Pluto's surface. This is a general picture however; the exact details have yet to be determined. No doubt there is a complex interplay between the atmosphere and the surface, creating the dramatic topography we have seen. If anything, New Horizons has revealed the atmosphere of Pluto to be just as fascinating and complex as the planet it enshrouds.
Fellow travelers
Pluto does not wander alone in space: it is accompanied by five satellites, Charon, Nix, Kerberos, Hydra and Styx. Charon is around one-eighth the mass of Pluto, and as a result the pair are tidally locked, which means they always present the same face to each other as they move around the Sun. Unlike our own Moon, Charon does not rise and set over the surface of Pluto, it remains fixed in the black sky.
New Horizons surveyed Charon and the results once more challenged the expectations of planetary scientists. Instead of a dead, cratered world, the spacecraft found a surface every bit as exciting as Pluto's. Charon has a dark red northern polar cap, and this is probably material that has escaped from Pluto's atmosphere. Running along its equator is a vast canyon system nearly 1,600km in length. What could have caused this enormous fracture?
Names from science fiction are given to features here and the aptly named Vulcan Planum is, as Mr. Spock would say, fascinating. There is surprisingly little cratering on this plain, which indicates that some sort of resurfacing has taken place; the fingerprints of cryovolcanism in action. New Horizons was also able to image the other satellites, although Nix was the only other moon close enough to show interesting surface details. The spacecraft showed a red patch on the surface similar to the dark coloration found on Pluto and Charon.
The continuing mission
Although the Pluto flyby has long since passed, New Horizons is far from finished. The mission has already been a spectacular success and it has transformed an object that was once just a pinprick of light on a photographic plate into a complex and diverse world.
The discovery of mountains and apparent ice floes shows that even out here, in the frozen extremities of the Solar System, geological activity is quite common. Like the satellites of Jupiter and Saturn, Pluto and Charon remind us that we were wrong to write them off as dead, airless worlds.
No doubt in years to come the next generation of planetary scientists will use data from New Horizons to formulate new models of these distant wanderers. In the larger picture they will help to provide a better understanding of the early Solar System. I would imagine there will be many more surprises in store as the story of Pluto embarks on a new chapter.
LIFE ON PLUTO
The dwarf planet's subsurface oceans are a well of possibility.
It is currently believed that under the thick icy surface of Pluto there is a vast layer of water-ice. Beneath this lies the core of Pluto, containing radioactive elements that would release heat as they decay, thawing the water-ice above. Indeed, there may have been enough heating to have produced yet-undiscovered subsurface oceans on the dwarf planet.
Data from New Horizons indicates that Sputnik Planitia is probably an impact basin formed when a large object collided with the surface. As a result of the collision, water from this subsurface ocean could have welled up to produce the vast glacier we see today. One can't help wondering whether conditions in the subterranean oceans of Pluto were ever right for life to have got started.
ABOUT THE WRITER
Paul Abel is an astronomer at the University of Leicester. He co-hosts BBC Sky at Night's Virtual Planetarium every month.
Copyright © Immediate Media. All rights reserved. No part of this article may be reproduced or transmitted in any form or by any means, electronic or mechanical without permission from the publisher.

![]() Orion is proud to partner with BBC Sky at Night Magazine, the UK's biggest selling astronomy periodical, to bring you this article as part of an ongoing series to provide valuable content to our customers. Check back each month for exciting articles from renowned amateur astronomers, practical observing tutorials, and much more!
Orion is proud to partner with BBC Sky at Night Magazine, the UK's biggest selling astronomy periodical, to bring you this article as part of an ongoing series to provide valuable content to our customers. Check back each month for exciting articles from renowned amateur astronomers, practical observing tutorials, and much more!
Catching the Milky Way's Monsters
A revolution that began with colliding neutron stars is taking place in astronomy. Will Gater looks at how electromagnetic and gravitational wave observations are expanding our view of the cosmos.
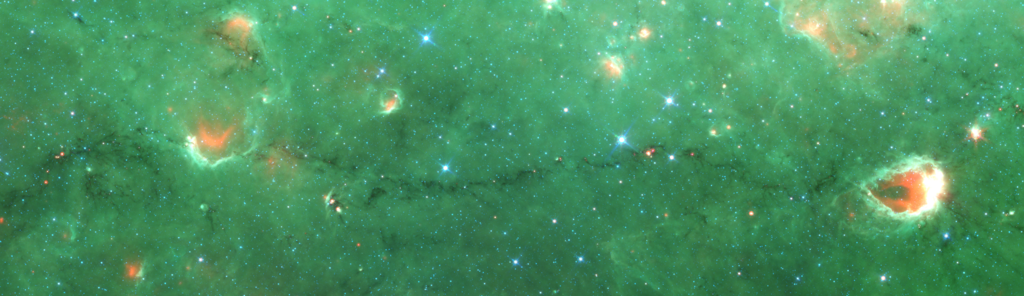
The "Nessie" infrared-dark cloud observed by the Spitzer Space Telescope. By NASA/JPL/SSC Public domain, via Wikimedia Commons
A brave trio of astronomers based at Harvard's Center for Astrophysics have been monster hunting in the Milky Way. Their first discovery was 'Nessie'; not a creature from the depths of a Scottish loch, but rather a long, dark filament slashed through our Galaxy's disc. The structure, made up of a long thread of relatively dense gas whose sinuous turns reflect those of the monster 'seen' in the classic photo, is hundreds of lightyears long.
When I first heard about it, I thought the existence of such a structure was just a curiosity, but this 'Nessie' is a complicated beast. Understanding how such a filament could have formed, and how it has resisted being ripped apart by the turbulent structure of the Galaxy's gas clouds, is not easy. A proper survey is needed and others have set out on this quest before. Six separate papers have tried to compile catalogues of giant filaments, using data from infrared and radio surveys within which dense clumps of gas stand out. Some inspected their data by eye while others used algorithms and machine learning to look for long filaments, so the first task for Catherine Zucker — the PhD student leading this monster hunt — was to bring these different datasets together in a useful way, using data from ESA's Herschel observatory to measure their properties.
The results of her and her team's hard work are fascinating. There are, it turns out, several types of monsters lurking in the Milky Way. While all share a habitat — closer to the center of the Galaxy than we are, and close to the middle of the disc — there are distinct differences. The most obvious bear similarities to how we imagine the Loch Ness Monster to look: they're long, thin filaments that, thanks to a significant fraction of dense gas, appear capable of forming massive stars (in some, three quarters of their gas is dense enough to be able to form stars). Such large and thin features are almost certainly the result of gravity working on a grand scale. What's more, these giant filaments may be very important, acting like bones to underpin the whole spiral structure of the Milky Way.
The second type, which have less dense gas and a more rounded appearance, may be squeezed versions of normal molecular clouds, which form the bulk of the Milky Way's star-formation regions. A comparison with recent simulations suggests that this idea is at least plausible, though more work — probably with more powerful computers — is needed. The third and final type sits between the previous two; these are as thin as the 'Nessie' filament but contain relatively little dense gas. They seem to be networks of molecular clouds, sorted into a regular pattern by gas collapsing in a particular way, specifically due to something called a 'sausage instability' (a wonderful technical term).
The three types of filaments seem to tell different stories about how gas collapses locally and how the large-scale structure of the Milky Way is put together. In corralling all of these beasts in the same place, Zucker and her team have done a great service to those who'll follow and continue our exploration of the Milky Way's wild places.
ABOUT THE WRITER
Chris Lintott is an astrophysicist and co-presenter of The Sky at Night on BBC TV. He is also the director of the Zooniverse project.
Copyright © Immediate Media. All rights reserved. No part of this article may be reproduced or transmitted in any form or by any means, electronic or mechanical without permission from the publisher.

![]() Orion is proud to partner with BBC Sky at Night Magazine, the UK's biggest selling astronomy periodical, to bring you this article as part of an ongoing series to provide valuable content to our customers. Check back each month for exciting articles from renowned amateur astronomers, practical observing tutorials, and much more!
Orion is proud to partner with BBC Sky at Night Magazine, the UK's biggest selling astronomy periodical, to bring you this article as part of an ongoing series to provide valuable content to our customers. Check back each month for exciting articles from renowned amateur astronomers, practical observing tutorials, and much more!
Ripples, Radiation and Revelation
A revolution that began with colliding neutron stars is taking place in astronomy. Will Gater looks at how electromagnetic and gravitational wave observations are expanding our view of the cosmos.
By ESO (https://www.eso.org/public/images/eso0917a/) [CC BY 4.0], via Wikimedia Commons
Every so often, a true moment of scientific insight comes along, a moment that has a profound impact on how we explore the Universe. One such moment came in 2015 with the first detection of gravitational waves — ripples in the fabric of space-time that propagate from moving celestial bodies and violent events such as the merging of two black holes or neutron stars.
But despite the astronomical possibilities gravitational waves grant us, it was another, more recent, observation that opened up a new field of space science. That new field is multi-messenger astronomy, in which the secrets of the Universe are revealed through detecting and observing not only electromagnetic radiation, but gravitational waves and other celestial phenomena too. And its story begins around lunchtime, in August last year.
At 12:41 UT on 17 August 2017, the Laser Interferometer Gravitational-wave Observatory (LIGO) detectors in Washington and Louisiana, USA, sensed a gravitational wave washing over their respective sites. What happened next would thrill researchers and set off a dramatic chain of events.
Mere seconds later, in space, NASA's Fermi Gamma-ray Space Telescope and ESA's International Gamma-Ray Astrophysics Lab (INTEGRAL) satellite both caught a burst of gamma rays emanating from somewhere in the southern celestial hemisphere. Could the two things be related?
"Less than a minute after the gamma-ray [burst] was picked up by the Fermi team, they notified everyone else that they'd seen something interesting and gave a rough sky map of the location," recalls Dr. Michalis Agathos, a LIGO-Virgo Collaboration researcher based at the University of Cambridge.
The scramble to correlate
As news of the gamma-ray burst started to reach astronomers around the world, the LIGO researchers were already analyzing the wave their detectors had sensed, which they'd now catalogued as GW170817. Like the Fermi and INTEGRAL teams, the LIGO researchers notified collaborators at astronomical organizations around the world with access to telescopes observing across practically the entire electromagnetic spectrum.
Astronomers and gravitational wave researchers have started to work together like this in recent years in the hope of observing electromagnetic radiation (be it visible light, radio waves, X-rays or gammarays) from the events that trigger gravitational waves and send them rippling across the cosmos. Such an observation of electromagnetic radiation had never been made alongside a gravitational wave before but now, with GW170817, the LIGO-Virgo team worked with great urgency to notify their colleagues who had spotted the Gamma-ray burst.
"We already knew that the Fermi team had circulated [news of the Gamma-rays] so everyone at LIGO worked hard to get [details of GW170817] out fast with as much accurate information as possible," says Agathos.
Using data from a third detector, Virgo in Italy, the researchers were able to narrow down the area of the sky that GW170817 had come from. "When we cross-checked our sky map with that of Fermi, which was relatively wide but still narrowed down the location to a few hundred square degrees, we noticed a significant overlap. That encouraged people to believe that this was something that may be picked up by other telescopes," says Agathos.
On the ground, the professional observatories in Chile slewed towards the area specified by the LIGOVirgo team, picking out a new pinprick of light in NGC 4993, a galaxy around 130 million lightyears away. Meanwhile in orbit, both the Hubble Space Telescope and NASA's Swift satellite spotted it too, while the Chandra X-ray Observatory would later detect X-rays streaming from the same location. One estimate from the European Southern Observatory suggests that around 70 observatories saw the glowing dot that had appeared in the distant galaxy. More significant than the large number of eyes on the new spot of light, however, is what the diversity of observations constituted.
For the very first time, researchers had caught both electromagnetic radiation and gravitational waves emanating from an astronomical phenomenon. And with the data they'd amassed, the science of multimessenger astronomy — of studying distant celestial objects by examining more than just the light they emit — took a vast leap forward.
As had long been hoped, decades of technological improvements had brought gravitational wave detection to the point where it could work in concert with all kinds of observatories to provide astronomers with a new way to scrutinize astrophysical processes. And nowhere was this better demonstrated than in the revelations that came from the analysis of the GW170817 event.
Looking beyond the wave
"The data that we see in [a] gravitational wave detection is in a waveform," says Agathos. "You can see it as a wave that evolves in a certain way and the structure of it gives you information about the source that generated it."
Analysis of the GW170817 gravitational wave suggested that the event which had produced it was a violent collision between two neutron stars that had been spiraling in towards each other. When the two stars finally collided, the force of the impact shuddered the fabric of space-time, sending the gravitational wave rippling across the cosmos. It also illuminated their host galaxy with a powerful blast of radiation — the light the world's telescopes picked up in August.
The identification of a neutron star binary system as the origin of GW170817 was important in itself. The initial flash that the Fermi telescope saw was a phenomenon known as a short gamma-ray burst. Short gamma-ray bursts had been observed many times prior to the GW170817 event and one of the theories that astronomers had put forward for what causes them was the merging of neutron stars.
With Fermi's observation of the short gamma-ray burst and a simultaneous detection of a gravitational wave produced by a collision of neutron stars, astronomers now had a key piece of evidence to support that theory.
The kilonova question
This revelation from the study of the GW170817 gravitational wave was the first triumph of multimessenger astronomy, but it wasn't the only one. The telescopes observing the electromagnetic radiation from the explosion caused by the two neutron stars colliding were able to capture spectra of the event. In doing so they were able to shed light on one of the great enigmas in astrophysics: where some of the heaviest elements in the Universe come from.
"Once you have the spectrum you can infer things about the [chemical] composition of the matter that you're observing," says Agathos. "The fact that we saw spectral lines of certain elements in this detection indicated that a big portion of elements, such as gold, platinum, uranium or other heavy elements, [are] actually produced in this type of process. This had been an open question for decades."
Those heavy elements were flung out by the explosion observed by the follow-up telescopes &mash; a powerful blast known as a 'kilonova', which astronomers had for many years suspected would occur when two neutron stars smash together. Kilonovae are fainter and release less material than supernovae, but as they dim rapidly they're much more tricky to catch.
"Sometimes you can see objects that have characteristics which would have looked like the theoretical models put forward for a kilonova," says Dr Kate Maguire, an expert in supernovae from Queen's University, Belfast. "But because they fade away very quickly from their brightness we never had good datasets."
Indeed, the multi-messenger nature of the GW170817 observations was crucial to positively identifying it as the kilonova predicted by models. "This is the first object that's conclusively a kilonova, because we have the gravitational wave detection of the two neutron stars merging," adds Maguire.
More messages
Astronomers hope to make more multi-messenger observations of kilonovae in order to get a better understanding of these events. But future multimessenger astronomy studies may also offer new insight into their more energetic cousins, supernovae, as well. And that's because there's another type of 'messenger' to pick up, a messenger that wasn't detected in the GW170817 event but one that could reveal the inner workings of these violent stellar detonations: neutrinos.
Neutrino particles can be produced in the powerful core-collapse supernovae that occur when a massive star dies, but they're extraordinarily hard to detect and require specialist detectors, such as the IceCube Neutrino observatory located at the South Pole. "We've only seen neutrinos from one supernova, 1987A, and that was 20 neutrinos out nos [a theorized total of] 1058," says Maguire.
Nevertheless if a supernova went off in the Milky Way and enough neutrinos could be detected from the blast, along with gravitational waves and electromagnetic radiation, it would be a pivotal observation. "The neutrinos would tell us about the explosion mechanism of the core-collapse supernova," explains Maguire. "The gravitational wave detection would be very nice for tying down the properties of the system, such as the mass. And we'd have the electromagnetic radiation as well — because it would be a supernova in our galaxy we'd be able to get very detailed observations. It would be incredibly exciting if we were able to do that."
With LIGO coming back online later this year, professional astronomers will be preparing to jump into action when another gravitational wave signal is detected. But there's another development on the horizon that should excite amateur astronomers too. In the future, the private notifications that the LIGO team send out to collaborators alerting them to a potential new gravitational wave event will be made more widely available.
"One cannot exclude the possibility that certain sources may be observable by amateur astronomers with decent telescopes," says Agathos. "For instance the host galaxy of the first neutron star binary [merger] detection was something in the region of [mag.] +12.4 and the source itself was not much dimmer. With a decent telescope, if you're lucky enough and you're in a place where the sky is dark and clear, you may actually be able to discover things before the large telescopes do."
The future of multi-messenger astronomy will certainly involve advanced, professional observatories and rapid-reaction, wide-field telescopes working alongside gravitational wave and neutrino detectors. But in among the authors of forthcoming studies they produce, we may well also see the names of dedicated amateurs working from their own back gardens.
ABOUT THE WRITER
Will Gater is an astronomy journalist, author and presenter. Follow him on Twitter at @willgater or visit willgater.com.
Copyright © Immediate Media. All rights reserved. No part of this article may be reproduced or transmitted in any form or by any means, electronic or mechanical without permission from the publisher.

![]() Orion is proud to partner with BBC Sky at Night Magazine, the UK's biggest selling astronomy periodical, to bring you this article as part of an ongoing series to provide valuable content to our customers. Check back each month for exciting articles from renowned amateur astronomers, practical observing tutorials, and much more!
Orion is proud to partner with BBC Sky at Night Magazine, the UK's biggest selling astronomy periodical, to bring you this article as part of an ongoing series to provide valuable content to our customers. Check back each month for exciting articles from renowned amateur astronomers, practical observing tutorials, and much more!
Spying on the Neighbors
Hubble's successor, the James Webb Space Telescope, will look farther back in time and space than ever before. But this giant telescope could also be turned to targets right in our own cosmic backyard, as Benjamin Skuse reveals.
Creative Commons Zero (CC0) license
Bigger and more powerful than any space observatory ever launched, the James Webb Space Telescope's (JSWT's) infrared gaze will stretch to the very first stars and galaxies being born, offering new insight into the Universe's origins. Its eyes will also scan exoplanets in the search for the building blocks of life beyond our cosmic doorstep, looking for answers to the perennial question: 'Are we alone?'
What many do not realize though is that JWST will not solely be peering at the farthest reaches of the Universe. In fact, with some clever reconfiguring, Webb will be able to cast its spying eye on our closest cosmic neighbors, hoping to uncover some of the secrets hidden within our Solar System.
Adapting JWST for the local nature of Solar System science, however, is fraught with difficulties. The biggest is that the telescope is designed for detecting the faintest, most distant objects. Its extremely sensitive sensors therefore need to be protected at all times from the overpowering light and heat from the Sun, which is why it is equipped with a tennis court-sized sunshield. This would not be a problem but for the fact that Webb will be located at the second Lagrangian point (L2), some 1.5 million km beyond Earth's orbit. As it is, the sunshield permanently shrouds Mercury, Venus, Earth and the Moon from Webb's gaze.
The closest of our neighbors Webb will be able to track are near-Earth objects (NEOs) like Eros and Halley's Comet. "The Earth's atmosphere makes it very difficult to observe NEOs in certain wavelength regions, some of which are very informative and diagnostic of things like water and organics," says NASA research scientist Cristina Thomas. "If we want to focus on origins of life questions, then going outside the atmosphere helps us."
The brightness dilemma
The second nearest target, Mars and its moons, will only be within JWST's spyglass every two years. Webb will add an infrared view to the Mars toolbox of rovers and satellites tasked with studying the planet and its potential for hosting life.
NASA planetary scientist Geronimo Villanueva believes this capability will be invaluable: "JWST will open a new window into the planet's current and past habitability," he says. Villanueva should know. Among other achievements, he was the co-discoverer of methane on the planet (a possible biosignature) and mapped deuterium to hydrogen ratios in Mars's atmospheric water — leading to the realization that the Red Planet had an ancient ocean. "New observations are urgently needed to confirm these findings," he says.
The Red Planet brings us to the second main challenge in using Webb to look over the garden fence: overexposure. Essentially, Mars is far too bright for the Webb's sensitive detectors to cope with. "Even Pluto is bright enough that if we took full-frame data with our widest filters it would saturate," says John Stansberry, a Space Telescope Science Institute (STScI) scientist. "So bright has a different definition for JWST!"
To get round this, NASA will command the instrument to just process a tiny square right in the middle of the full detector array. "Instead of having a 4-megapixel image, we'll take a much smaller postage stamp in the middle," says NASA space scientist Conor Nixon. "That way we can read that out really quickly before it becomes overexposed."
Beyond Mars is where JWST will really have to start getting busy. With an observing window of around 50 days approximately every six months, the giant planets Jupiter, Saturn, Uranus and Neptune will all be viewable, as well as their associated rings and 170 known moons.
While the planets themselves will be monitored by JWST, some of the most interesting science will concern their satellites. From helping to solve the tidal heating conundrum on Jupiter's moon Io to taking over the task of watching the Saturnian moon Titan after the Cassini mission comes to an end or even establishing whether Neptune's retrograde-orbit moon Triton has a subsurface ocean, JWST offers the chance to view and try to understand the most dynamic processes of the Solar System's satellites.
Focus on the small things
However, the bread and butter for JWST's Solar System science will be even less studied, smaller and distant bodies: comets, the main belt asteroids situated between Mars and Jupiter, the Trojan asteroids that share Jupiter's orbit, and the Kuiper Belt objects — including dwarf planet Pluto and the yet-to-be-seen Planet Nine. All could yield clues to how the Solar System came to be the home we know.
"Because they retain material from the very start of Solar System history, they reveal the chemical makeup of the planets and how planets form," says Andy Rivkin, planetary astronomer from Johns Hopkins University.
For these smaller distant bodies and ring systems, NASA has another trick up its sleeve: stellar occultations, where a star is temporarily blocked by a passing Solar System body.
"If you can take data very quickly as an object passes in front of a star, you can measure various things about the object itself," explains Stansberry. By looking at the changes to the star's light as it disappears behind a planet, Webb will be able to look at ring microstructures, and may discover rings around minor planets or even find atmospheres around various Kuiper Belt objects.
All of these proposed targets for Webb suggest the Solar System's most well-hidden mysteries may soon be solved, but one paper really sticks out as having the potential to captivate the public's imagination. In it, the authors propose using JWST and Hubble together to create stereo 3D movies of the planets and moons amateur astronomers have been fascinated by for centuries.
"I worked with a vision scientist colleague to understand the limits of human depth perception," says Joel Green, a project scientist at STScI, who led the study. "It turned out that if you had eyes one million miles apart, and the resolution of Hubble and Webb (roughly 1,000 times better than 20/20 vision), you could actually see objects like Mars, or Jupiter's moon system or Saturn's rings in stereo 3D!"
Not only might this be a boon to astronomers, offering stereo data on weather changes, collisional studies, ring system shocks, and many more, but would also be a first for science education, making ancient astronomical bodies come to life in the classroom. As Green notes: "These are the sorts of images that could inspire a generation."
ABOUT THE WRITER
Dr. Benjamin Skuse is a mathematician turned science writer based in Bristol, UK.
Copyright © Immediate Media. All rights reserved. No part of this article may be reproduced or transmitted in any form or by any means, electronic or mechanical without permission from the publisher.

![]() Orion is proud to partner with BBC Sky at Night Magazine, the UK's biggest selling astronomy periodical, to bring you this article as part of an ongoing series to provide valuable content to our customers. Check back each month for exciting articles from renowned amateur astronomers, practical observing tutorials, and much more!
Orion is proud to partner with BBC Sky at Night Magazine, the UK's biggest selling astronomy periodical, to bring you this article as part of an ongoing series to provide valuable content to our customers. Check back each month for exciting articles from renowned amateur astronomers, practical observing tutorials, and much more!
Grand Designs
Grand Canyon National Park is set to get a whole lot darker as it embraces its International Dark Sky status, writes Jamie Carter.

Creative Commons Zero (CC0) license
For anyone after an uplifting experience from nature, the Grand Canyon almost has it all. By day you can stand anywhere along its South Rim and peer down nearly 2,000m into its layer-cake bands of red rock, taking you back two billion years into Earth's deepest history. When the Sun goes down, the combination of a high elevation and dry desert air means clear, cloudless night skies are common. So why doesn't the Grand Canyon National Park have a particularly high reputation among amateur astronomers and astrophotographers?
Five million visitors per year, that's why. Most of them visit Grand Canyon Village on the South Rim, which is easily accessible from Flagstaff in Arizona and only a few hours from Las Vegas in neighboring Nevada. Over the years the undeniably picturesque properties on the South Rim added lighting. And then more lighting. Even the pathways along the rim were floodlit.
This wilderness gateway is now a major light polluter, but that's all set to change in the wake of the June 2016 announcement that the reserve has been provisionally designated as an International Dark Sky Park. This certification is awarded by the International Dark-Sky Association (IDA), a US-based organization that encourages others to maintain the darkness of the night sky for future generations.
The 'provisional' status reflects the complex job ahead. There are thousands of light fixtures on both rims and within the canyon itself, and the National Park Service has set a deadline of June 2019 — the park's centenary year — to retrofit two-thirds of them to comply with the IDA's lighting guidelines.
Harking back to darker times
"Technology is coming along nicely, with excellent night sky and eye-friendly choices now on the market, with prices that are becoming competitive with more common fixtures and bulbs," says Jane Rodgers, deputy chief science and resource management at Grand Canyon National Park, who applied for the Dark Sky Park status. "Backpackers and campers within the canyon will look up at the South Rim and see fewer, more subdued lights, most of which are illuminated only for a few hours after sunset and an hour or so before sunrise. The general aesthetics will hark back to the time when the village was first developed, where the natural world dominated and visitors experienced the feel of an amazing night sky."
Not that the national park doesn't already promote itself as a dark-sky destination. Its rangers are well informed about the night sky, and a star party has been held here each June for over a quarter of a century. Last year's even included talks in the visitor center, constellation tours and free telescope viewing outside the building and at nearby Mather Point, a 10-minute walk away on the rim.
The north-south divide
At other times of year (May to September pretty much guarantees a dry climate and crystal clear night skies), there are night-time walks and talks by rangers, who often set up a telescope for public use. Amateurs and professional astronomers from nearby Lowell Observatory in Flagstaff (where Clyde Tombaugh discovered Pluto) make visits, while on the darker North Rim, the Saguaro Astronomy Club of Phoenix set up telescopes on the porch of the Grand Canyon Lodge.
Mather Point is the best place for stargazing on the South Rim, though Rodgers is looking into establishing a designated night-sky viewing area. Nearby Hermit's Rest and the many pullouts on the flat Rim Trail are perfect, as are the remoter Desert View and Lipan Point on the South Rim, about 30km drive from Grand Canyon Village.
Alternatively, pitch a tent in one of the reserve's campgrounds. Here you may well find a ranger who can point out the local Navajo tribe's giant constellations: the First Revolving Male, First Revolving Female and the Central Fire. You'll recognize them; they're based on the Plough, Cassiopeia and Polaris, respectively. The constantly turning circumpolar stars represent the Navajo ideal home of a husband, a wife and an abode. By protecting natural darkness as well as the natural landscapes, Grand Canyon is itself committing to a beautiful billion-year marriage all of its own.
ABOUT THE WRITER
Eclipse-chaser and dark skies expert Jamie Carter is the author of A Stargazing Program for Beginners: A Pocket Field Guide
Copyright © Immediate Media. All rights reserved. No part of this article may be reproduced or transmitted in any form or by any means, electronic or mechanical without permission from the publisher.


![]() Orion is proud to partner with BBC Sky at Night Magazine, the UK's biggest selling astronomy periodical, to bring you this article as part of an ongoing series to provide valuable content to our customers. Check back each month for exciting articles from renowned amateur astronomers, practical observing tutorials, and much more!
Orion is proud to partner with BBC Sky at Night Magazine, the UK's biggest selling astronomy periodical, to bring you this article as part of an ongoing series to provide valuable content to our customers. Check back each month for exciting articles from renowned amateur astronomers, practical observing tutorials, and much more!
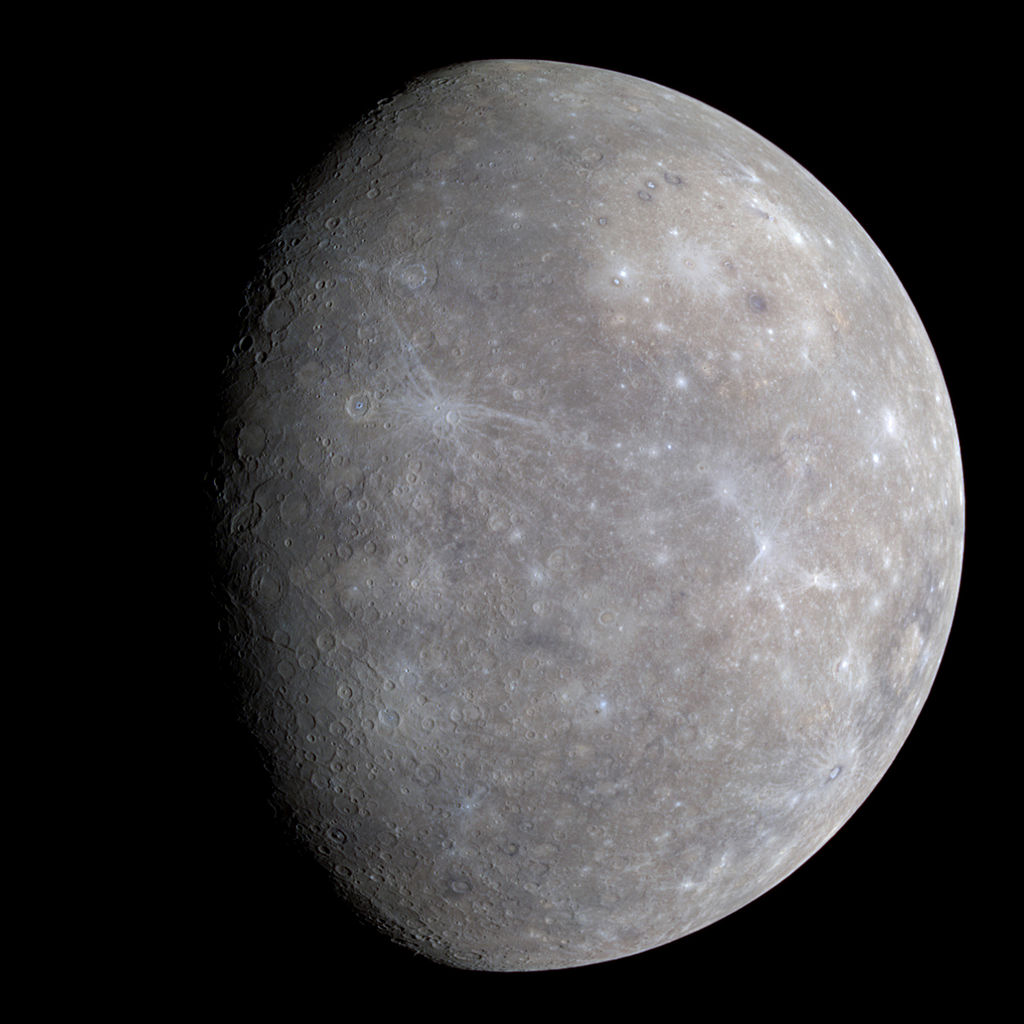
Mission to Mercury
October will see the launch of a European mission to the innermost world in our Solar System.
By NASA/Johns Hopkins University Applied Physics Laboratory/Carnegie Institution of Washington [Public domain], via Wikimedia Commons
"A peculiar planet of mysteries and surprises" — this is how European planetary scientist Johannes Benkhoff describes Mercury. In October this year, ESA will launch the BepiColombo spacecraft to the Solar System's smallest and innermost planet. Some eight years from now, it will begin studying Mercury in meticulous detail across the electromagnetic spectrum. According to Benkhoff, the mission's project scientist, planetary researchers expect BepiColombo to solve many Mercurial mysteries. It's a planet, he says, that is also a key element in understanding the formation of the Solar System.
The mission's Ariane 5 rocket launch from French Guiana will send two orbiters to the planet: the relatively small Japanese Mercury Magnetospheric Orbiter (MMO) and ESA's 4,100kg Mercury Planetary Orbiter (MPO). Both are mounted on a six-meter tall transfer module that will deliver the two craft into orbit around the 4,879km-diameter planet.
"It's a very harsh environment," says Benkhoff, referring to Mercury's distance from the Sun, which varies between just 46 and 69 million km. "But if we're lucky, the nominal mission duration of one year may be extended up to four years."
Although Mercury is much closer to Earth than, say, Saturn, it's tough to get there, basically because the planet's orbital speed is much higher than Earth's. The first Mercury probe, NASA's Mariner 10, didn't even make it into orbit. Launched in 1973, it performed three close flybys in 1974 and 1975, before ending up orbiting the Sun. Mariner 10 mapped just shy of half of the planet's surface, revealing a crater pocked landscape. It also discovered a weak magnetic field: quite a surprise, since no one expects Mercury to have retained a molten core.
It would be 30 years before another probe set course for Mercury. NASA's MESSENGER spacecraft launched in August 2004, and orbited the barren world between March 2011 and its intentional crash in April 2015. From its polar orbit, MESSENGER collected nearly 290,000 images and mapped the planet's topography. Among other things, it discovered deposits of ice at the floors of permanently shadowed polar craters, mysterious 'hollows' beneath the surface, signs of relatively recent volcanic activity, and a mysterious displacement of the magnetic field by 400km northwards with respect to the planet's center.
So what's left for BepiColombo to discover? A lot, says former project manager Jan van Casteren at the European Space Research and Technology Center (ESTEC) in Noordwijk, the Netherlands. Originally, he says, BepiColombo was scheduled to arrive first, but the project was delayed by technological problems, cost overruns and redesigns. "Still, in 2009, ESA's Science Programme Committee decided to give the go-ahead for the mission because of its great scientific potential. BepiColombo is a much more versatile mission than MESSENGER, which was relatively simple."
No easy journey
During its seven-year cruise phase, BepiColombo's solar orbit will gradually be tweaked by one Earth flyby, two Venus flybys and no less than six Mercury flybys. This 'gravity assist' technique, pioneered by Mariner 10, was invented by Italian astronomer Giuseppi 'Bepi' Colombo, after whom the mission is named. The craft's versatile ion engine will perform additional orbital corrections. Eventually, in early December 2025, BepiColombo will arrive in its elliptical polar orbit. A few months later, the lowest point of the orbit is brought down to just 250km, and science operations will begin.
At Mercury, a spacecraft receives about 10 times more solar energy than it would in Earth orbit: some 14,500 watts per square meter. Moreover, Mercury's surface is so hot (430°C) that BepiColombo's main orbiter needs to be protected from the planet's infrared radiation, which delivers more energy: 5,500 watts per square meter. To cope with these extremes, the craft is completely wrapped in thick, multilayer thermal blankets. A huge contraption of silver-coated titanium fins always points away from the planet to radiate excess heat away into space.
You might expect that the use of solar panels is straightforward when you're so close to the Sun, but you'd be wrong, as Markus Schelkle of Airbus Defence and Space in Germany (the spacecraft's prime contractor) explains. "The solar array had to be newly developed using novel materials," he says. "It's very difficult to make them resistant to both high temperatures and strong ultraviolet radiation." The same is true for the large solar arrays on BepiColombo's transfer module, which provide the energy for the ion engine. "Developing the solar arrays took as long as developing the whole spacecraft," says Schelkle.
As the MPO studies the planet up close, the smaller MMO will monitor the solar wind, the planet's magnetic field and the extremely tenuous sodium-rich 'exosphere'. Because of strong solar wind buffeting, Mercury's magnetosphere can sometimes be pushed back all the way to the surface. As a result, the solar wind directly interacts with the surface, possibly releasing sodium atoms in the process. "It's one of the questions we want to answer," says Hajime Hayakawa of the Japanese space agency JAXA. Another big issue he hopes MMO will solve is the mysterious 'shift' of Mercury's magnetic dipole. Meanwhile, as project scientist Benkhoff recounts, the MPO will map the elemental and chemical composition of the planet's surface, look for morphological changes in the mysterious subsurface 'hollows' (which may be due to the loss of volatiles), hopefully elucidate the origin of the polar ice deposits and study the planet's relatively large iron-nickel core. "Also," says Benkhoff, "Mercury's potassium/thorium ratio is much higher than current planetary formation models predict. The mission may shed new light on the origin of the Solar System." Van Casteren is confident that the ambitious €1.65 billion mission will be worth every penny. "The highest resolution images will reveal details as small as 5m," he says, "and BepiColombo has an impressive suite of 11 science experiments. It would have been nice to be the first, but in the long run, it's the science that counts."
TARGET MERCURY
Why is studying Mercury so tricky, and what might we learn from doing so?
Mercury is the smallest and innermost planet in the Solar System. Studying it from Earth (or with an Earth-orbiting instrument like the Hubble Space Telescope) is difficult, because it always appears close to the Sun in the sky.
Because Mercury is orbiting the Sun so fast (48kms on average), a spacecraft launched from Earth has to undergo a large change in velocity to end up orbiting the planet. That's one reason why there have been so few Mercury probes so far.
Visible light, X-rays and ultraviolet radiation from the Sun are about 10 times more powerful at Mercury than they are on Earth. The solar wind (charged particles from the Sun) is also more energetic. This is another reason why Mercury has remained relatively unexplored.
Compared to the other terrestrial planets, Mercury has a very large iron-nickel core. No one knows why. Maybe a huge primordial impact blew away most of its rocky mantle. Or maybe scientists need to adapt their pet theories on the formation of the Solar System.
Learning more about Mercury and its extreme environment will also help in understanding habitable-zone exoplanets that orbit at comparable distances to their parent dwarf stars.
Copyright © Immediate Media. All rights reserved. No part of this article may be reproduced or transmitted in any form or by any means, electronic or mechanical without permission from the publisher.

![]() Orion is proud to partner with BBC Sky at Night Magazine, the UK's biggest selling astronomy periodical, to bring you this article as part of an ongoing series to provide valuable content to our customers. Check back each month for exciting articles from renowned amateur astronomers, practical observing tutorials, and much more!
Orion is proud to partner with BBC Sky at Night Magazine, the UK's biggest selling astronomy periodical, to bring you this article as part of an ongoing series to provide valuable content to our customers. Check back each month for exciting articles from renowned amateur astronomers, practical observing tutorials, and much more!
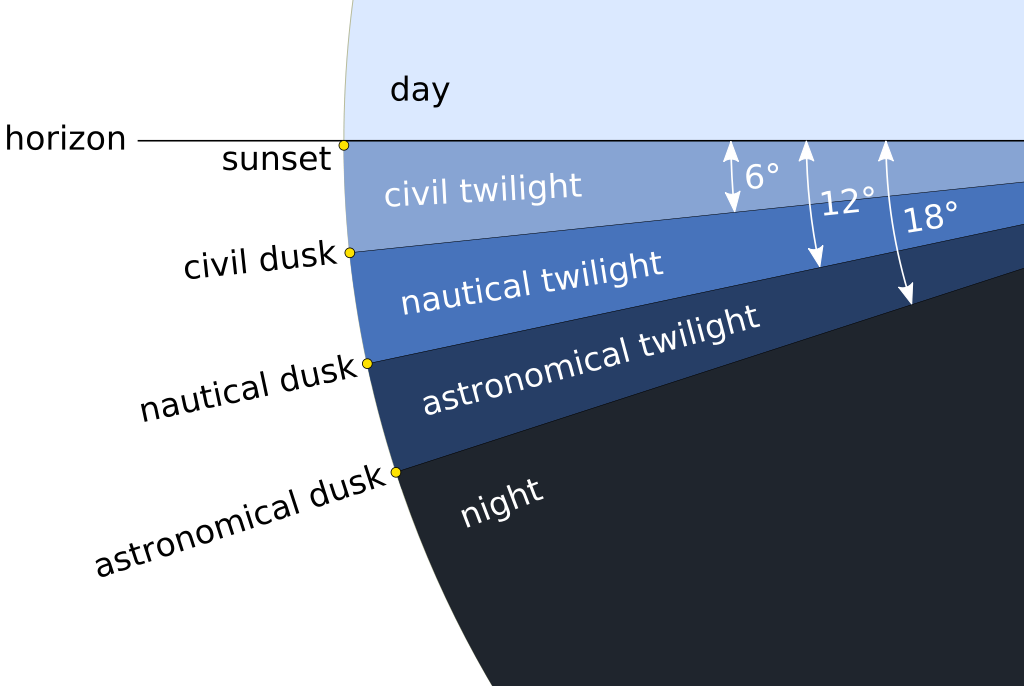
The Three Types of Twilight
The period between 'day' and 'night' is complex, and so is the sky at this time.
By Pmurph5 (Own work) [CC BY-SA 4.0], via Wikimedia Commons
The changes that occur during dusk can be as striking as anything we observe in nature. Everything we can see changes, as the brightness of the sky drops to less than 3/10,000ths of a per cent of its intensity at sunset. Yet this daily spectacle is often lost to us, perhaps obscured by cloud, but also obliterated by artificial lighting and sometimes simply ignored because of its regularity.
Twilight is not a single, fixed state, but a gradual change that has three distinct phases. The first is civil twilight, which begins as the upper limb of the Sun disappears below the horizon and ends at civil dusk, when the geometric center of the Sun is 6° below the horizon. During this period, you can carry on doing things much the same as if the Sun were above the horizon, lit only by the still-blue overhead sky. The first half an hour being dubbed by photographers as the 'blue hour'.
We tend to look to the west at sunset, drawn by the coral pink hues above the horizon, and miss the more dramatic changes that are happening behind us. Here, we see a band of more muted amaranth pink, dubbed the Belt of Venus, illuminated by red sunlight that is not scattered in its passage through the atmosphere. Below is a rising purple swathe, that part of the visible sky that is in Earth's shadow. During civil twilight, only the very brightest stars and planets become visible.
Civil dusk signals the beginning of nautical twilight, which persists until the geometric center of the Sun is 12° below the horizon — nautical dusk. At nautical dusk, it's sufficiently dark that a sailor at sea would not be able to see the horizon, hence its name. Our monochrome scotopic (low light) vision begins to dominate and colors fade as everything on land takes on shades of grey. The purple in the east merges with darkening sky above. First-magnitude stars begin to appear. Initially they seem lonely points of light, but they gradually multiply as the sky darkens and fainter stars join them. Eventually, the entire Plough asterism in Ursa Major appears, pointing to Polaris, so at last we can polar align our equatorial mounts. Night is approaching, but the sunlit sky is still visible on the sunset horizon. The third phase, astronomical twilight, is beginning.
Light's last gasp
As the Sun descends past nautical dusk and into astronomical twilight, when our star is between 12° and 18° below the horizon, its illumination is replaced by other sources. For too many of us, this is the skyglow from artificial light, but even in unlit places on a Moonless night the sky is never completely dark. The combination of an imperceptibly faint auroral glow, the zodiacal light (sunlight reflected off interplanetary dust particles), and the light of diffuse matter in our Galaxy all contribute, though their contribution is less than that of a single mag. +6.5 star if it was distributed over an area the size of the Moon.
Astronomical dusk takes place when the Sun's geometric center drops to 18° below the horizon. Above our heads we will see, with dark-adapted eyes, objects as faint as we are likely to. Away from light pollution, the Milky Way shows structure sculpted by the dust of dark nebulae. The Andromeda Galaxy and the Double Cluster in Perseus may show themselves even without binoculars. The varied colors of stars become more apparent, and our awareness of the existence of artificial satellites and sporadic meteors grows. The glittering sky-dome above our heads appears to have come closer. This is night.
Then, all too soon, it is over. The sky brightens, the stars fade, the twilight phases play out in reverse. Dawn, and a brand-new day, is upon us.
Copyright © Immediate Media. All rights reserved. No part of this article may be reproduced or transmitted in any form or by any means, electronic or mechanical without permission from the publisher.


![]() Orion is proud to partner with BBC Sky at Night Magazine, the UK's biggest selling astronomy periodical, to bring you this article as part of an ongoing series to provide valuable content to our customers. Check back each month for exciting articles from renowned amateur astronomers, practical observing tutorials, and much more!
Orion is proud to partner with BBC Sky at Night Magazine, the UK's biggest selling astronomy periodical, to bring you this article as part of an ongoing series to provide valuable content to our customers. Check back each month for exciting articles from renowned amateur astronomers, practical observing tutorials, and much more!
Imaging for Science, Asteroids
Pete Lawrence looks at how your images can help monitor the position of potentially hazardous objects crossing Earth's orbit.
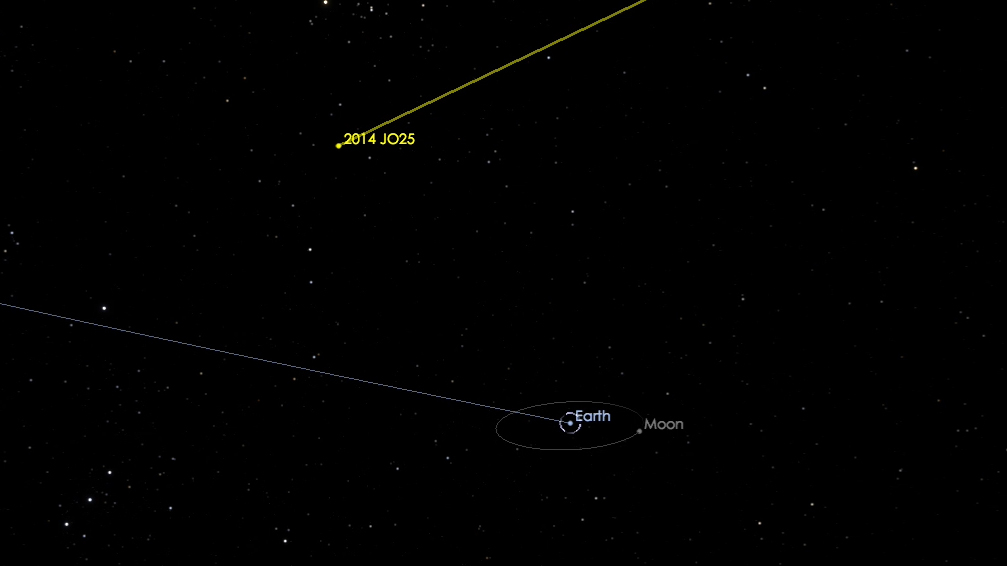
This computer-generated image depicts the flyby of asteroid 2014 JO25. The asteroid safely flew past the Earth on April 19, 2017 at a distance of about 1.1 million miles (1.8 million kilometers), or about 4.6 times the distance between Earth and the moon. Image credit: NASA/JPL-Caltech
Asteroids or minor planets are small Solar System bodies that are visible because they reflect sunlight. The larger members of this group have dimensions measured in hundreds of kilometers, but asteroids can be as small as 1m along their largest axis. Most asteroids are located in what's known as the main belt, a huge repository for such objects located between the orbits of Mars and Jupiter. In all but very rare circumstances, asteroids appear star-like through amateur scopes. Visually, they can be measured in terms of their brightness, position and occasional apparent interactions with other objects.
The sheer number of asteroids in orbit around the Sun means that occasionally we get to see one occult a distant star. Asteroid occultations provide an important way to determine the shape profile of these rocky bodies.
Accurate date and time recording is vital when observing asteroids, as it is this information which ultimately is used to refine the objects orbit and position.
Asteroids look just like stars when viewed through a telescope. It's only when their positions have been noted or photographed over an extended period — normally days — that their motion and true nature is revealed. Most asteroids appear to move slowly against the background stars but those that venture close to Earth may have enough apparent speed to appear to move in real time when viewed through a telescope or binoculars.
Bodies that have orbits bringing them close to Earth are known as near-Earth objects (NEOs) of which near-Earth asteroids (NEAs) are a subset. NEOs larger than 140m that cross Earth's orbit are classed as potentially hazardous objects (PHOs) and again, asteroids form a subset known as potentially hazardous asteroids (PHAs). To date, all known PHOs are PHAs.
Scientific asteroid images for astrometry and photometry need to record the body as a sharp dot without trailing. For slow-moving asteroids this may not be an issue, but fast movers require short exposures or setups that track the asteroid itself. This is especially useful for the high-cadence photometry necessary to determine the light curve, and hence spin-rate, of an asteroid.
For more general appeal, in outreach material for example, a fast-moving asteroid provides a convenient way to produce a trail that would otherwise take many extended exposures to capture. In this instance, a correctly polar aligned telescope tracking at the sidereal rate or, better still, autoguided on the stars, will produce a sharp star field with the asteroid as a light trail. A similar effect can be created by aligning shorter exposures on the stars, and stacking them with the brighter elements set to show through.
Many asteroids are within range of a basic telescope and DSLR setup. For scientifically calibrated work, CCD cameras, (preferably with specialist filters) are recommended. By using planetary imaging techniques, larger telescopes may even be able to capture larger asteroids as extended discs during favorable oppositions, rather than the usual star-like dot.
Project 2: Asteroid astrometry
Use software to help you plot the exact position of small space rocks
Measuring the position of an asteroid is an important step in determining and refining its orbit. This is especially true for asteroids on eccentric orbits, which have the capacity to pass close to Earth. Smaller bodies returning to the inner Solar System may have been gravitationally perturbed, leading to changes in the previously established orbit, and these need to be monitored.
The astrometry of asteroids is similar to comet astrometry, with the exception that asteroids are somewhat easier to measure, appearing as singular dots of light without the complexity that accompanies the expansive head of a comet.
It is recommended that serious astrometric measurements follow the guidelines set out by the International Astronomical Union's Minor Planet Center (MPC), available online at www.minorplanetcenter.net/iau/info/Astrometry.html.
The basic workflow for the astrometric measurement of an asteroid is quite straightforward. First you need to obtain a set of images that include the object you intend to measure. Then you'll need some software assistance to measure the position accurately; the shareware Astrometrica is highly recommended.
Astrometrica allows you to 'blink' your images, which should reveal the asteroid moving against the static star field. The software will need to identify the star field in the images in order to determine the asteroid's position. You can help here by manually identifying the star field and supplying Astrometrica with the correct RA and dec. coordinates for the center of the imaging frame. Once entered, the program attempts to match the star field.
If it doesn't quite get things right, you can adjust the alignment manually. Astrometrica's star template can be adjusted for scale with a focal length used setting, for rotation with a position angle setting and positionally with an onscreen arrow key pad. Once the alignment has been set, clicking on the object will generate an MPC compatible log file of positional data which can then be submitted according to the submission guidelines.
Project 3: Asteroid photometry
Accurately plotting of the brightness and shape of distant asteroids is a team effort
Occasionally an asteroid will pass in front of a star, dimming the star's light as it goes. There are numerous programs available to predict such events as well as websites, such as Euraster, which presents results without you having to having to calculate them yourself.
A typical asteroid occultation path will be a narrow track and may require you to travel to a specific location in order to view and record the event. This adds additional complexity in that it requires the use of a portable observing and recording setup and a means to accurately calculate your location and altitude. The modern way to do this is with some form of GPS recorder.
One of the hardest parts of observing asteroid occultations is to locate the star that is going to be occulted. This can be done using a Go-To system, but you often need to use very accurate star charts to augment the process, especially when the star to be occulted is very faint.
A common way to record asteroid occultations is with a low light video camera. The resulting video, normally recorded in the AVI format, can then be analyzed by specialist programs such as LiMovie or Tangra, which are both available for free.
A successful occultation should produce a light graph for the star that shows it dim as the asteroid passes in front of it and brighten as the asteroid moves out of the way. Accurate timing of the star's dimming will produce a line profile across the asteroid. Interesting though this is, such profiles really become useful when multiple observers record and communicate these events. With multiple profiles recorded, it's then possible to produce a more complete profile of the asteroid.
Obviously for this to be of any worth, a highly accurate time signal needs to be used. A device such as the International Occultation Timing Association's video time inserter (IOTA-VTI; https://occultations.org) is an ideal way to do this as it has the capability to insert coordinated Universal Time (UTC) on every frame of a recorded video signal.
ABOUT THE WRITER
Pete Lawrence is an expert astronomer and astrophotographer who holds a particular interest in digital imaging.
Copyright © Immediate Media. All rights reserved. No part of this article may be reproduced or transmitted in any form or by any means, electronic or mechanical without permission from the publisher.

![]() Orion is proud to partner with BBC Sky at Night Magazine, the UK's biggest selling astronomy periodical, to bring you this article as part of an ongoing series to provide valuable content to our customers. Check back each month for exciting articles from renowned amateur astronomers, practical observing tutorials, and much more!
Orion is proud to partner with BBC Sky at Night Magazine, the UK's biggest selling astronomy periodical, to bring you this article as part of an ongoing series to provide valuable content to our customers. Check back each month for exciting articles from renowned amateur astronomers, practical observing tutorials, and much more!
The Wonder of Satellites
Astro imager Will Gater explores the photo opportunities presented by the myriad spacecraft that can be seen speeding overhead through the night.
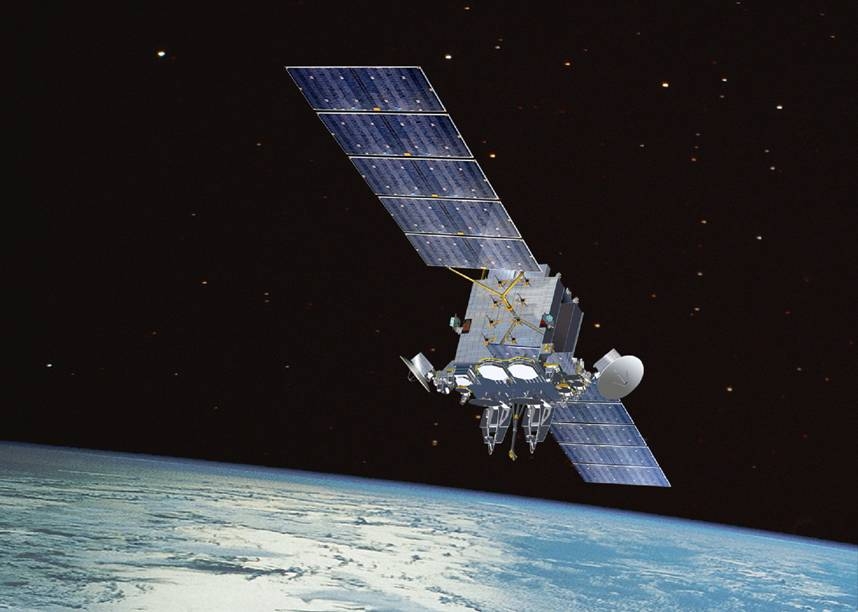
AEHF (Advanced Extremely High Frequency) Satellite. Image By USAF (Los Angeles AFB) [Public domain], via Wikimedia Commons
Nightscapes with a bit of Sparkle
Nightscape images that contain glinting Iridium flares or space stations have been a staple of astro-imaging for decades. For beginners, they're great targets to practice your skills on, and it's possible to get really striking images with a basic setup consisting of nothing more than a DSLR and tripod. If you have a bit more experience, don't dismiss shooting a satellite or space station; even advanced photographers can find fresh challenges in experimenting with the framing and foreground of such photos, and in finessing the quality of the final shot. Done well, these pictures can really spark the imagination in ways that other types of astro-images might not.
The timing, brightness and location on the sky of any potential Iridium flares is dependant on your location, so — just as with ISS and other bright-satellite passes — in order to find out when and where one will be visible from your site you'll need to consult a website like Heavens Above (www.heavens-above.com). Once you have this information you can set about planning your shot.
The free planetarium software Stellarium (www.stellarium.org) is particularly useful for this as you can use its plugins to overlay a rectangle showing the size of your camera's field of view on the sky. By cross-referencing the Stellarium view with the information and star chart from Heavens Above, you can identify the path and position of whichever satellite you're aiming to catch and try out different compositions. Stellarium can show the track of the ISS on the sky, and the paid app SkySafari Plus can also perform the same task.
Shooting a series of consecutive 10- to 20- second exposures at a mid-range ISO with a DSLR, kit lens and static tripod will pick up most bright satellite passes. With Iridium flares, aim to start capturing images about 90 seconds prior to the predicted flare time and end the series about the same amount of time after the flare reaches its brightest; this way you'll capture a pleasing trail that slowly builds in brightness, peaks, then fades away. You can then bring the series of images you've captured into processing or stacking software and combine them, so that the short trail in each photo joins the others to form a longer one.
Since most satellites zip across the sky, capturing a series of photos from a static tripod will result in gaps in the final 'combined' satellite trail due to the short delay between exposures. To get around this you can mount your camera on a tracking mount and take one, much longer, single exposure. This requires balancing the exposure length — which will need to be several minutes — with the lens aperture, ISO setting and sky brightness, but can produce attractive unbroken satellite trails against rich, starry skies. Remember, if you do this any foreground will be slightly blurred.
A Split-Second Spectacular
One of the most exciting areas of satellite astrophotography to develop in recent years is imaging the International Space Station passing in front of the Sun or Moon. Imaging these 'transits' requires extensive planning, but the resulting pictures are extraordinary. A typical transit might last seconds, — sometimes much less — and will only be visible from within a narrow strip of Earth's surface. To find out when an ISS transit is visible near your location you can use the excellent ISS Transit Finder (transit-finder.com). If you intend to image a solar transit, where the space station is silhouetted against the disc of the Sun, you'll need to use a certified solar filter for your telescope and be sureto remove any finderscopes. Here are the key steps required to capture this thrilling phenomenon with a scope and DSLR camera.
Step 1: Plan
Find out when a transit will be visible nearby using the ISS Transit Finder website. You may have to travel to be in a position to capture the event. Use planetarium software to check where in the sky the Sun or Moon will be.
Step 2: Setup
Next set up your scope and have it track at the solar or lunar rate (depending on your target). If you're imaging the ISS transiting the Sun, fit a specialist, certified solar filter and remove any finder scopes.
Step 3: Focus and exposure
Focus the view — use the terminator if viewing the Moon, or sunspot or the solar limb if viewing the Sun. Whether you capture stills or video, make sure that the exposure length is very short so that the ISS does not blur.
Step 4: Capture video or a rapid burst of stills
Start capturing video or a burst of stills as the moment of the transit approaches; that way if there is a slight error in your timing you'll still get the shot. For a DSLR video use the highest frame rate that the camera allows.
Step 5: Review, extract and process
Review and process the frames from our video or still images that show the ISS. Software such as PIPP (https://sites.google.com/site/astropipp) can extract still frames from videos. Then process and enhance the images.
Catch a Dragon
If, like us, you remember fondly the days of NASA's Space Shuttle, you may well recall that on occasions the spacecraft and its — just-detached — external fuel tank would be visible passing over the UK shortly after launch. There was nothing quite like watching the rocket roar off the pad live on NASA TV then seeing the very same shuttle and orange fuel tank — both appearing as points of light; the orbiter appearing white, the fuel tank a subtle ochre tint — silently glide overhead. Though the Space Shuttle is no longer flying, there's still occasionally a chance to catch a similar spectacle thanks to one of the new generation of ISS-servicing spacecraft: SpaceX's Dragon capsule.
Whether you'll be able to see the capsule on its way to the ISS just after lift off depends on the conditions of its launch. For the capsule to be visible, it needs to be dark or deep twilight in the UK, but the Dragon itself has to be in sunlight as it flies over. Helpfully, the CalSky website (www.calsky.com) publishes visibility predictions for some of the Dragon spacecraft around the time of scheduled launches to the ISS; you simply input your location details and it will tell you if the Dragon will make any visible passes. The pass you want to look out for — if it's listed — is the one that's about 20 minutes after the expected launch time, as that'll be the Dragon making its first flyover after departing the Florida coast. It's worth keeping an eye on either the NASA TV or SpaceX online video stream that usually accompanies the launch too, as it'll let you know if the lift off gets scrubbed.
One of the things that's so exciting about catching the ISS-bound Dragon just after lift off is that, from here in the UK, it's not just the capsule you get to see. Dragon is propelled into orbit by a SpaceX Falcon 9 rocket, and the separated upper stage of that rocket is visible next to the capsule as it passes over.
Not only that, but Dragon itself jettisons two solar-panel covers after lift-off and these appear either side of the spacecraft as two points of light which repeatedly brighten and fade during the pass as they tumble away. It's a truly electrifying sight and one that can be captured easily using a DSLR, static tripod and 50-100mm lens, and the same basic technique described in 'Nightscapes with a sparkle'. We've even been able to film Dragon firing one of its thrusters during a pass, using a DSLR and a telephoto lens.
The ISS up Close
Ordinarily, high frame rate cameras are used to create detailed images of targets like the lunar surface and planets. But it's also possible to use them to capture high-resolution shots of the ISS showing its modules and solar arrays.
The primary challenge with this type of imaging is tracking the rapidly-moving ISS, since most high frame rate camera and telescope combinations will provide a small field of view that is tricky to keep centred on the station.
Tracking is typically done manually with the help of an accurately aligned finderscope and the mount's handset set at the highest possible slew rate or, in some cases, carefully manoeuvring the telescope by hand. Essentially you start your computer recording a video from the camera and hope that at some point during the pass your guidance causes the ISS to race through the frame.
Focusing can be done in advance on a bright star — or even better, the Moon — while the correct exposure length will depend on the setup you're using; crucially it'll need to be short enough to stop the ISS from blurring and this may mean that you have to greatly increase the camera's gain to compensate.
Fade to Orange
The reason it's possible to see the ISS against the starry sky is that, at the altitude of its orbit, it's still illuminated by the Sun. Sometimes, however, the ISS will disappear into the darkness of Earth's shadow. Just before it does that you can see and image one of the most beautiful satellite phenomena of all: the ISS experiencing 'orbital sunset'.
As the station slips into the shadow, the Sun sinks below the Earth's limb as seen from the ISS in orbit. In the last moments leading up to that 'sunset' the whole structure is bathed in a deep-orange light. And because that light is the same sunlight that illuminates the station as it passes over us, from the ground the ISS turns from a brilliant white to a deep orange-red, before disappearing.
This effect can be seen clearly in binoculars from suburban sites, but is a particularly rewarding target for imagers and naked-eye observers under darker skies. The passes in which the ISS moves into Earth's shadow are clear in the night-sky charts that accompany each ISS pass prediction on Heavens Above (www.heavens-above.com); they're the ones where the pass seems to abruptly 'stop' amongst the stars. Point your camera in the direction of that end point and — with a long exposure of a minute or so using a DSLR on a tracking mount — you should pick up the gradual fade to orange in the ISS's trail.
What is an Iridium flare?
Iridium 'flares' appear as a brief and slow-moving point of light that brightens rapidly and fades just as fast. They are produced when the antennas of any of the numerous of Iridium communications satellites catch the Sun's light and reflect it back to Earth. In January, the first in a new fleet of Iridium satellites was launched. The antennas of these new satellites aren't as reflective, so the days of Iridium flares could be numbered.
ABOUT THE WRITER
Will Gater is an astronomy journalist, author and presenter. Follow him on Twitter at @willgater or visit willgater.com
Copyright � Immediate Media. All rights reserved. No part of this article may be reproduced or transmitted in any form or by any means, electronic or mechanical without permission from the publisher.

![]() Orion is proud to partner with BBC Sky at Night Magazine, the UK's biggest selling astronomy periodical, to bring you this article as part of an ongoing series to provide valuable content to our customers. Check back each month for exciting articles from renowned amateur astronomers, practical observing tutorials, and much more!
Orion is proud to partner with BBC Sky at Night Magazine, the UK's biggest selling astronomy periodical, to bring you this article as part of an ongoing series to provide valuable content to our customers. Check back each month for exciting articles from renowned amateur astronomers, practical observing tutorials, and much more!
The Sky in Motion
Astronomer Will Gater reveals the best way to observe and image transient and evolving celestial phenomena, and how you can help scientists in the process.
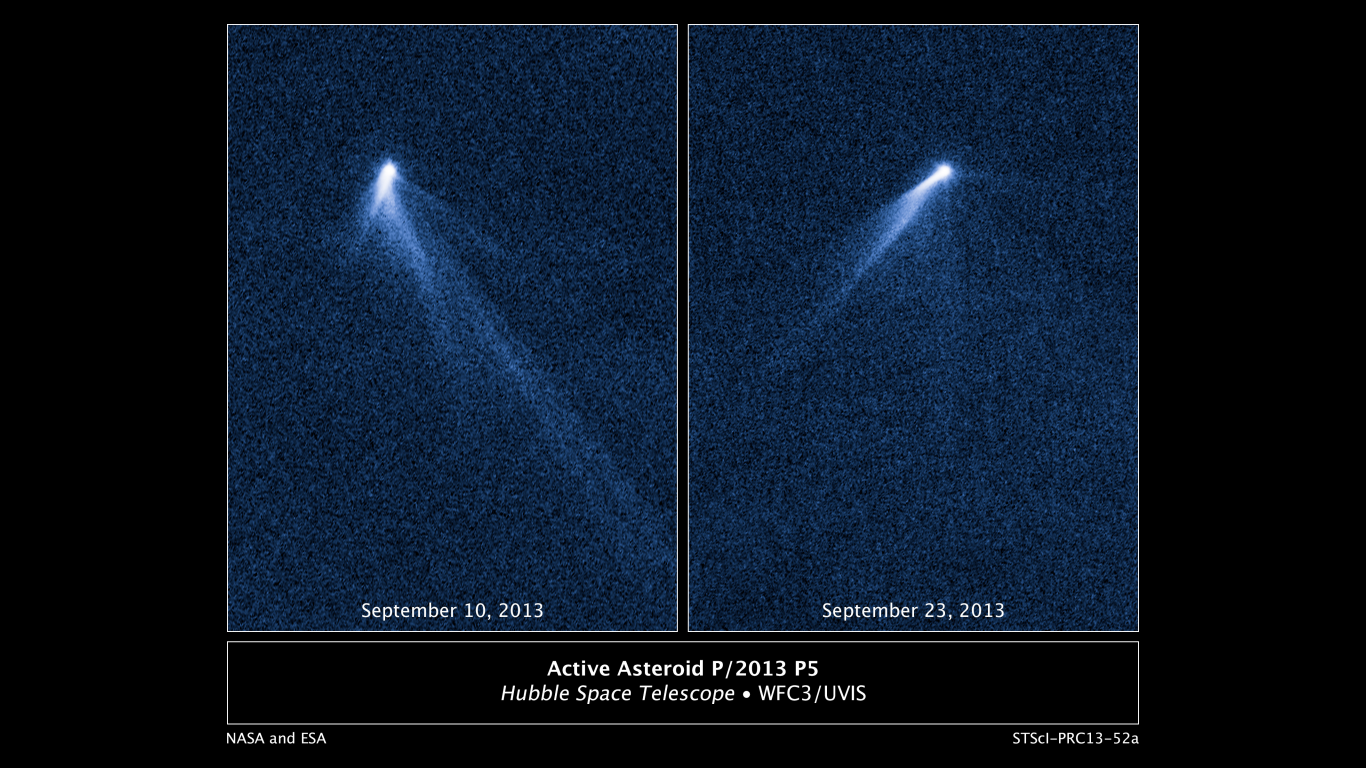
This NASA Hubble Space Telescope set of images from Sept. 10, 2013 reveals a never-before-seen set of six comet-like tails radiating from a body in the asteroid belt designated P/2013 P5. Image Credit: NASA, ESA, D.Jewitt/UCLA
For most of us our interest in astronomy is, and hopefully will continue to be, a lifelong passion. In 10, 20, even 30 years from now we'll look up to the night sky and in the stars, galaxies and nebulae that fill our view we'll see old friends, unchanged over all that time. The truth is, of course, that the stars and galaxies we see are moving through space, and nebulae are evolving — they're just changes that are unfolding on an extraordinarily long cosmic timescale.
But that's not to say that we humans can't perceive any alteration or movement in the night sky. Quite the opposite. One could argue that the heart of amateur astronomy — and indeed one of the key elements of astronomy as a field of scientific study — is a rich and deep tradition of observing the changing night sky, from the appearance of comets to the monitoring of variable stars and the searches for supernovae in distant galaxies.
In the following pages we're going to explore some other transient and evolving celestial phenomena that you can observe and photograph with relatively simple equipment — the kind of kit that many amateurs have access to — so that you can see for yourself that the sky, and indeed the cosmos all around us, really is in motion.
Watch an Asteroid Whizz By
While the planets might be the quintessential 'wandering stars', drifting against the night sky's sparkling backdrop over weeks and months, there are other objects within the Solar System whose movement across the heavens is far more dramatic — so much so that their motion against the stars can be discerned over hours and minutes, rather than many days. Near-Earth asteroids are small, typically irregularly shaped bodies, whose orbits bring them relatively close to our planet at times. If a near-Earth asteroid is big and bright enough it can be a thrilling object to catch sight of in a telescope eyepiece, or capture on camera, as it makes a close approach. ESA maintains a database at http://neo.ssa.esa.int/web/guest/close-approaches that you can examine to see when any large, relatively, bright objects are next passing by — and of course the BBC Sky at Night magazine Sky Guide will usually contain news of upcoming notable near-Earth asteroid passes.
Capturing a Near-Earth Asteroid Pass on Camera
Watching a near-Earth asteroid slowly wander across a star field at the eyepiece can be tremendously exciting, but it's the sort of target that really requires a medium- to large-aperture instrument to be seen well. On the other hand, even a modest astrophotography setup can capture brighter near-Earth asteroids — here we explore how.
Step 1 — Equipment Small refractors or Newtonians combined with a CCD camera or DSLR are well-suited to imaging bright near-Earth asteroids; we've even had success using just a DSLR and a 135mm telephoto lens. You'll also need a mount that can track the sky accurately for a few minutes at least.
Step 2 — Track and focus Set up your imaging kit. If you're using an equatorial mount get the polar alignment (and thus the mount's tracking) as accurate as you can, as this will help both image quality and processing later on. Next, focus on a bright star — ideally with the help of a Bahtinov mask.
Step 3 — Locate and image capture Use Stellarium (stellarium.org) and its Solar System Editor plug-in to find a near-Earth asteroid's location. Slew to the coordinates, take brief test exposures, then cross-reference the star field with Stellarium. When you've confirmed the near-Earth asteroid is in frame, check it's not moving out of shot. Capture a series of exposures.
Step 4 — Stack or animate You should now have a set of images (typically taken over several tens of minutes) that shows the near-Earth asteroid moving between frames. You can now process and stack these together with your chosen image processing software to show the asteroid's path, or collect and save the frames as an animated GIF.
Marvel at a Lunar Sunrise
As astronomers we're familiar with the Moon's phases, caused by its movement around the Earth and the changes in illumination that come from the varying geometry of the Earth, Moon and Sun relative to one another. Prior to full Moon, the boundary demarcating night and day on the lunar globe, and the line that gives the phase its 'shape' — called the terminator — is the swathe of terrain where the Sun is rising over the lunar landscape. At this point in the lunar cycle the phase is waxing (growing), as the terminator travels across the disc. After full Moon the terminator moves westwards from the eastern limb once again, but is now where the Sun is setting, with the phase waning (shrinking).
This night-by-night movement of the terminator, and consequently the daily change in the lunar phase, is large and easily visible to the naked eye. But you can also observe and image subtle variations in the Moon's phase over the course of just one night. Watching the Sun rise or set over a chain of mountains or a large crater rim is a captivating observing experience; it is quite something to see the lighting change, and shadows lengthen or shorten. It's evidence of the Moon's orbital motion, happening right in front of your eyes.
The UK winter months, when the Moon is high for hours in a dark sky, are an ideal time to attempt the observation. Our favourite targets to see this phenomenon on are the large craters Copernicus and Plato — the latter especially, for the shadows from its rim that creep across its smooth floor — the lunar Alps and the Sinus Iridum.
A high frame rate camera and a modest amateur telescope can capture the changes easily. If you are able record an AVI video every 20-30 minutes or so for several hours, you can create dramatic animations of the changing illumination. This requires each processed image produced from the raw AVI videos to be brought into software — such as Photoshop or GIMP — as a separate layer. Multiple layers within a single picture can then be saved as an animated GIF file.
How You Can Help The Professionals
Taking pictures or making observations of some of the phenomena we've covered in this article can be an exciting experience in itself, but it's also possible that your records could help professional astronomers with their research. For example, if asteroid imaging is your thing, the scientists working on the OSIRIS-REx mission — which will return samples from the surface of the asteroid 101955 Bennu in 2023 — run a project called Target Asteroids! (https://www.asteroidmission.org/get-involved/target-asteroids) It uses data captured by amateurs to help learn more about certain asteroids. Alternatively, if you've been lucky enough to capture a picture or timelapse of the Northern Lights on holiday, the Aurorasaurus citizen-science project (http://aurorasaurus.org) is collecting images of a poorly-understood auroral phenomenon dubbed, rather unusually, 'Steve' — if your snaps show the unusual filamentary feature they could be useful to researchers.
And of course many national astronomical societies and organisations gather reports and observations of transient and changing astronomical phenomenon sometimes for publication and analysis in their journals.
So whether it's through a citizen-science project or a more traditional endeavour, like meteor counting, planetary imaging or variable star observing, there are many ways that we amateurs can make a meaningful contribution.
The Spectacular Seething Sun
We needn't look lightyears out into space to find evidence of the dynamic and ever-changing nature of the cosmos we live in. In fact you'll find it on our celestial doorstep in the form of our star, the Sun. This seething ball of plasma is constantly changing. Its churning 'surface' — the photosphere — is occasionally pockmarked by dark, transitory, blemishes known as sunspots, while above huge tendrils of plasma, called prominences, rise and waver as they are corralled by the star's magnetic fields.
To observe these features safely however you'll need specialist equipment. To study the photosphere, for example, a telescope needs to be fitted with a certified solar filter and any finder scopes should be removed too. With careful and correct use and installation — conforming to the manufacturer's instructions — certified solar filters can provide superb views of evolving sunspots and large sunspot groups.
There are also specialist dedicated solar telescopes available which, as well as filtering the Sun's light so it is safe to view, show only certain specific wavelengths of the Sun's radiation. One type of dedicated solar telescopes shows what's known as the 'hydrogen-alpha' band in the Sun's spectrum. These solar scopes reveal a layer in the Sun's atmosphere known as the chromosphere and in doing so open a window onto one of the most dynamic regions of our star.
While an ordinary certified solar filter will show the solar photosphere as a smooth whitish or yellowish disc, perhaps marked by sunspots or speckled bright patches known as faculae, a hydrogen-alpha solar telescope will show the Sun's chromosphere as a bright, scarlet-red globe shrouded in a mass of plasma 'fibres'.
A hydrogen-alpha solar telescope will also often reveal the prominences leaping off the limb of the Sun, and these can change in literally a matter of minutes, meaning they are a wonderful target for high-resolution imaging where spectacular animations can be made of their evolution. Sketching can be a great way to record the changes in these features too.
The powerful magnetic fields associated with sunspots also have an effect in the chromosphere. There they manifest themselves as bright 'active regions' where loops of plasma twist and turn around the dark sunspots. Like prominences these too can change and evolve over short periods. Sometimes they may even exhibit very bright, fleeting, beads or filaments of light. These are thrilling events for solar observers and imagers, and are known as solar flares.
Create a Timelapse of the Turning Sky
One of the most obvious signs that we live on a rock spinning in space is the motion of the stars across the sky during the course of a night. This movement is a result of Earth rotating on its axis, and you don't need a hugely advanced setup to capture it on camera; a DSLR, wide kit lens and static tripod are ideal for tackling a classic star trail shot. Leave the shutter open for 30-60 seconds and the rotation of the Earth will blur the stars into short arcs. If you want to take things a step further, try creating a timelapse of the sky — and perhaps the Milky Way too — moving. You can use the same kit as for a star trail shot, but you'll need to approach the way you capture the images in a slightly different way. For timelapses you don't actually want the stars to trail. What you need are for them to be points of light so that when you come to animate the shots it looks almost as if the sky is a static picture that's drifting over a landscape. This may mean that you have to keep the exposure length short, increase the ISO and open your lens's aperture right up to compensate. When you've found the right settings, set the camera taking exposures continuously, say for 30 minutes for a short timelapse. You'll typically capture hundreds of photos doing this, so make sure your camera's memory card and your computer are up to the task! The images can then be processed as a group in image processing software and then imported into a video editor to be animated into a smooth video. There are numerous ways of achieving the latter — for example in iMovie you'd do it by setting the 'duration' of each still image to 0.1 seconds. This technique can also be used to make timelapses of other dynamic astronomical phenomena, such as aurorae and noctilucent clouds.
The Skies In Motion This Month
A particularly fine chance to watch the motion of the heavens is on offer in the UK this month when, in the early hours of the morning on 6 November, the gibbous Moon will occult (slip in front of) the bright star Aldebaran in Taurus. As the Moon journeys across the background stars of Taurus, Aldebaran will disappear behind the brightly lit western limb of the Moon, emerging 40-60 minutes later from behind the unlit eastern limb. Occultations are great events for video astronomy, so if you have a digital camera that can shoot video try capturing Aldebaran suddenly popping into view as it reappears from behind the Moon. The exact moment of Aldebaran's reappearance (and disappearance) will depend on where in the UK you're observing from, so consult a planetarium programme, such as Stellarium (http://www.stellarium.org), for location-specific times.
ABOUT THE WRITER
Will Gater is an astronomy journalist, author and presenter. Follow him on Twitter at @willgater or visit willgater.com
Copyright © Immediate Media. All rights reserved. No part of this article may be reproduced or transmitted in any form or by any means, electronic or mechanical without permission from the publisher.

![]() Orion is proud to partner with BBC Sky at Night Magazine, the UK's biggest selling astronomy periodical, to bring you this article as part of an ongoing series to provide valuable content to our customers. Check back each month for exciting articles from renowned amateur astronomers, practical observing tutorials, and much more!
Orion is proud to partner with BBC Sky at Night Magazine, the UK's biggest selling astronomy periodical, to bring you this article as part of an ongoing series to provide valuable content to our customers. Check back each month for exciting articles from renowned amateur astronomers, practical observing tutorials, and much more!
Chasing the Moon's Shadows
This summer, Elizabeth Pearson travelled across the US to hunt down the total eclipse of the Sun on 21 August 2017.
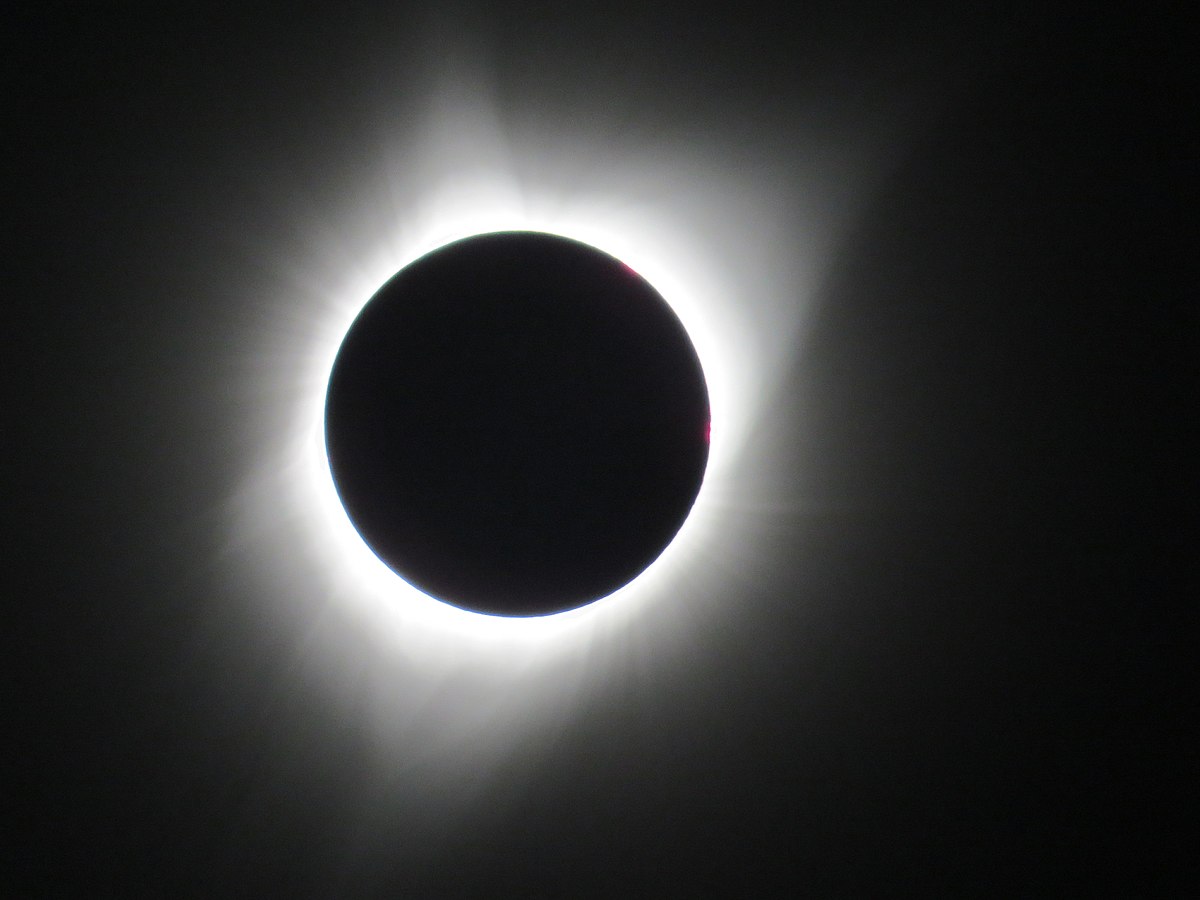
By Zombiepedia - Own work, CC BY-SA 4.0, Link
In 1999, a total eclipse of the Sun passed over Cornwall. And I missed it. Ever since, I have wanted to see totality, and so when I heard that the Moon's shadow would be passing coast to coast over the US mainland on August 21st 2017, I knew I had to be there. I decided to take a road trip that would end up taking me almost 3,000km across the country as I attempted to chase down the lunar shadow.
My journey started in Salt Lake City, Utah, where I picked up the hire car that would prove to be my faithful steed for the week. My first stop was Salt Lake City's Clark Planetarium, where I found queues out the door. The crowds had been brought in by an email from a major online retailer recalling eclipse glasses, sparking a panic.
"A lot of people who thought they had glasses just got emails saying their glasses cannot be trusted, and have come to the Clark Planetarium because we have the real ones. We never thought we'd be the only supplier in town. We have a supply for today, we may even have a supply for tomorrow, but then who knows," says Seth Jarvis, the director of the Clark Planetarium.
Like most of the nation, Salt Lake City would only see a partial eclipse, making appropriate eyewear crucial. But for me, the 91 per cent it would see wasn't enough. I wanted totality. It was time to start chasing that shadow.
As I drove from Utah into Wyoming, I began to see signs that I was heading into totality country. On the highways there were notices banning heavy vehicles on August 20-22 to keep traffic moving, while in towns handwritten signs offered eclipse parking. Every business, it seemed, had special 'Totality Deals'.
The Building Buzz
Eventually I made it to Casper, Wyoming, the largest town on the eclipse's central line and host to the Astronomical League's annual AstroCon convention — which happened to coincide with my visit. The event had drawn people from all over the world, keen to see the eclipse.
"Once you've seen totality, you've just got to see it again," says Sue Baldwin, an eclipse chaser from Auckland, New Zealand. "The first time I saw it I bawled my eyes out for 30 seconds, and actually had to hit myself so I could look at the totality. It's just that emotional, there is no comparison."
With so many eclipse enthusiasts together under one roof I couldn't help picking up on their excitement. And it only grew when I drove on to my next pit stop of Alliance, Nebraska. "They're saying that there are going to be 20,000 people in town altogether," says Jessica Hare, the acting manager for local monument 'Carhenge', a replica of Stonehenge made from scrap cars and the reason this remote location is so busy when I arrive.
"For the most part people in town are excited. There's a reason we live here, though: we're not into big crowds," Hare continues. "But it's a change of pace for a few days and then we've got something to talk about for 60 years."
With only two days to go, people were already arriving and setting up camp. But amongst the bustle, an air of disquiet was beginning to form. People were checking the weather and all was not well. On August 21st, clouds were forecast across the eastern side of the US. Combined with the eclipse glasses scare, it looked like huge numbers of people might not get to witness the great event.
By the time I reached Sutherland in central Nebraska, where I had planned on watching the eclipse, the forecast had grown even worse. The nearest place with completely clear skies forecast was almost 400km back the way I had just come, along roads already gridlocked with traffic. Did I stay and risk being clouded out, or go and risk getting stuck on the highway?
I had come too far to end up staring at clouds. Time to chase those clear skies. Wanting to avoid the most horrific traffic, I picked a town just off the centerline and at 4am on 21 August, I was back in the car.
As I set off, the fog was so thick that at times I could barely see 30m ahead of me. But I was determined to beat the clouds and fought on until four hours later I reached my final destination — an old airfield in Mitchell, Nebraska. A few hundred people had already arrived, most of whom had also undertaken long treks, and were ready to see their first eclipse when it started at 10:25am.
The Moment of Darkness
When the hour came, we donned our (certified) eclipse glasses to watch as the Sun was slowly eroded away by the Moon. As the spectacle unfolded, the dwindling sunlight made its effect felt. The air, which should have been uncomfortably hot by now, felt more like a breezy afternoon.
With around 20 minutes to go, I reached to take my sunglasses off before realising I wasn't wearing them. The light was fading and taking the colour out of the world with it, like an old photograph that's been left in the Sun.
At 11:46am, with one minute left, the Sun was down to the merest sliver. I turned to the west to watch as a wall of darkness seemed to advance across the sky.
Turning back, I watched as a sudden explosion of diamond light came from the Sun as the last of its rays were covered, accompanied by a huge cheer from the crowd.
Where once the Sun had been, there was now a hole of utter blackness. A crown of light danced around it and I could almost see the fine tendrils swaying with the breeze. It seemed huge, stretching over a much larger area of sky than I'd expected. Around me, the sky was in twilight with pink trimming every horizon, as if the Sun had just set in all directions together.
The crowd was quiet now. After all the excitement and panic, I felt a sense of quiet calm. I was under the shadow of the Moon, watching plasma arcing a million kilometres out of the Sun. It was humbling, a reminder of our small place in the grand Universe.
The Chance of a Lifetime
All too soon, I could tell totality was reaching its end. The perfect circle of blackness was beginning to look lopsided. One minute, 53 seconds after the first, there was a second burst of light as the shadow passed, sweeping across the nation and taking the spectacle to the millions who waited farther east. As others rushed home, I stayed to watch as the Sun returned, taking a moment to appreciate what I had just witnessed.
Later that evening, back in Sutherland (where the weather had been perfect, of course), I headed out to look at the Milky Way, knowing our Galaxy is only one of billions that all move together in the ballet of the Universe. I've devoted my life to studying that dance, but I have never grasped its majesty like I did in that one minute and 53 seconds.
Once you've seen totality, you really do have to see it again. On April 8th, 2024, another eclipse will sweep across the US and I plan on being under the Moon's shadow once more. Maybe I'll see you there.
Stargazing Central
Sandhills, NE
The rural state of Nebraska is home to some of the darkest accessible skies in the world, making it a dream destination for deep-sky imagers.
https://visitnebraska.com/stories/visit-the-sandhills
Strategic Air and Space Museum, Omaha, NE
The museum is home to several space artefacts and a tribute to Nebraskan astronaut Clay C Anderson, as well as dozens of aircraft.
http://sacmuseum.org
Clark Planetarium, Salt Lake City, UT
As well as shows in the dome, the Clark Planetarium houses a space museum with interactive exhibits to enthuse little astronomers.
https://slco.org/clark-planetarium
Yellowstone National Park, WY
Spend the days exploring the world-class park and the nights taking in the dark skies. An astronomy program runs in summer.
www.nps.gov/yell/index.htm
Carhenge, Alliance, NE
This huge replica of Stonehenge made from cars was built in 1987 as a tribute to the artist's father, and has proved to be a popular road trip stop ever since.
http://carhenge.com
Craters of the Moon, ID
Follow in the footsteps of the Apollo 14 crew, who underwent geology training in this volcanic landscape prior to their trip to the Moon.
www.nps.gov/crmo/index.htm
ABOUT THE WRITER
Dr Elizabeth Pearson is BBC Sky at Night Magazine's news editor. She gained her PhD in extragalactic astronomy at Cardiff University.
Copyright © Immediate Media. All rights reserved. No part of this article may be reproduced or transmitted in any form or by any means, electronic or mechanical without permission from the publisher.

![]() Orion is proud to partner with BBC Sky at Night Magazine, the UK's biggest selling astronomy periodical, to bring you this article as part of an ongoing series to provide valuable content to our customers. Check back each month for exciting articles from renowned amateur astronomers, practical observing tutorials, and much more!
Orion is proud to partner with BBC Sky at Night Magazine, the UK's biggest selling astronomy periodical, to bring you this article as part of an ongoing series to provide valuable content to our customers. Check back each month for exciting articles from renowned amateur astronomers, practical observing tutorials, and much more!
Why We've Got to Get to Mars
He may be one of the most famous moonwalkers, but Buzz Aldrin has spent the past 30 years developing a plan to get people to Mars. He tells Jamie Carter why.
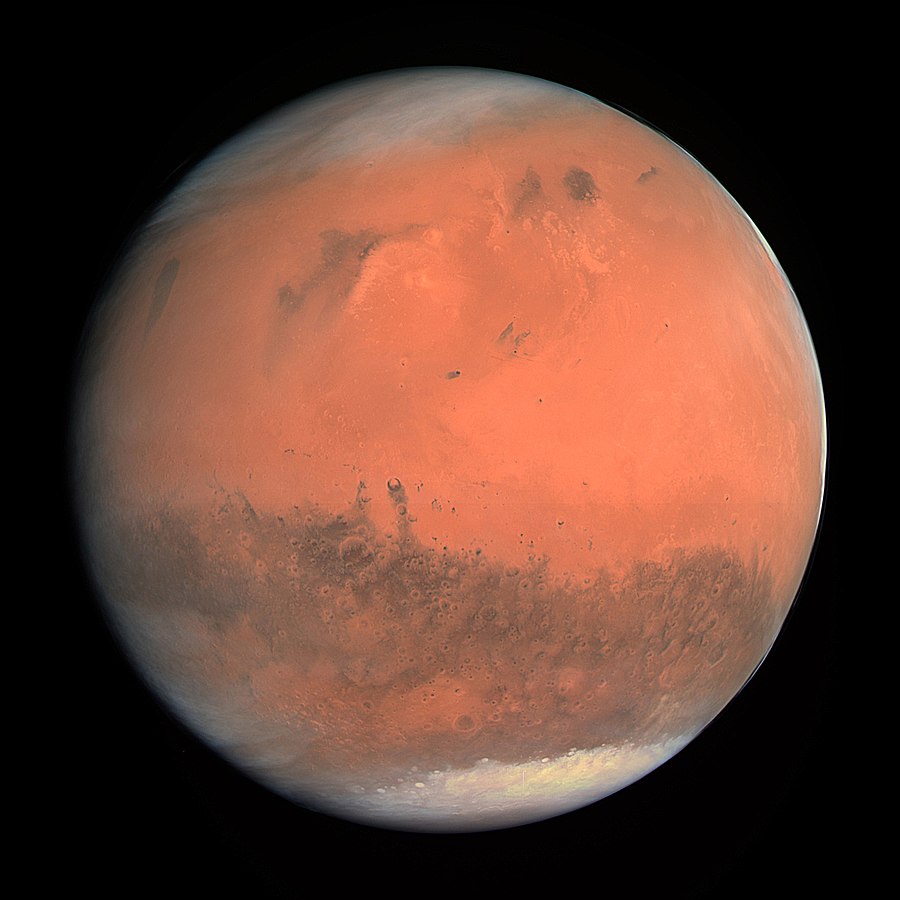
By ESA - European Space Agency & Max-Planck Institute for Solar System Research for OSIRIS Team ESA/MPS/UPD/LAM/IAA/RSSD/INTA/UPM/DASP/IDA - http://www.esa.int/spaceinimages/Images/2007/02/True-colour_image_of_Mars_seen_by_OSIRIS, CC BY-SA 3.0-igo, Link
Colonising the Solar System is becoming the 'in' thing among billionaires. SpaceX supremo Elon Musk recently talked putting a million people on the Red Planet within 100 years, while Blue Origin's Jeff Bezos thinks he can help spread a trillion people throughout the Solar System. That's big talk, but there's one man who's spent the last three decades telling anyone who'll listen about his plans to go to Mars, and why it's so important we do so.
"I'm 87 years old and I'm getting impatient," says Dr Buzz Aldrin, who walked on the Moon in 1969 as part of Apollo 11. "We've been stuck in low-Earth orbit for too long and I believe that we need to break this malaise," he says. "I do believe we can establish permanent habitation on Mars by 2039, and I have a plan to achieve it."
If that date seems rather specific, there's a good reason for it: it would be the 70th anniversary of Apollo 11's Moon landing. Not that Aldrin wants to be constantly reminded of that. It may be regarded as a seminal moment for humanity, but only until someone sets foot on Mars. "I want to be remembered as the man who led the world to Mars, for a permanent settlement," he points out.
Occupation vs. Exploration
Aldrin, who is constantly refining the ideas he first set out in his 2013 book Mission to Mars: My Vision for Space Exploration, now wants to play a pivotal role in the push to the Red Planet. But there remains a fundamental question: why do we need to occupy Mars? Why not just pay it a quick visit?
"What concerns me most about expeditionary missions is that we may go there once or twice and never go back — it would be flags and footprints again," says Aldrin, citing the Apollo Moon landings, the last of which was 45 years ago. "But the more important reason is that it's vastly more expensive to send people up there with all their infrastructure in one spacecraft and the quality of the science would be dramatically lower."
According to Aldrin, once you have the right kind of surface and transportation infrastructure, the cost of sending individual astronauts would be affordable. His is a pragmatic plan built upon orbital calculations that could make inhabiting Mars far more affordable than anyone imagines.
Aldrin's idea revolves around the concept of 'Cycling Pathways': one or possibly two Earth-Mars spacecraft (a 'Cycler') that travel constantly between Earth and Mars. "The astronauts will be transported to the Earth-Mars Cycler with a single launch, with refuelling in Earth orbit," explains Aldrin. "Using spacecraft that cycle between Earth and Mars would be an order of magnitude cheaper than using an entirely new series of rockets to send each crew to Mars."
Following on From Von Braun
Although his ideas pre-date those currently being proposed by various billionaires, Aldrin is certainly not the first to consider how to carry out a manned mission to Mars. Dr. Wernher von Braun, developer of the Saturn V rocket, briefed NASA's Space Task Group just after the Moon landings on a plan to land two expedition spacecraft on Mars in 1982. "Werner von Braun's vision of Mars exploration was a tremendous inspiration to many of us," says Aldrin. "But von Braun was really interested in using very large rockets. I think we can get to Mars without the same reliance on state-developed and operated rockets." Aldrin's plan also differs from Von Braun's in its level of reusability.
Ambitious space exploration plans always come with a huge caveat: politics. Aldrin was recently at the White House, standing alongside President Donald Trump as he signed an executive order re-establishing the National Space Council after its 24-year hiatus, but he's not getting too carried away with that decision. "I don't expect the Space Council to fundamentally change the US space programme by itself. But it will really become critical if the administration decides to fundamentally rethink major aspects of our civil and national space programmes," says Aldrin. That's what he's hoping for.
Aldrin will be keeping a close watch on what President Trump says on 24 July 2019 when the world marks 50 years since Aldrin and Neil Armstrong set foot on the Moon. "I'm personally very committed to the idea that the President should, and indeed must, announce a major US commitment to Mars permanence by the 50th anniversary", he says. "It's essential to force us to make the hard choices we must make in order to get to Mars in the next 20 years."
ABOUT THE WRITER
Jamie Carter is the author of A Stargazing Program for Beginners: A Pocket Field Guide and edits WhenIsTheNextEclipse.com
Copyright © Immediate Media. All rights reserved. No part of this article may be reproduced or transmitted in any form or by any means, electronic or mechanical without permission from the publisher.

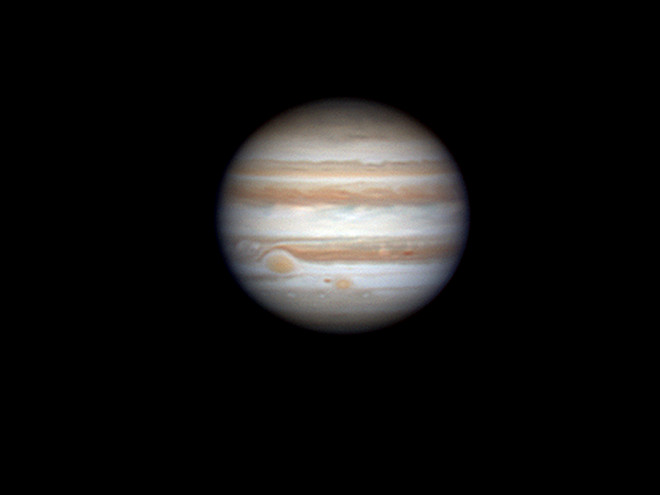

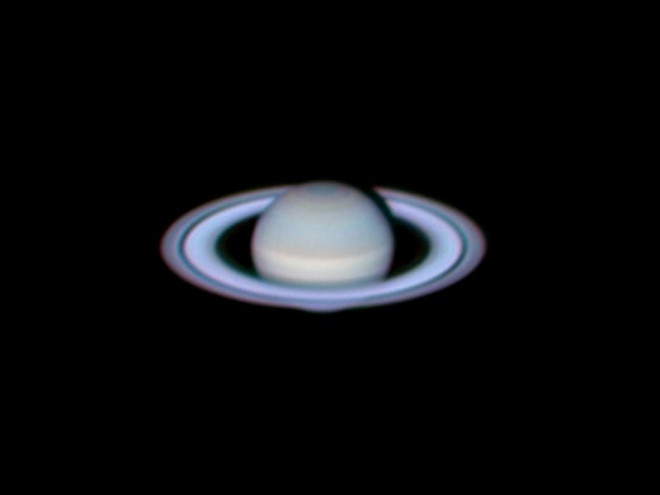
