


I have been interested in photography for most of my life, but only in the past couple of years did I consider the possibility of photographing the night sky. Luckily, technology has advanced to the point where night sky photography is not only possible but it can be an affordable for many people. This posting is intended for those who are either photographers or who are just interested in photography, but have not yet explored the world of night sky photography. It is my hope that this will serve as a "getting started" guide for you.
#1 - What kind of camera do I need for shooting the night sky?
You will need either a DSLR, dedicated CCD or CMOS astrophotography camera, or possibly a Micro Four Thirds camera. The reason deals with the size of the sensor. Your camera phone and inexpensive point-and-shoot camera simply don't have large enough sensors to gather enough light to capture the night sky. There are many entry-level DSLR cameras available now for around $500 or less. You don't need to start out with a professional model that costs in the thousands at all. A Canon Rebel or something like a Nikon D3200 would do a good job. If you are interested in the Micro Four Thirds format such as the Sony Nex series or an Olympus E-M5, their sensors are not as large as a DSLR but they are large enough to do a decent job with dark sky objects. Still, a DSLR is the best kind of camera for shooting at night.
My personal cameras are the Canon 6D and Canon 60Da.
#2 - What kind of lenses should I consider?
Because you will be shooting in very low light, you will want fast lenses. That means you will want to look at lenses that have a large aperture so that they can let in as much light as possible. In general, a lens with an aperture of f/2.8 or larger is recommended.
You will also want to consider what kind of targets you want to shoot. If you prefer shooting large portions of the sky such as the Milky Way, you will want a wide-angle lens with a focal length of 20mm or less. For the Moon and planets you will want a lot more zoom. I would recommend a minimum of 300mm for lunar or planetary photography.
Another consideration is the fact that you will be shooting in manual mode. This is because you camera will be unable to auto-focus at night. This means that you might want to consider some manual-focus lenses. Rokinon, for example, makes a 14mm f/2.8 lens that is very popular for wide-field night shooting. This lens retails for less than $350, while the Canon equivalent (which has auto-focus) checks in at over $2,000. I personally use the Rokinon lens and have had great success with it.
These are my primary lenses for astrophotography:
- Rokinon 14mm f/2.8 (This lens is often marketed under different names, You might see it listed as Samyang or Bower, but it is the same exact product as the Rokinon)
- Canon 50mm f/1.4
- Canon 85mm f/1.8
- Canon 100mm f/2.8
- Canon 135mm f/2
- Canon 200mm f/2.8
#3 - What other equipment should I consider?
After your camera and lens, the next most important piece of equipment is a sturdy tripod. If you think that a cheap tripod will work, you are quite wrong. Because you will be taking long exposures, you want a tripod that won't shake while you are shooting. Cheap tripods not only hurt your image quality, but they can be dangerous for your equipment. You don't want to lose a $500 camera and a $300 lens because your $15 tripod got blown over by a slight breeze.
You might also want to get a tripod with an interchangeable head. One of my best additions was an Orion Precision Slow Motion Adapter for my tripod. This provides micro-motion altitude and azimuth control to any camera tripod. If you'd rather not have one of those, a ball head mount would be ideal so that you can adjust the camera position easily and safely.
Another possibility would be to use a telescope mount. I often connect one of my cameras to a computerized telescope mount so that I can take longer exposures. The Orion SkyView Pro GoTo mount is an excellent choice for this. If you decide you want to connect your camera to a telescope mount, you will need a 1/4"-20 Adapter for this. With this adapter you can connect virtually any camera to a telescope mount. Orion's Autotracker mount includes a 1/4"-20 adapter for cameras, allowing for long exposures.
#4 - How do I find good locations to shoot at night?
The general rule is to try to find the darkest location you can. City lights make it difficult to shoot at night because they wash out the sky. Even bright targets won't look as good in brighter areas because light pollution reduces contrast. Do a Google search for dark sky locations and you should be able to find something that hopefully isn't too far from you. If you can find a location that allows you to see the Milky Way, then you have found a great location.
#5 - What are some possible night sky targets to start with?
My first recommendation is to start with the Moon. Not only is it bright and easy to find, but it can provide you with some practice for shooting in manual mode. If you've been shooting in automatic modes until now, it will take a little time to figure out things like shutter speed, aperture, and ISO. Experiment with those on your camera with the Moon and try to get some really good crater detail. Here is an example:
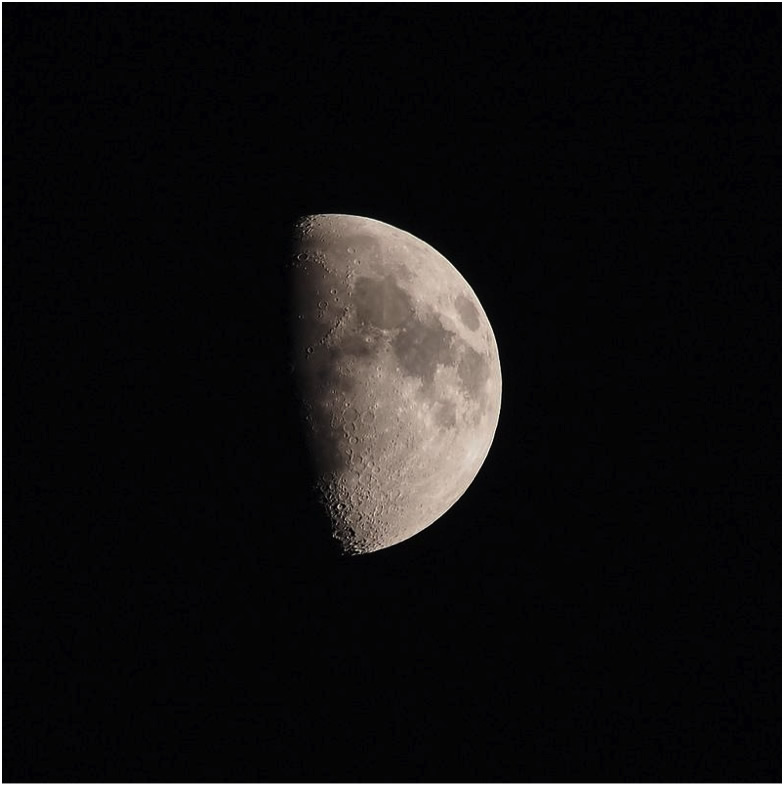
This was shot with an Olympus E-M5 with a 300mm lens.
ISO 200
Aperture f/6.7
Shutter speed 1/160
After you've gotten the hang of using manual mode, another easy target (if you have dark enough skies) is the Milky Way. For this you will want a wide-angle lens and shoot with the widest aperture. Exposures of 20-30 seconds will yield the best results, depending on how wide your lens is.
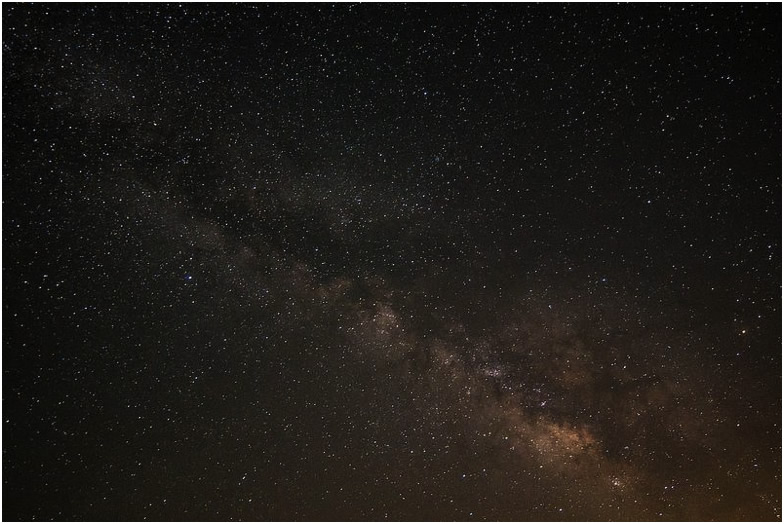
This was shot with a Sony A99 and a 14mm Rokinon lens.
30-second exposure
ISO 1250
Aperture f/2.8
Once you've gotten some nice Milky Way shots I would recommend looking for some online star maps or even a very good free computer program called Stellarium. These will let you know what's in the sky at any time so you can decide for yourself what might be interesting to shoot.
Happy Shooting and Clear Skies!
Stephen is a native of Georgia and works in the field of instructional technology. He has been an educator for the past 24 years and is a lifelong admirer of the night sky. He took up astrophotography in 2012 and is still learning new techniques and how to improve them.
|


{entityCount: 3}


