


Orion is proud to partner with BBC Sky at Night Magazine, the UK's biggest selling astronomy periodical, to bring you this article as part of an ongoing series to provide valuable content to our customers. Check back each month for exciting articles from renowned amateur astronomers, practical observing tutorials, and much more!
View our nearest star in all its glory, with BBC Sky at Night Magazine's safety-aware guide to solar imaging
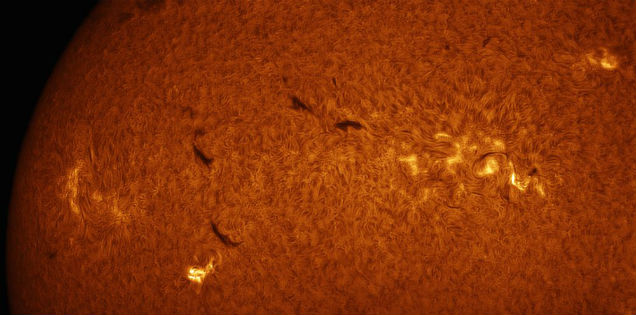
Hydrogen Alpha Closeup by Jimmy E.
Taking an image of the Sun is a fascinating astronomical pursuit that gives you the opportunity to study a star close-up. There are other advantages to solar imaging: it can only be done during the day, when the temperature is normally quite pleasant, and with plenty of light around you can say goodbye to fumbling around with red light torches.
The Sun has a visual activity cycle that is about 11 years long. The cycle starts at what is called a 'solar minimum', when activity is low. Roughly five to six years later activity reaches its peak at a point known as 'solar maximum', before receding back to solar minimum once more. The amount of detail you'll be able to capture depends on the type of kit you use, but there's usually something interesting and different to see from one day to the next, whatever equipment you have.
Of course, there are downsides to overcome. It's difficult to see your computer screen in sunlight and there's a real danger from the intensity of light — it's one of the only times that astronomy can pose a risk of physical injury. Over the next few paragraphs, we'll look at how to address these issues and how to image the Sun safely using different methods. We'll also discuss some of the solar features that are visible using different types of equipment and tell you how to take the best images of them.
So, if you're fed up with sitting outside under a cold, dark and frequently misty night sky, let's see if we can tempt you to come over to the light side.
Need to Know — The Dos and Don'ts of Solar Viewing
The Sun is a dangerous object and only the correct kit should be used to observe or image it. Never look through or even point an unfiltered reflector or compound telescope like a Schmidt-Cassegrain at the Sun: you'll cause physical damage to your eyes and the scope. Never use solar filters that attach at the eyepiece end of your scope, either — these may crack under the intense heat. Don't take risks by using uncertified filters. A piece of welding glass may look dark but it could still let through wavelengths that may damage your eyes. The golden rule when working with the Sun: if in doubt, don't do it.
What You'll Learn in This Article:
Equipment
Solar imaging equipment ranges from basic white light filters to precision narrowband filter systems. We discuss how to get started with white-light solar imaging and how to advance using hydrogen-alpha and calcium-K filters.
Technique
Constellation: Orion
We take you further into the world of solar imaging and explain the different types of narrowband filter systems available. We'll explain why certain filters are expensive and what benefits you're getting for your money.
Masterclass 1
White light imaging is the simplest way to start your solar journey. We'll discuss a number of methods for imaging the Sun. Our walkthrough will show you how to set up your kit for imaging with a white light filter and how to make your first capture.
Masterclass 2
An introduction to the dynamic world of hydrogen-alpha imaging using an entry-level Personal Solar Telescope (PST). We'll discuss how to take your first PST images and show you how to process them for maximum effect.
Software
As well as software to help you understand exactly what it is you're looking at, you'll need packages to control your camera, process your captures and make those final tweaks.
EQUIPMENT
From filters to scopes — all you need to capture the Sun
When taking images of the Sun it's important to use the right tools for the job. The dangers involved in pointing a telescope at the Sun mean that only proper certified equipment should ever be used.
Solar telescopes come in two varieties — those that are dedicated to the purpose and those that have just been temporarily adapted for safe solar viewing. A standard, equatorially driven mount makes a perfect platform for either variety, since the Sun's motion across the sky is not significantly different from that of the stars.
White Out
White light imaging involves removing most of the harmful light that could reach your camera sensor. There are various ways to do this, including projection using a 'Herschel Wedge', or by fitting a white light filter over the front of your scope. Projection and Herschel Wedges are discussed in 'Masterclass 1' (see below), but both are limited for use with refractors. The more flexible option is to use a white light filter such as Baader AstroSolar Safety Film. This type of filter is easy to make, and can be used with all telescope types. Never use cheap solar filters that fit onto eyepieces.
A white light filter will show sunspot groups that will appear and rotate across the disc over the course of a couple of weeks. But for really dramatic views, you'll need to use a narrowband filter that lets only a specific wavelength of light through, such as hydrogen-alpha or calcium-K. These filters are more expensive than white light filters and can only be used for solar work. Don't confuse deep-sky hydrogen-alpha filters with solar ones — deep-sky filters should never be used for imaging the Sun.
The cheapest hydrogen-alpha scopes are the Coronado PST and Lunt LS-35. They record all manner of exotic phenomena including solar prominences.
Both instruments have small apertures, but if you want something larger, you'll have to spend more. Both hydrogen-alpha and calcium-K filters are available pre-fitted into dedicated solar telescopes or as 'kits' that can be used to convert night-time scopes for narrowband solar work.
Whichever filter system you opt for, once it's been fitted, imaging the Sun is no more complicated than imaging the Moon. To capture the finest detail, a high frame rate camera like a webcam or planetary camera will produce the best results. For extra magnification, just use a Barlow lens. If you want to fit the entire disc in the frame, use a focal reducer. But do note that this kind of smaller scale is only possible with certain telescope and camera combinations.
Tech Talk — Cameras for Solar Imaging
DSLR
DSLR cameras are well suited for taking shots of the Sun through white light filters, but less so for narrowband filter shots where special processes are required to extract detail. Single images are also prone to atmospheric distortion.
Webcams
The effects of atmospheric seeing can be reduced by using webcams. These work very well for white light filtered imaging but the Bayer matrix colour filters fitted to a webcam's sensor will reduce its sensitivity when using narrowband filters.
High Frame Rate Cameras
As with other Solar System targets a mono, high frame rate camera will produce the best results, especially when used with narrowband filter systems. The high frame rates these cameras can achieve are ideal for reducing seeing effects.
Cooled CCD Cameras
A monochrome, cooled, astronomical CCD camera can work well with narrowband-filtered images. The best technique is to take lots of short-exposure images and stack them together using a registration and stacking program such as RegiStax.
Need to Know — Which Mount?
Solar imaging at low magnification can be done using a fixed mount such as a tripod, but a driven, polar-aligned, equatorial mount will make life much easier. While the Sun's apparent motion across the sky isn't quite the same as that of the stars, it is close enough not to have to worry about it while carrying out a typical imaging session, and a standard RA drive will do a perfectly adequate job.
As with any other type of imaging, a stable, heavy-duty mount is highly recommended to help avoid any unwanted wobbles.
TECHNIQUE
Tips and tricks for successful solar imaging
The techniques used to image the Sun are similar to those used to capture images of the Moon and planets. The difference is that the intensity of the light from the Sun must be reduced. There are different filter systems to do this and it's important only to use certified ones.
The best camera for imaging the filtered Sun, especially if you intend to use any magnification, is a monochrome high frame rate camera like a webcam or a dedicated planetary camera. Colour devices work for white light captures, but they may be lacking when using speciality filters as their in-built colour filters can reduce the sensor's sensitivity.
Two Techniques
Solar imaging falls into two categories: white light and narrowband. White light imaging reduces the amount of sunlight to safe levels, cutting out harmful, invisible wavelengths. With a white light filter on the front of your telescope, the Sun's light is dimmed to safe levels for imaging. The white light filter allows you to capture the Sun's visible surface (the photosphere).
Narrowband imaging is completely different. It calls for filters that are typically many times more expensive than a basic white light filter. The reason for this expense is down to the very fine optical tolerances that need to be met in order for the filters to work. These higher tolerances mean higher costs.
The main narrowband filter types used for solar imaging concentrate on hydrogen-alpha light, which has a wavelength of 656.3nm, plus calcium-K light with a 393.4nm wavelength. Less common filters include those that work with the 589.6nm wavelength of sodium-D light.
Narrow Bandwidths
How good a narrowband filter is can be measured by how wide its 'window' of extra wavelengths is, which lets light through either side of the central wavelength. This is also known as bandwidth. Narrowing the bandwidth allows ever-finer surface detail to be picked out. A low-cost hydrogen-alpha filter, like one from a Coronado PST, has a stated bandwidth of less than 0.1nm. Bandwidths can get narrower, to 0.05-0.03nm, and this is where the cost comes in: filters with windows this narrow can cost many thousands of pounds. Stacking two matched filters on top of one another — a technique known as double-stacking — can also help reduce bandwidth.
We've said that imaging the Sun is no more complex than imaging the Moon. While this is generally true, the lack of fixed features on the Sun's disc can lead to confusion, especially in relation to its orientation in the sky. Fortunately, if your scope sits on an equatorial mount, the solution is pretty straightforward. Begin by rotating the camera so that any features visible move parallel to the bottom edge of the imaging frame when you slew your scope in RA. The north edge of the Sun is found by using a finger to apply gentle upward pressure to the front of the tube. The last edge of the Sun visible if this motion were continued would be its northern edge if you're in the northern hemisphere, or southern edge if you're in the southern hemisphere. Finally, apply a similar pressure to push the tube over to the west. Again, the last edge of the Sun that would be visible if the motion were continued would be its western edge.
The Sun's axis tilts relative to Earth and changes throughout the year. A program called TiltingSun can help you visualise this tilt when you come to image the Sun (see 'Software' below for more information).
Pro Pointer — Viewing our Nearest Star in Three Different Ways
White Light
A white light view reveals the Sun's visible surface or 'photosphere'. With good seeing, a 4-inch or larger scope will reveal the photosphere's mottled texture. Called solar granulation, this looks a bit like lots of rice grains packed together. The photosphere looks darker at the edge of the disc due to a phenomenon known as limb darkening and it's here that you might find bright patches called faculae.
If the Sun is active, there may be sunspots on view too. Larger spots typically appear in groups called sunspot groups, pictured, or active regions. A typical sunspot has a dark centre known as the umbra, surrounded by a lighter region known as the penumbra.
Hydrogen-Alpha
Through a hydrogen-alpha filter, the photosphere is hidden under a blanket of hydrogen known as the chromosphere — only light from this outer layer gets through.
'Dark mottles' formed by dark jets of hydrogen are known as fibrils. Seen edge-on at the Sun's limb, fibrils look like tiny spikes and are known as spicules. Active regions are marked by huge swirls of hydrogen tracing intense magnetic field lines, in and around which bright regions called 'plage' appear. Where magnetic tension erupts, there are vast releases of energy from bright flares. Snake-like clouds of hydrogen known as filaments float above the chromosphere. When at the edge of the Sun, they are known as prominences.
Calcium-K
A calcium-K filter reveals detail in a low part of the chromosphere immediately above the photosphere. Consequently, the view is not dissimilar to that seen through a white-light filter. There are, however, some subtle differences — for example, a calcium-K filter is especially good at bringing out detail in and around active regions.
Bright plage can be seen within these regions and remain visible right across the Sun's disc. Solar granulation is hidden from view but the calcium-K Sun does show a large-scale network of bright interlinked paths known as the chromospheric network. Bright prominences may also be imaged as they extend off the edge of the calcium-K Sun.
MASTERCLASS 1
Cheap and easy, using a white light filter is a popular way to image the Sun
Imaging the Sun in its natural 'white' light is an inexpensive way to get into solar photography. When you pay attention to the safety issues, it can be a very rewarding way to monitor our nearest star.
One of the most basic methods is to use solar projection. For this you'll need a small refractor, ideally mounted on a driven equatorial mount. With your scope pointing away from the Sun, fit a non-plastic, low-power eyepiece and ensure the finder is removed or capped. Watching the scope's shadow on the ground, turn it to point directly at the Sun. A piece of stiff white card held behind the eyepiece will catch the Sun's image, while a tweak on the focuser will bring it into sharp relief. A card shield taped to the objective end of the tube may help improve contrast if the projection is difficult to see.
Now set your camera to automatic and take a shot of the image on the card screen. If the image comes out too bright, try moving the screen away from the eyepiece or, if you have manual controls, try under-exposing the shot. This basic method is capable of showing the photosphere, limb-darkening, sunspots and faculae — it is, however, only suitable for refractors.
A more sophisticated method, also limited to use with refractors, is to use a device called a Herschel Wedge inserted in the eyepiece holder. The wedge basically blocks most of the harmful heat and light from the Sun, reducing its intensity to safe viewing levels.
Using a Filter
A more universal method that is suitable on any type of telescope is to use a white light filter such as Baader AstroSolar Safety Film or a Solar Filter. See 'Step by step' below for instructions on imaging with a solar filter.
With a filter fitted you can image the Sun just as you would the Moon. In fact, the same constraints apply because the Sun's light is just as susceptible to our turbulent atmosphere. Stills cameras such as DSLRs are good for low-power shots, but webcams or, preferably, high frame rate planetary cameras are more suited for close-ups. For optimal results, however, screwing a solar continuum or green imaging filter onto your camera's nosepiece may enhance contrast in sunspot detail and solar granulation.
High frame rate captures are processed in the same way as lunar or planetary captures: by sending the capture file through a stacking program such as RegiStax or AviStack. See 'Software' below for more on processing solar images.
Tech Talk — Finding Your Focus
Focusing is a critical skill to master in any form of astronomical imaging — without it, you'll get poor results. If you're just starting out, accurate focusing can be quite hard to get to grips with, which can make the whole imaging experience rather frustrating. There's no real reason why this needs to be the case, so here are a few tips on how to get your images as sharp as possible.
First, make sure your camera is securely locked into your telescope's eyepiece holder and that the focuser tension adjustment is set firm. You want to be able to move the camera back and forth quite easily, but you also want it to stay where you've put it. Locate a high-contrast part of the Sun. For white light imaging, the best target is the Sun's edge. For more exotic filters, the Sun's surface is normally sufficiently detailed for you to lock onto that. Even here, though, it's good practice to choose a sunspot group or perhaps a dark hydrogen-alpha filament to give you a better focus target.
With a gentle grip on the focuser, move in towards focus, getting slower as you appear to be reaching the critical point. When you do reach this point, keep going, coming out of focus again on the other side. Then reverse direction again, passing slowly through focus, this time from the other side. Do this a few times until you're confident that you can recognise the real focus position; then adjust the focuser until you're in that position.
Need to Know — Seeing the Sun
Earth's turbulent atmosphere interferes with sunlight on its journey to your telescope and this makes fine detail on the Sun's surface appear to wobble and distort. Known as 'seeing', the Sun's own heat can make matters worse, causing heat thermals as the day starts to get going.
For white light imaging, poor seeing means the difference between viewing solar granulation or not, so it's a good idea to try and choose periods when the seeing is good. Mid to late morning is often ideal because it's a time before the Sun's heat has had a chance to take full effect.
Step by Step — How to Set Up and Capture Solar Images
1. Fitting the Filter
With the scope pointing away from the Sun, remove its lens cap and fit the solar filter; remove or cap the finderscope too. Make sure everything is securely fastened. If required, use a bit of low-tack electrical tape to hold the main filter in place securely. This is especially important on a windy day.
2. Line Up with the Sun
Lining the telescope up with the Sun without the use of a finderscope isn't as hard as it sounds. Without looking along the tube towards the Sun, roughly align the scope and then look at its shadow. As the scope approaches the correct alignment, so the tube shadow will reach minimum size.
3. Keep It in the Dark
If you find it hard to see detail on your laptop's screen in sunlight, you'll need a dark enclosure. A simple one can be made by putting a blanket over your head and the computer, but for something more sturdy, try placing the laptop in a closed cardboard box with a slit cut in it so you can see the screen.
4. Insert your Camera
If you have one, screw a solar continuum or green imaging filter onto your camera's nosepiece. Insert the camera into the eyepiece holder of your scope and fine-tune the scope's position so that an image can be seen on your computer's screen. Locate the Sun's edge and focus roughly.
5. Settings and Focus
Using the highest frame rate, reduce gain and then exposure until the image is correctly exposed and contains no white. If you can't, you may need to use a neutral density filter. Rotate the camera so that any spots visibly move horizontally across the frame while slewing in RA. Finally, fine focus the image.
6. Capture
For low image scale (magnification) setups showing all, or at least a large portion, of the Sun's photosphere, aim to capture 500-800 frames. Increase this to around 2,000 frames for larger image scales. If your control software offers it, reduce gamma slightly to make granulation and spot detail easier to pick out.
MASTERCLASS 2
Capturing hydrogen-alpha detail with a PST
The Coronado PST revolutionised hydrogen-alpha solar observing because it was both cheap and portable. However, as far as imaging was concerned there were a few hiccups, mainly due to a lack of inward movement when focusing high frame rate cameras and webcams. This resulted in being unable to reach prime focus, hindering the scope's usefulness for solar imaging.
But there are solutions. One of the easiest is to take the front lens off a standard 2x Barlow and screw it into the camera's nosepiece. The view isn't quite prime focus but it's not far off, and focus can generally be reached. You can also buy a low-profile nosepiece that puts the camera closer to the eyepiece holder.
Using a PST
The PST is a low-power instrument. Its 40mm objective works at f/10, giving a focal length of 400mm. Consequently, image scale tends to be quite modest and the PST is excellent for overview shots of the Sun's hydrogen-alpha disc. In terms of the camera, a monochrome, high frame rate camera is best. Colour cameras, including webcams, are fitted with a matrix of colour filters that severely reduces sensor sensitivity when working at one specific wavelength.
The PST is threaded for a standard photographic tripod, but if you can mount it on a driven equatorial mount you'll find things a lot easier. With the scope mounted, use its shadow on the ground to point it roughly at the Sun. Fine pointing can be achieved by getting the bright spot (a small Sun image) in the centre of the PST's built-in solar finder. You can then look through a low-power eyepiece in the PST's eyepiece holder to finish off the job if this proves necessary.
Screw the lens from a 2x Barlow into your camera's nosepiece and insert it into the PST's eyepiece holder. It's a good idea to place your head and laptop under a blanket or inside a dark cardboard box to make the screen easier to see. Once done, you should be able to see an image, probably unfocused, on-screen. Carefully focus using the thumbscrew at the base of the PST's body. If the image appears over-exposed at this point, that's fine — just make sure the Sun's edge and any visible prominences are as sharp as possible.
Once done, set your camera's gamma, contrast and brightness to their zero (default) settings. Using the highest frame rate available, decrease the gain and then the exposure so that the surface appears detailed but not over exposed — there should be no white showing. If the image is dim to start with, begin using a lower frame rate. Rotate the PST's tuning ring so that you achieve maximum hydrogen-alpha contrast in the centre of the image.
For the low image scale images that the PST offers, aim to record 500-800 frames per capture.
Tech Talk — How Dedicated Solar Scopes Work
At the heart of many hydrogen-alpha telescopes is an optical device known as a Fabry-P�rot etalon. This creates an optical cavity by bringing two optically flat glass plates together, separated by a precise gap. The two parallel facing surfaces are semi-silvered. As light enters the cavity through the first plate, it reflects back and forth between the semi-silvered surfaces. The reflecting beams interfere with each other so that certain wavelengths reinforce while others cancel out — this is a physical process that's known as 'constructive and deconstructive interference'.
The light that eventually passes out through the semi-silvered surface of the second plate contains bright wavelength peaks and dim wavelength troughs. A plot of wavelength vs intensity of this light looks a bit like an upside down comb, the peaks being represented by the tips of the comb's teeth. By passing the etalon's output through a less precise 'blocking' filter, it's possible to strip off all the unwanted 'comb teeth' and let just the one of interest through. The width of this peak defines the quality of the etalon and dictates how good a view you'll eventually get at the eyepiece or camera.
SOFTWARE
Programs every Sun worshipper should have
For best results in solar imaging, you'll need software for camera control and for grading and stacking multi-frame movie files, as well as for tweaking the end results. In addition, one highly recommended support program is TiltingSun, which is available from www.atoptics.co.uk. This provides valuable information about the Sun's orientation with respect to the Earth. TiltingSun can also be used to generate a grid that you can overlay onto your own image via a graphics editing program.
As far as webcams are concerned, there are more astro-specific camera control programs available such as wxAstroCapture (arnholm.org/astro/software/wxAstroCapture/) and K3CCDTools (www.pk3.org/Astro/index.htm?k3ccdtools.htm).
Higher end cameras typically come with their own control software, but even here there may be better options such as Lucam Recorder (www.astrofactum.de/Astrofactum/LucamRecorder/index.htm), which is capable of controlling numerous high end cameras from Lumenera and The Imaging Source.
The main registration and stacking contenders are both freeware. RegiStax (www.astronomie.be/registax) has been the mainstay of both beginner and experienced imagers for a while. A relative newcomer is AviStack (www.avistack.de/index_en.html), which is also proving to be a popular choice with astro-imagers. Both of these programs run on fairly modest computers but, as always, a bit of processing power and added memory will help speed things up a little.
For final tweaks, a layer-based graphics editor is a must — Adobe Photoshop or the freeware GIMP (www.gimp.org) are undoubtedly great choices. These can also be used to apply false color to monochrome solar images.
Tech Talk — Check Your Settings
Different camera control software can have different setting options, but the most common settings are 'exposure', 'gain', 'gamma', 'contrast', 'brightness' and 'frame rate'.
Typically, gamma, contrast and brightness should be left at their zero (default) levels. It might be tempting to adjust gamma down to improve surface detail clarity but, in reality, this can be emulated using a graphics editor after image capture.
Exposure, gain and frame rate need to be adjusted so that you get a strong signal at the fastest frame rate possible. If you can keep the gain as low as possible to achieve this, you'll also reduce the level of noise.
Step by Step — Refine and Sharpen Your Images with Post-Processing Software
1. Registax
Pass your capture files through a registration and stacking program such as RegiStax or AviStack. If you're using RegiStax 6, select your capture file, click 'Set Alignpoints' and then 'Align'. Drag the bottom slider to include the best frames on the 'RegiStrationgraph' and click 'Limit'. Click 'Stack' to finish the process.
2. Wavelets
Wavelets can sharpen your images. A typical PST result (using the 2x Barlow lens trick referenced earlier), sharpens well with 'Wavelet-scheme: Linear' and 'Wavelet-filter: Gaussian'. Check the 'Use linked wavelets' box and set the first slider to 30. Once you've found a scheme that suits you, save it via the 'Save Scheme' button.
3. Save and Load
Save your processed result as a 16-bit PNG or TIFF file and load it into a layer-based graphics editor like Photoshop. If necessary, crop the image to remove any white borders that may have appeared during the registration and stacking process. Duplicate the base layer for safety and work on the duplicate layer.
4. Working With Features
For images including prominences and surface, duplicate the working layer and make the top layer active. Select everything in the background sky down to the curved limb. Expand, feather the selection by two pixels, delete its content and deselect. Make the lower layer active. Adjust the mid slider.
5. Tweaking
Tweak the surface (top) layer by adjusting its 'Curves' to taste. A contrast tweak can work wonders. If applicable, tweak the prominence (next layer down) in the same way. Try to keep the join between surface and prominences as natural as possible. When you're happy that both layers look correct, merge them together.
6. Apply False Color
Make sure the mono image is in RGB mode and open its 'Levels' adjustment. Move the red channel's mid slider towards the black (left) end of the histogram. Move the green channel's mid slider slightly towards the black end too. Move the blue channel's mid slider slightly towards the white end of the histogram.
Copyright � Immediate Media. All rights reserved. No part of this article may be reproduced or transmitted in any form or by any means, electronic or mechanical without permission from the publisher.


