


{ width: 160, height: 160, defaultImage: '', layers: 'Artimg-StarsDeepSky' }


Galaxies
When you observe a galaxy, you're looking beyond the boundaries of our own Milky Way galaxy at a colossal stellar system millions of light years away. Spiral galaxies feature a central bulge of old stars surrounded by spiral arms containing younger stars and laced with gas and dust. Barred-spiral galaxies have an obvious central "bar" of material. Spirals are further classified as Sa, Sb, Sc, Sd, or Sm (or SBa, SBb, etc. for barred spirals) according to how tightly their arms are wound, with Sa being the tightest and Sm the loosest. Intermediate classifications are designated by ab, bc, and so on. SO galaxies are poorly defined spirals with bright disks but no discernible arms. Sp galaxies are peculiar spirals that don?t fit the standard profiles. Elliptical galaxies are armless masses of elderly stars. They vary from nearly spherical (E0) to highly flattened (E7). Irregular galaxies show no symmetry, exhibiting odd or chaotic structures. So-called peculiar galaxies do not fall into any of the above classifications.
Galaxies are tilted at different angles to our line of sight, from edge-on to face-on. The sense of dimensionality adds to the enjoyment of viewing galaxies. Note that the magnitude listed for galaxies or other "extended" objects can be deceiving. It represents overall light output; however, the light is spread out over an area of sky, reducing the object?s surface brightness. Thus, an 8th-magnitude galaxy will appear fainter than an 8th-magnitude star, whose light is concentrated at a single point.
 Nebulas
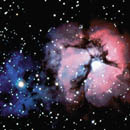
Ghostly clouds of gas and dust, nebulas reside in the spiral arms of our galaxy. Emission nebulas shine on their own, as intense ultraviolet radiation from nearby stars excites hydrogen gas, causing it to fluoresce. Reflection nebulas do not glow; tiny dust particles merely reflect the light emitted by nearby stars. Dark nebulas consist of cold dust and gas that absorb or scatter starlight. We infer their presence by the absence of light visible behind them. Planetary nebulas (PN) are the expelled shells of aging stars. They appear as small, bright disks. Although planetaries usually have a high surface brightness, their faint central stars can be difficult or impossible to detect in small instruments. The remains of more violent stellar explosions are called supernova remnants.
Star Clusters
Stars congregate in two different types of clusters: open and globular. Open clusters, also called galactic clusters, contain from a few to upwards of 100 young stars born from a common cloud of hydrogen gas and cosmic dust. These loose groupings, held together gravitationally, are found mostly in the Milky Way band. Many open clusters are best viewed with low power, making excellent targets for binoculars. Globular clusters are quite different, and more challenging to observe. They are tightly packed balls of thousands or hundreds of thousands of older stars that lie in a halo around the central hub of our galaxy. Part of the fun of observing globular clusters, as well as the challenge, is in trying to resolve individual stars. This is easier to do for the larger and less condensed globulars. Larger telescope apertures also help. Stars on the fringes of the cluster will resolve first. Asterisms are not clusters per se, but distinctive patterns of unassociated stars.
Double and Multiple Stars
Although most stars may appear to be single, the majority actually consist of two or more stars bound together gravitationally, orbiting around a common center of gravity. Some of these binary star systems can be separated into their component stars with a small telescope, revealing beautiful color and magnitude contrasts as well as varying degrees of separation. Optical doubles are not physically associated; these stars appear close together in the sky only because they lie along the same line of sight. Observing double stars requires a still atmosphere (good "seeing"), especially when trying to split very close doubles using high magnification. Large apertures will resolve more doubles than small apertures. Defocusing the stars a bit can accentuate their colors.
Variable Stars
Variable stars change in brightness over time. Estimating a variable star's magnitude at various time points and plotting its "light curve" is a worthwhile activity. To accurately estimate the magnitude, you must compare the variable to stars of known, fixed magnitude, preferably in the same field of view. Exact star magnitudes can be found in a star catalog or on special variable star charts.
Long-period variables, known as Mira-type variables after the prototype Omicron (o) Ceti, or Mira, in Cetus, are pulsating red giants whose magnitude varies over several months. The light fluctuations differ in duration and amplitude with each cycle. Cepheid variables, named after the prototype Delta Cephei, in the constellation Cepheus, exhibit very regular and precise brightness fluctuations ranging from one day to several days. A Cepheid's period (the time it takes to cycle from maximum brightness to minimum and back to maximum again) and its intrinsic luminosity are directly related: the longer the period, the more luminous the star. RR Lyrae variables have short, regular periods of less than one day. Irregular variables have unpredictable periods. Eruptive variables are stars whose brightness changes irregularly and often suddenly. R Coronae Borealis stars are in this class; they exhibit occasional sudden drops in magnitude. RV Tauri variables are pulsating supergiants with alternating primary and secondary minimum magnitudes. Eclipsing variables are really binary pairs of steady-shining stars that orbit each other edge-on to our vantage point. Periodically, one member of the pair passes in front of the other, temporarily blocking its light. Algol, in the constellation Perseus, is a classic example of an eclipsing variable.
{ width: 160, height: 160, defaultImage: '', layers: 'Artimg-Messier' }

Nicknamed the "Comet Ferret" by France's Louis XV, astronomer Charles Messier (1730-1817) charted the positions of certain celestial objects that he felt could be mistaken for comets. In doing so he hoped to reduce "false alarms" in the hunt for new comets.
Today, his "catalog" of 110 nebulas, star clusters, and galaxies comprises many of the more stunning gems of the night sky—compelling subjects for viewing with amateur telescopes. Various Messier objects are available to view on any given night. Indeed, there is no better way to learn the night sky and develop your observing skills than to locate and study these luminaries.
In doing so, you will be treated to a rich diversity: 26 open star clusters and 29 globular clusters; 28 spiral galaxies, 11 elliptical galaxies, 1 irregular galaxy; 7 diffuse nebulas, 4 planetary nebulas; 3 asterisms; and 1 supernova remnant. They reside in 36 different constellations.
Some M objects, like M42 (the Orion Nebula) and M31 (the Andromeda Galaxy), are easy-to-find celestial guideposts. Others take more diligence to spot. Most are visible in binoculars or a small telescope. They are popular quarry at star parties; enthusiasts have even formed Messier "clubs." Messier "marathons" are held each spring, when it is possible to "bag" all of the Messier objects in a particular night (should one be so inclined)!
Interestingly, Messier's list includes many objects that couldn't possibly be mistaken for comets even with the naked eye. The loose, bright cluster known as the Pleiades (M45) is one example. It is possible that his initial motivation for documenting the positions of "comet-like" objects evolved to a desire to catalog a broader repertoire of nebulas and clusterings for their own sake. His findings were bolstered by the inclusion of some 27 objects cataloged by a fellow astronomer, Pierre M�chain.
The irony of Messier's enduring legacy is that his aim, at least initially, was to steer observers away from these now famous treasures. Instead, get thee to a telescope and seek them out!
{ width: 160, height: 160, defaultImage: '', layers: 'Artimg-Constellations' }

Constellations are like countries on a wall map. They help narrow down the search for those tiny hard-to-find little cities or deep sky objects you would like to visit. By learning the constellations, you also share in the imagination of the people who created them thousands of years ago. Today there are 88 internationally recognized constellations. From either hemisphere, forty-five to fifty should be visible throughout the year.
Most northern constellation names come from the Greeks and Romans, who had vivid imaginations and no television to watch at night. They depicted the lives of the gods and goddeses, heroes and monsters that made up their legends. The southern constellations were mostly named during the seventeenth century by European astronomers who gave them mundane names like the Microscope, the Telescope, and the Sextant.
Expanding Your Horizons
Not all the constellations look like what they’re supposed to, and there are so many of them, it’s tough to keep them all straight.
First, get a good star chart. A revolving star wheel, called a planisphere, is an excellent choice. When you set it for the current time and date, it shows what stars and constellations are visible from your location right then. Monthly star charts that appear in astronomy magazines also work well. Use a flashlight that emits red-colored light to read your star chart. Red light works best because it does not spoil your night vision like white light does. Stay away from porch and street lights too.
The next step is to decide just what constellations you want to tackle. On any given evening, set your sights on mastering no more than four new star figures. Carefully trace them in the sky as you learn them and then go back and review the ones you found earlier. On your next night out, before you push off again into uncharted waters, go over what you memorized the previous night.
Studying the constellations over a period of a few hours also serves as a dramatic reminder that the Earth is spinning in space. Constellations near the equator rise and set while those near the North or South poles always seem to be hanging around in the sky. The circumpolar constellations located near the North Celestial Pole include some very famous star groups such as the Big Dipper, the Little Dipper, and Cassiopeia.
What’s Your Sign?
When pointing out constellations to someone else, be prepared for someone to ask the big question. "Can you show me my astrological sign?"
Twelve constellations make up the signs of the Zodiac. The reason these particular star groups were chosen is because they form the "Highway of the Gods." If you point your arm to the east where the Sun or Moon came up and move it across the sky to where it set, you have just traced out the ecliptic, or the pathway where all the major members of our solar system can be found. The early Greeks and Babylonians thought the planets, the Sun, and Moon were gods walking across the sky. They also recognized that the constellations visited by these gods must be very special. That is why these twelve particular constellations were chosen.
Incidentally, there is a lot of confusion when people go out on their birthdays and try to locate their sign in the night sky. When the ancients put this whole thing together they reasoned that the constellations must be at their greatest importance when the King of the Gods, the Sun, was visiting them. So, on your birthday, you will not find your sign in the nighttime sky. It is straight overhead at 12 noon right behind the Sun. Unless you are blessed at that very moment with a total solar eclipse (when some stars are briefly visible in the daytime), you will have to wait six months before your special constellation rolls around to the nighttime sky.
Capturing the Constellations on Film
Putting together your own personal set of constellation photos is fast and easy. All you need is
1) a 35mm camera capable of time exposures
2) a 50mm or 55mm lens
3) a steady tripod
4) a shutter release cable (with lock)
5) slide or print film (ISO 400 to 1000)
To create your own set of constellation photos, first set your lens at f/2.8 to prevent stars from looking like footballs around the edges of your photograph. Set your focus at infinity. Then frame the constellation in the camera finder, and open the shutter for about 20 seconds. Exposures longer than 20 seconds will begin to record the rotational movement of the Earth, and the stars will "trail" on the film instead of appearing as nice sharp points. You will be amazed at the sheer number and different colors of stars visible in the photographs that were invisible to your eyes alone.
{ width: 160, height: 160, defaultImage: '', layers: 'Artimg-SeeingDark' }

You've probably noticed that when you first go outside from indoors on a starry night, you can see relatively few stars. But then, as your eyes adjust to the darkness, many more stars come into view. This phenomenon is called dark adaptation, and it is crucial for visual astronomy, especially for observation of faint objects, such as galaxies and nebulas.
There are many ways you can improve and maximize your night vision. But first we must understand how night vision works.
Dark Adaptation: A Complex Process
Dark adaptation begins as soon as you enter a dark environment, and it happens in several steps:
- The iris of your eye opens the pupil, the "black hole" in the center, to its maximum width, usually 5 to 7 millimeters. Though this is the most visible aspect of dark adaptation, it is only the first step.
- Next, a pair of chemicals in the eye, rhodopsin and iodopsin, begin to take effect. These two chemicals are always present in the eye, but they break down in the presence of light, so when the eye is exposed to bright light these chemicals have no effect. But when in the dark the concentration of these chemicals begins to grow and the rod cells and cone cells in the retina become more and more light sensitive.
- At first, most of the increase in night vision comes from the cones, which are densely concentrated in the center of the retina. They are highly sensitive to color and are important for distinguishing fine detail. After 7 minutes or so the cones have reached their maximum sensitivity, while the rods, which are insensitive to color but are more sensitive than cones to low levels of light, keep gaining in sensitivity for another 20-30 minutes.
At the end of a half-hour or so the eye has achieved almost all of its dark sensitivity, with a small increase continuing until about 1 hour or so.
The Rods Have It
When your eye is fully dark adapted, most of your night vision comes from the rod cells in the retina. But the rods are not color sensitive, which is why in the dark you can see only shades of gray. The bright colors you see in pictures of nebulas and galaxies are typically only visible in photographs (film being much more sensitive to colors than a dark-adapted eye).
Most people are aware that night vision is not in color, but few realize that you see less fine detail at night as well. This is because the rods are not as tightly packed as the cones, so they cannot distinguish detail nearly as well. To prove this to yourself you need only look at a tree about 50 feet away: In the daytime you can clearly make out the leaves in the tree; at night you can make out the outline of the tree, but not the individual leaves.
Ten Tips For Improving Your Night Vision
So now that you know how night vision works, here's how to maximize your ability to see in the dark.
1) Observe from a dark site. Any amount of light will reduce your dark adaptation, so get away from street lamps, porch lights, car headlights, and urban skyglow.
2) Avoid bright sunlight as much as possible during the day prior to an evening's observing session, especially later in the afternoon. Exposure to intense light can hamper your dark-adaptation for a long time! Wear sunglasses when you have to go outside.
3)  If you are in a light-polluted location consider wearing dark glasses or special red night-vision goggles at all times except when looking through the eyepiece. It may seem odd to wear dark glasses at night (and certainly don't do that when you're driving), but it can be a real help.
4)  When you need some light to see what you're doing, use a dim red flashlight, the dimmer the better. A red light with adjustable brightness is very handy because it allows you to dial down the brightness to the bare minimum required. (Red light works best because it is less efficient than white light at breaking down the iodopsin and rhodopsin that allow your eye to see in the dark.)
5) Your eyes adapt to darkness independent of one another, so if you have to look at something bright do so with one eye, saving the dark adaptation of your other eye.
6)  In light-polluted areas, do whatever you can to block ambient light from your eyes. For instance, consider using a dark shroud over your head to block out distracting light when at the eyepiece. Cupping your hand around your eye and the eyepiece helps, too.
7) When you take a break during a night of observing, say to go inside to warm up or grab a bite to eat, put on a pair of red goggles. If you don't need to see what you're doing, cover your eyes with a dark cloth and relax. Even though your eyes may seem fully dark adapted, after a half hour with your eyes completely sealed from light you may find that you gain a bit more acuity.
8) Use averted vision. The rod receptors, which are most sensitive to dim light, are more highly concentrated around the periphery of the retina than in the center. This means that you can see faint objects better by looking slightly off to the side of them rather than straight at them. Try it.
9) Breathe deeply. Avoid the tendency to slow your breathing rate or hold your breath when concentrating intently on a dim object. Reduced oxygen diminishes your night vision. Many experienced astronomers use the trick of "oxygen loading" before observing a particularly faint object, to enhance their visual acuity. Breathe deeply for 15 to 30 seconds just before looking into the eyepiece, and continue doing so as you observe. Don't go overboard, though. If you start feeling dizzy, breathe normally!
10) Avoid drinking alcoholic beverages before or during an observing session. Alcohol is a depressant and will decrease your visual acuity. Wait until after you're finished to crack open that cold one!
In astronomy the name of the game is seeing as much as you can possibly see. For that reason it pays to take a few extra steps to achieve and maintain your maximum dark-adapted night vision, particularly because it is so easy to do.
{ width: 160, height: 160, defaultImage: '', layers: 'Artimg-CelestialCoordinates' }

"It’s about 500 light-years away in the direction of one of the spiral arms of the Milky Way." Directions like those sound good in a science-fiction story, but they won’t help you find anything in the night sky. In this article, we will explain the coordinate systems that are actually used in astronomy.
The need for a coordinate system is obvious: it’s a way of pinpointing the exact locations of celestial objects in the sky.
The first thing to get used to, as a skywatcher, is that the Earth is the center of your universe, though not of the real one. That is, you are always standing on the Earth, and that’s what everything seems to revolve around.
Great Ball of Stars!
Specifically, it’s convenient to think of the sky as a gigantic celestial sphere, a globe surrounding the Earth. The sphere is assumed to be infinite in size; the planets and stars are so far away that their distances don’t matter. When you step outside and look up, the sky appears as a dome, a hemispherical bowl. It isn’t, of course, but the illusion works for our purposes.
As the Earth rotates, this bowl seems to twirl around. The Earth rotates from west to east, which causes the sky seemingly to rotate from east to west, once every 23 hours and 56 minutes (one sidereal day). The stars stay in fixed positions on the celestial sphere (because they’re so far away); the Sun, Moon, and planets gradually move around it in their orbits, so it takes four more minutes (making a total of 24 hours) for the Sun to get back to the same position.
Latitude and Longitude, Astronomy Style
On the celestial sphere, astronomers use lines similar to those of latitude and longitude on the Earth. The astronomical equivalent of latitude is declination, measured in degrees (°) of arc, positive for north and negative for south. Each degree is divided into sixty minutes (’), and each minute is divided into 60 seconds (’’). (Seconds are used only when great precision is needed.) "Declination" comes from a Latin word for "bending" or "angle."
The celestial equivalent of longitude is right ascension (a rather clunky term, for sure). It is measured in hours (0 to 24), minutes, and seconds, rather than degrees, for reasons we’ll get to presently. For example, the pole star, Polaris, is at right ascension 2 hours 32 minutes, declination +89° 16’. The Table below shows the right ascensions and declinations of some other bright stars.
Positions of some bright stars (Epoch 2000.0)
| Star | Right Ascension | Declination |
|---|---|---|
| Sirius (in Canis Major) | 6h 45m 09s | -16° 42’ 58’’ |
| Regulus (in Leo) | 10h 08m 22s | +11° 58’ 02’’ |
| Arcturus (in Boötes) | 14h 15m 40s | +19° 10’ 57’’ |
| Altair (in Aquila) | 19h 50m 47s | +8° 52’ 06’’ |
| Fomalhaut (in Piscis Austrinus) | 22h 57m 39s | -29° 37’ 20’’ |
The strange name "right ascension" has to do with the rising of a star as viewed from the Earth’s equator, where stars with low declinations rise (ascend) vertically (straight up).
The right ascensions and declinations of stars are essentially fixed, although they shift very slowly because of precession, a gradual change in the direction of the Earth’s axis. The reason most star charts say "Epoch 2000.0" is that they show star positions for the beginning of the year 2000. Earlier, we had Epoch 1950 and Epoch 1900 charts. The rate of precession is 1° every 72 years, but different parts of the sky are affected to different extents.
On the contrary, the Sun, Moon, planets, comets, and asteroids are not fixed relative to the stars. They move around. You have to look up their right ascension and declination for a particular date.
The declination of Polaris, +89° 16’, is almost 90° north, which means Polaris is less than a degree away from the north celestial pole. That’s the point around which the stars appear to twirl (for Northern Hemisphere viewers). You can line up the polar axis of an equatorial mount by sighting on Polaris. If you live south of the equator, you can’t see the north celestial pole; instead, you see the south celestial pole, which is not marked by a bright star (although Sigma Octantis is close). An old astronomers’ joke is to report the discovery of some interesting object "about ten degrees south of Sigma Octantis" — there’s no such place, because declinations range only from +90° to -90°.
The point directly over your head, the zenith, has a declination the same as your latitude on Earth. The point directly south of you on the horizon has negative declination of 90° minus your latitude; for example, declination -50° if your latitude is 40 north. That’s why objects such as the Magellanic Clouds, at declination -65°, are never visible from the continental United States.
We mentioned already that right ascension is measured in hours (0 to 24) rather than degrees (0° to 360°). The two are interconvertible, of course; one hour equals 15 degrees of arc. If you want to give right ascension in degrees, you can; celestial navigators do, and they call it sidereal hour angle (SHA).
The reason right ascension is measured in hours is of course that the celestial sphere seems to rotate as the Earth turns. Its rotation period is called one sidereal day, or 24 hours of sidereal time, which runs slightly faster than mean solar time. If a particular star is directly above you, it will be directly above you again 24 sidereal hours later, or 23 hours and 56 minutes later by the ordinary clock. The sidereal time at any moment is the right ascension of the point directly overhead, as well as points directly north and south of it (along a line called the meridian).
At the same mean solar time — midnight, for instance, or 10 p.m. — the sidereal time will be 4 minutes later each successive day. That’s because the Earth orbits the Sun. The celestial sphere seems to "slip" relative to the Sun (actually, the Sun is moving on the celestial sphere), and that’s why we see different constellations at different seasons.
Most objects rise in the east and set in the west. Along the way, they follow lines of declination, which are circles centered on the north celestial pole.
Some objects near the celestial pole are always above the horizon; they just whirl around and around without setting. They’re said to be circumpolar. Above the Arctic Circle, the circumpolar region is so large that the Sun gets into it and doesn’t set, resulting in the Midnight Sun.
What Does the Coordinate System Mean For Amateur Astronomers?
An object’s coordinates tell you where it is in the sky. If you have a telescope on an equatorial mount, you can locate celestial objects to view by "dialing in" their right ascension and declination coordinates using the mount’s setting circles. (We won’t go into how to do it here.) The setting circles on most equatorial mounts, and the mounts themselves, are not accurate enough to land you right on an object consistently, but they’ll get you close; then you merely have to sweep the telescope a bit using the slow-motion controls until you spot the object.
Conversely, you can use the setting circles to identify objects you happen upon in the sky. By noting the right ascension and declination values of an object your scope is pointed at, you can then look up the values in a star atlas or catalog to find out what it is.
Other coordinates are useful for other purposes. The most obvious are altitude (distance above the horizon, in degrees) and azimuth (compass direction; north = 0°, east = 90°, south = 180°, west = 270°). Computer programs can convert right ascension and declination into altitude and azimuth for a particular place and time.
Also important are ecliptic coordinates. The ecliptic is the line in the sky that corresponds to the Earth’s orbit around the Sun. The planets are always near the ecliptic, in a narrow band called the zodiac. Planetary orbits are always computed relative to the ecliptic, and ecliptic coordinates take the ecliptic as their "equator." Ecliptic latitude is the distance of an object from the ecliptic, and ecliptic longitude is measured along the ecliptic from the place where it passes through declination 0°.
There’s yet another set of coordinates that uses the center line of our galaxy as the equator. Galactic longitude is reckoned in degrees from the galactic center in Sagittarius; galactic latitude is the distance north or south of this center line. These coordinates are used in the study of the structure of our galaxy, but not for finding objects in the sky.
{ width: 160, height: 160, defaultImage: '', layers: 'Artimg-ObservDoubleStars' }

You might never guess it from looking at the sky, but estimates indicate that between one-third and one-half of all stars belong to star systems called double stars or binary stars. Double stars come in many different combinations. Some consist of a faint star teamed with a bright star, while others comprise two equal-magnitude suns. Still others have three or more members, and are called multiple stars. Then, there are optical double stars, two stars that only appear closely set from our vantage point. In reality, these celestial imposters are not physically linked, and in fact are nowhere near each other in space.
For amateur astronomers, binary stars offer both charm and challenge. Many pairs display beautiful color and/or magnitude contrasts, while others are so close together that "splitting" them becomes a good visual test of one’s optics and of the night’s seeing conditions.
In a double star system, the brighter star is labeled the primary or "A" star, while the fainter member is called the companion or "B" star. If the system has other members, they are labeled alphabetically C, D, and so on. Their apparent separations are usually expressed in arc-seconds, abbreviated ". (An arc-second is a small fraction of an angular degree. There are 60 arc-minutes in one degree and 60 arc-seconds in one arc-minute.) Seven-power binoculars will resolve, or separate, double stars separated by approximately 30". A 60mm refractor can split equal-magnitude doubles separated by 2" at high power. A high-quality 6-inch telescope can resolve binaries less than 1" apart, given nearly perfect seeing conditions (i.e., a very steady atmosphere at the time of observation).
Check Out These Pretty Pairs
Some of the prettiest doubles in the sky are made up of two color-contrasting suns, where both shine like glittering jewels against a velvety backdrop. One of the most dazzling binary systems is Albireo in the summer constellation Cygnus. Here, a golden primary star radiates in sharp contrast to its fainter companion, which is blue. Another gorgeous double is Eta Cassiopeiae in the constellation Cassiopeia. It features yellow and red members separated by about 13 arc-seconds.
The table below lists some of the sky’s most interesting stellar couples. You’ll need to refer to a star atlas to find them.
| Star | Constell. | RA | Dec | Mag | Sep | |
|---|---|---|---|---|---|---|
| Spring | ||||||
| Xi Boötis | Bootes | 14 51.4 | +19 06 | 5,7 | 7" | |
| Cor Caroli (alpha) | Canes Venatici | 12 56.0 | +38 19 | 3,6 | 20" | |
| Alcor & Mizar (zeta) |
Ursa Major | 13 23.9 | +54 56 | 2,4 | 12’ | |
| Mizar (zeta) |
Ursa Major | 13 23.9 | +54 56 | 2,4 | 14" | |
| Summer | ||||||
| Albireo (beta) | Cygnus | 19 30.7 | +27 58 | 3,5 | 35" | |
| Nu Draconis | Draco | 17 32.2 | +55 11 | 5,5 | 62" | |
| Rasalgethi (alpha) | Hercules | 17 14.6 | +14 23 | 3,6 | 4" | |
| Epsilon Lyrae | Lyra | 18 44.3 | +39 40 | 5,5 | 208" | |
| Lyra | 5,6 | 2.6" | ||||
| Lyra | 5,6 | 2.3" | ||||
| Autumn | ||||||
| Algedi (alpha) | Capricornus | 20 21.0 | -14 47 | 3,6 | 3’ | |
| Almach (gamma) | Andromeda | 02 03.9 | +42 20 | 2,5 | 10" | |
| Eta Cassiopeiae | Cassiopeia | 00 47 | +57 5 | 3,7 | 13" | |
| Delta Cephei | Cepheus | 22 29.2 | +58 25 | 4,6 | 41" | |
| Polaris (alpha) | Ursa Minor | 02 31.8 | +89 16 | 2,9 | 18" | |
| Winter | ||||||
| Rigel (beta) |
Orion | 05 14.5 | -08 12 | 0,7 | 9" | |
| Pollux (beta) | Gemini | 07 34.6 | +31 53 | 2,3 | 3" | |
| Sigma Orionis | Orion | 05 38.7 | -02 36 | 4,8, 7 |
13", 43" |
|
| Theta1 Orionis | Orion | 05 35.5 | -05 23 | 7,8, 5,7 |
9", 13", 22" |
|
Notes:
"Mag" is the visual magnitudes of the A and B stars, respectively.
"Sep" is the separation of the component stars, usually expressed in arc-seconds (").
Resolution and the Dawes Limit
While all of the doubles in the listing here should be resolvable through nearly all amateur telescopes, others challenge both our eyes and our telescopes to be seen. Just how close will your telescope be able to resolve a double star? In the 19th century, a British astronomer named William Dawes experimented to find how close he could resolve a pair of 6th-magnitude stars with different apertures. This value, called Dawes’ Limit, can be estimated by dividing 4.54 by the aperture of a telescope in inches. In other words, a 6-inch telescope should be able to resolve a pair of 6th-magnitude stars separated by 0.8 arc-seconds, while an 8-inch telescope can resolve stars to 0.6 arc-seconds.
But this is not set in stone. While Dawes’ Limit is a good guide for testing a telescope’s optical quality, resolving power can be greatly affected by a number of things. Above all, seeing conditions play a tremendous role. "Seeing" is a measure of how steady the Earth’s atmosphere appears. A good way to judge seeing conditions is to check the stars. If they appear to be twinkling, which is caused by a turbulent atmosphere, then Dawes’ Limit will never be reached. Frequently, the steadiest nights appear slightly hazy, when our atmosphere is more tranquil and seeing is enhanced.
Easy on the Power
Equally important is the optical quality of a telescope’s optics as well as those of the eyepiece and the observer’s eye. Refractors are often favored for splitting tight binaries, but reflectors and catadioptric telescopes can be equally adept provided their optics are precisely collimated. The secret to success is not to overpower the telescope. Use moderate powers for the best results, as high magnification will also amplify atmospheric turbulence and optical faults.
To test Dawes’ Limit for yourself, choose a binary star that has two equally bright components, both as close to 6th magnitude as possible. A large disparity in star brightness will render the test null and void. Beside steady seeing, be sure to use a moderate-power eyepiece, wait for the telescope’s optics to cool to the ambient outdoor temperature, and move away from any buildings and other objects that may be radiating the heat of the day. Dawes’ Limit will never be reached if test conditions aren’t just so, but under the right circumstances, some observers can actually exceed it.
Observing double stars is a great project for anyone who is looking for an enjoyable and varied observing program as well as an enjoyable way of testing the acuity of both your telescope and yourself. Dozens, even hundreds of targets are waiting for you in tonight’s sky. Perhaps best of all, double stars can be studied from anywhere any clear night of the year. Unlike other, diffuse deep-sky objects that are badly hampered by light pollution, double stars look striking even from urban or suburban skies, even at Full Moon.
{ width: 160, height: 160, defaultImage: '', layers: 'Artimg-Generic_Scope' }

In honor of our 37th anniversary, we offer 37 ideas to celebrate the hobby we love.
- Remember why you got it in the first place - Revisit the joy of stargazing.
- Scan the sky - The sky is constantly changing; there are always new wonders in astronomy.
- Share your hobby - This doesn’t need to be a solo hobby. Share the fun.
- Explore the Moon - Get a field map and log details on the moon.
- Get Ready for Jupiter - Visible now before dawn, the best planetary show in the sky is coming this fall and winter (visible in the early evening); filters help bring out the belt detail.
- Catch Saturn - Saturn is still well placed in the evening sky. You can see the rings with almost any telescope.
- Track Neptune - Neptune is in opposition in August, but still a challenge in a small scope.
- Zodiac - Work your way through the constellations of the Zodiac.
- Star Charts - Having a roadmap makes it easier to find things. Orion offers a monthly chart online
- Find the Orion Nebula - Our all-time, personal favorite!
- Find a Bright Planetary - Even in a city, during the summer, the Ring Nebula is frequently visible. To boost contrast use an OIII eyepiece filter.
- Galaxies - Explore the galaxies. Go beyond the Milky Way to Andromeda and beyond.
- View all Messier objects - Try to find as many of the Messier objects as possible.
- Go Deeper with the Caldwell catalog - Try the same thing with the Caldwell catalog
- Camera - Try astrophotography to take your hobby to a new level.
- Filters - Experiment with color filters on the planets and with SkyGlow filters for nebula.
- Sun - Break out that solar filter. Sunspots come and go all the time.
- Adjust your finderscope - Being unable to find things is frustrating. Taking the time to adjust the scope will make things much easier (or get one if your scope doesn’t have it)!
- Smartphone astronomy - Smartphone’s have astronomy apps available. Keep yours handy.
- Take Pictures with your iPhone - Orion has the adaptors to mount your iPhone to snap pictures of the moon, planets and more.
- Astrogoggles - Astrogoggles protect your night vision when you run inside. For the same reason, get a red-beam flashlight when outside reading charts.
- Laser Pointer - A laser is a fun way to share astronomy with friends.
- Use Binoculars - Binoculars are a great complement to a telescope.
- Take a course - You’ll not only learn, but meet new hobbyists.
- Earth Gazing - Turn your scope earthward. Find a high spot and explore the world around you.
- Subscribe to a blog - Learn about events. It’s over 100 years to the next Venus transit. Don’t miss another once-in-a-lifetime event.
- Join a club - Meet people and go stargazing together.
- Eyepieces - Get a new high power eyepiece for planets or a wide-field to more easily catch nebulae.
- Get a chair - Find a swiveling stool at the right height so you don’t have to stand or bend over.
- Hold an event - Invite friends and fellow hobbyists and make a night of stargazing.
- Catch a Meteor Shower - A great one is coming in August, the Perseids.
- Try finding and following the Space Station - This is about as bright as Jupiter!
- Look for Satellites. Try to spot satellites and other man-made objects.
- Bird watching - Use your scope for watching birds and other animals.
- Try sketching what you see - You don’t have to be an artist, but this can help catalog your finds. Sketch your moon findings.
- Test how far can you see - What’s the most distant object you can track down?
- Just have fun -That’s why you bought the telescope in the first place!
{ width: 160, height: 160, defaultImage: '', layers: 'Artimg-ObservVariable' }

Before the invention of the telescope, our ancestors marveled at the permanent nature of the stars at night. Planets, the Sun, and Moon moved, and comets occasionally appeared in the sky, then faded, but the stars remained constant and fixed to the celestial sphere. They were considered a source of great stability in an otherwise unstable world. At least, most were. There were exceptions.
Even in ancient times, some rogue stars were known to misbehave and were regarded with awe and fear. One such star was located in the constellation Cetus, the Whale. At times, it could be seen easily with the unaided eye, while at others, it was only dimly visible, if at all. Early skywatchers named this star Mira, which means "wonderful." Then, there was the case of the Demon star, Algol, marking the evil eye of Medusa's decapitated head in the constellation Perseus (hey, nobody said constellation mythology was pretty!). Algol winked at stargazers, varying from dim to bright over the course of about three days. What could be causing these amazing sights?
Once the telescope was turned to the heavens, astronomers began to discover more stars that changed in brightness like Algol and Mira. Today, thousands of these so-called variable stars are known and cataloged. Some fluctuate in brightness by only a few tenths of a magnitude, while others may vary by five or ten full magnitudes, or even more!
For amateur astronomers, observing variable stars can be an interesting and challenging pursuit, a different twist on typical stargazing. Before we get into the how-to of observing them, let's review the different kinds of variable stars.
Pulsating, Erupting, Eclipsing — They Vary
Variable stars like Mira are classified as pulsating variables. Known to be old, red giant stars, they actually expand and contract in diameter like a beating heart. Their rhythmic pulsations usually take weeks or months to complete a cycle.
A second class of variable stars suddenly and unpredictably change in brightness in just a few days, hours, even minutes, and so, are called eruptive variables. One example of an eruptive variable star is a nova. Here, a white dwarf star lying close to a normal star abruptly increases in brightness by five or more magnitudes, only to fade slowly back to its original, pre-eruption brightness over the course of several weeks. Another example of an eruptive variable are called R Coronae Borealis stars. These peculiar suns actually drop in brightness due to the formation of clouds of "soot" in their atmospheres.
Algol represents a third class of variable stars called eclipsing binaries. In these cases, the stars themselves do not fluctuate in brightness, but instead, are alternately covered and uncovered by unseen, orbiting companions. When a companion passes in front of or behind the system's primary star, their combined brightness fades, only to return after the eclipse ends. By measuring the period and amplitude of the fluctuations, astronomers can tell how far the two stars are apart and how long the companion takes to orbit. In the case of Algol, the orbital period is 2 days 20 hours 49 minutes, with the two stars separated in space by about 10 million kilometers (about 6 million miles).
How Bright is That Variable?
It?s fun to estimate the apparent magnitude of variable stars. This is usually done by comparing their brightness with that of neighboring stars of known (and fixed) brightness. The American Association of Variable Star Observers (AAVSO) has a collection of special finder charts for variable stars, which give the magnitudes of surrounding stars. The variable may appear to be the same brightness as one of the reference stars, which makes estimating its magnitude easy. Or, if the variable is brighter than comparison star A, but dimmer than comparison star B, then the variable?s magnitude lies somewhere in between. If star A is magnitude 8.0 and star B is 8.8, then the variable star may be about magnitude 8.4. This is called interpolation.
See the "Z": Check Out this Big Dipper Variable
Here?s a variable star that has long been a favorite among variable star observers. Z Ursae Majoris is categorized as a red, pulsating star, fluctuating between magnitudes 6.5 and 9.4 over a period of 195 days. What makes Z such a favorite is its location inside the bowl of the Big Dipper, about 2.5 degrees to the west-northwest of Megrez, the star that joins the bowl to its handle. This northerly location also means that the star stays above the horizon year-round for many observers in the Northern Hemisphere.
You don?t need fancy equipment to make accurate estimates of the brightness of variable stars — just your eye! It's really not as hard as it might sound at first. Begin by locating the star right in the center of the chart below, labeled with a "Z."
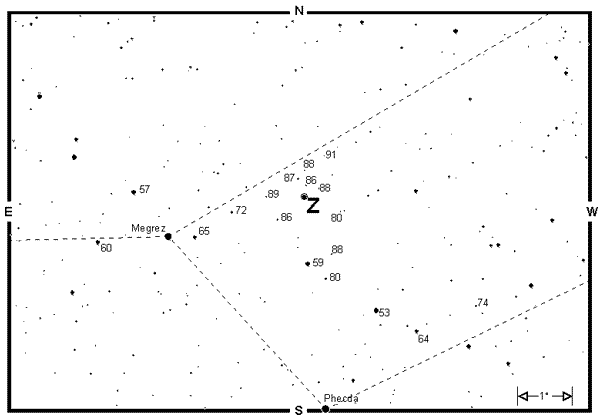
Some of the stars on the chart are numbered, while others are not. Those numbers represent the magnitudes of those stars. The decimal point has been omitted, since it would be easy to confuse it for another star. The star labeled "72" is really magnitude 7.2, while the star marked "86" shines at magnitude 8.6, and so on. These fixed-brightness "comparison stars" can be used to estimate the brightness of the variable.
If it's clear tonight, bring a print of the chart outside and find Z through your telescope or binoculars (you won?t be able to see it with your naked eyes). Begin at Megrez, then shift slowly north and west, following the trail of stars to its position (see "Star-Hopping: How and Why" for more details about locating sky objects). Be sure to use a low-power eyepiece to show the widest field of view. Unless it happens to be near its minimum brightness, Z should be bright enough to be seen through most finder scopes and binoculars.
With Z in view, take a look around at the stars in the eyepiece and compare them with the stars on the chart. Rotate the chart around so that the stars' orientation matches the eyepiece view. Remember, if you are using a star diagonal in your telescope, the view will be flipped left-to-right, like a mirror.
Begin by locating the variable star through your binoculars or telescope. Any type of telescope can be used, but be sure to select just enough magnification to see the star. Low power is usually preferred, since higher powers have very restrictive fields of view. Take a look around and find some of the comparison stars. Look for one or two that appear a little brighter than the variable, and one or two that are a little dimmer, then estimate how much brighter or dimmer the variable is from the others. For instance, you may find that Z appears a little dimmer than the "80" and "83" stars, but brighter than the "86" and "87" stars. If so, the variable must be either magnitude 8.4 or 8.5. Narrow your view now and scan back and forth between Z and the "83" and "86" stars. Try to decide if the variable is a little closer to one of the other, and mark down your estimate.
By keeping track of your estimates over the course of weeks or months, you will be able to plot a "light curve," a plot of the stars changing brightness over time. Mark the passage of time in days along the "X" axis (horizontal) and brightness along the "Y" axis (vertical). Plot the points matching the intervals of days and your magnitude estimates, then connect the dots. You?ve created a light curve just as professional astronomers do when studying variable stars!
Interested in viewing more variable stars? Here is a short sampling of the sky's most interesting ones.
| Star | Constell. | RA | Dec | Mag | Per. | Type |
|---|---|---|---|---|---|---|
| Spring | ||||||
| R Coronae Borealis | Corona Borealis | 15 48.6 | +28 09 | 5.8 to 14.8 | Irreg. | Eruptive |
| R Leonis | Leo | 09 47.5 | +11 26 | 5.8 to 10.0 | 313 | Pulsating |
| R Virginis | Virgo | 12 38.5 | +06 59 | 6.0 to 12.1 | 146 | Pulsating |
| Z Ursae Majoris | Ursa Major | 11 56.5 | +57 52 | 6.5 to 9.4 | 195 | Pulsating |
| Summer | ||||||
| Chi Cygni | Cygnus | 19 50.6 | +32 55 | 3.3 to 14.2 | 407 | Pulsating |
| RT Cygni | Cygnus | 19 43 | +48 46 | 6.0 to 13.1 | 190 | Pulsating |
| Beta Lyrae | Lyra | 18 50.1 | +33 22 | 3.4 to 4.3 | 12.94 | Eclipsing |
| R Scuti | Scutum | 18 47.5 | -05 42 | 5.0 to 7.0 | 144 | Pulsating |
| Autumn | ||||||
| R Andromedae | Andromeda | 00 24.0 | +38 35 | 5.8 to 14.9 | 409 | Pulsating |
| Delta Cephei | Cepheus | 22 29.2 | +58 25 | 3.5 to 4.4 | 5.37 | Pulsating |
| Mira | Cetus | 02 29.3 | -02 59 | 3.4 to 9.2 | 332 | Pulsating |
| Winter | ||||||
| R Leporis | Lepus | 04 59.6 | -14 48 | 5.5 to 11.7 | 432 | Pulsating |
| Algol | Perseus | 03 08.3 | +40 57 | 2.1 to 3.3 | 2.87 | Eclipsing |
Notes:
Mag is the variable's range in brightness.
Per. is short for Period, the number of days it takes the variable to complete a full period, or cycle, in brightness
Amateur observations of variable stars are especially sought by professional astronomers worldwide. If you are interested in learning more about observing variable stars, or in obtaining a set of variable star charts, contact the American Association of Variable Star Observers at 25 Birch Street, Cambridge, Massachusetts 02178, or visit their Web site at http://www.aavso.org.
{ width: 160, height: 160, defaultImage: '', layers: 'Artimg-ObservSun' }

Amateur astronomers usually consider themselves creatures of the night, since that is when the stars come out. But one star, our most important, most impressive star, the Sun, is visible at a much more convenient hour. The Sun bathes the Earth in life-giving light and heat as we orbit a mere eight light-minutes away. By comparison, light from the nearest star beyond the Sun takes more than four years to reach Earth. Astronomers can learn much about the distant nighttime stars by studying the characteristics and behavior of our own, daytime star. For amateur astronomers, viewing the Sun with a telescope is both interesting and fun!
Rather than appearing as a point of light as all other stars do, the Sun displays a disk half a degree in diameter, large enough to reveal fine detail on its visible surface. But with the Sun being so close and its energy so intense, it must be observed cautiously to prevent it from damaging both our equipment and our eyes. The Sun should never be viewed directly without first exercising precaution (except during the short span of totality during a total solar eclipse), so it is critical to know how to look at the Sun before you try.
Safety First!
Extreme care is necessary when viewing the Sun. The intensity of its light, when focused by even the smallest lens, is strong enough to ignite paper. The retina of an unprotected eye will be instantly destroyed, causing permanent blindness! Never look directly at the Sun without a proper solar-protection filter.
Amateur astronomers usually use one of two methods to view the Sun safely. The first and simplest uses a telescope or binoculars to project the Sun's image onto a white screen. Move the screen closer or farther from the telescope to adjust both image size and brightness. Always try to tilt the screen slightly so that it is not in direct sunlight, but rather in shade, to increase image contrast.
 A second way to look at the Sun is with a solar filter. Proper solar filters are designed to fit over the front of a telescope or binoculars. By dimming the Sun's rays before they enter the instrument, the dangerously high levels of solar radiation and heat are reduced, preventing permanent damage to both observer and optics.
Never place the filter between your eyes and the eyepiece, since it will be quickly destroyed by the magnified solar energy. Many less-expensive telescopes once came with solar filters that screwed into an eyepiece (a few still do!). They are extremely unsafe, sitting right at the focus point of the light rays. The tremendous heat produced there can crack the filter, instantly frying your eye. If you have this kind of solar filter, discard it immediately.
Projection is wonderful for showing the Sun to a group of people all at once, but usually fails to reveal the fine level of surface detail visible with a filter. Filters provide a more detailed view, though they cost more and allow only one person at a time to view.
Another safety warning: Never look through the finder scope when aiming a telescope at the Sun. In fact, you should cover the front of it with an opaque material just to be safe. Crosshairs exposed to sunlight can melt in just a few seconds, and burns or blindness can result from unintentional exposure of your eyes to light passing through the finder.
Instead, keep an eye on the telescope's shadow on the ground as you move the tube back and forth, up and down. When the tube's shadow is shortest, the telescope should be pointed at the Sun.
What Can You See?
Both viewing methods show the Sun's photosphere, the visible layer of the Sun that produces sunlight. Scattered across the photosphere are dark markings called sunspots. Scopes as small as a 60mm refractor will reveal them. A close look shows that larger sunspots have a darker, central area, called the umbra, surrounded by a lighter region called the penumbra. Single spots can form, but usually spots appear in groups and clusters.
Try keeping a daily sunspot log, noting their number, sizes, shapes, and grouping patterns with pencil diagrams. Track their migration across the Sun's face as it rotates on its axis once every 3-1/2 weeks.
Sunspots are not permanent features on the photosphere, but instead, change in shape and size from day to day. Galileo was first to notice that spots move across the Sun. From his observations in the early 17th century, he inferred that the Sun rotates about once a month. It is now known that the Sun's equator takes 25 days to turn once on its axis, while the poles require 36 days.
The number of sunspots is always changing, increasing, then decreasing over an 11-year period known as the sunspot cycle. During peak activity "solar maximum" there may be dozens of sunspots visible at the same time, while at solar minimum, there may be none at all.
The exact cause of sunspots remains a mystery, but astronomers know that they are associated with irregularities in the Sun's magnetic field. These irregularities lower the temperature of the Sun in their immediate area by as much as 1,500 degrees Celsius, forming sunspots. Appearance to the contrary, sunspots are not really dark. They only appear dark in contrast against their hotter, brighter surroundings. In reality, they are hotter than the surfaces of many stars.
Other Surface Features to Look For
Finally, when using a filter to Sun-watch, look carefully along the solar edge, or limb. Notice how it appears slightly dimmer than the center of the disk? This effect, called limb darkening, is caused by our looking through a thicker layer of the Sun's atmosphere toward the edges than toward the center. With sharp optics and a good eye, you might see some small, brighter areas along the limb. These are called faculae, and mark elevated regions of hot gases. Some observers may also notice that the Sun's surface looks "grainy," an effect called granulation. Each granule is a continent-sized cell of heated gas rising from the core of the Sun.
The Sun has a lot to offer those who want to enjoy the science and hobby of astronomy during daylight, too. And with solar max now upon us, it is a great time to meet the star of our sky show.
{ width: 160, height: 160, defaultImage: '', layers: 'Artimg-Sketching' }

Despite the advent of photography and CCD imaging, many amateur astronomers today prefer to chronicle their observations by making eyepiece renderings. Sketching at the telescope, however, does more than create a personal observing record. It hones the observer’s perception skills.
Say you look at a star cluster for a few minutes. In that time you may note whether it is rich or sparse, contains predominately bright stars or dim or a mixture of both. Afterward, you would come away feeling as if you "saw" this cluster.
But let’s say you sketch it. Now you may notice that some of its brighter stars appear reddish; that the chains form a kind of pattern; that what you thought was a sparse cluster actually contains myriad faint members. Instead if five minutes, you may spend half an hour scrutinizing this object, after which you would come away feeling that you "observed" this cluster.
All you need to get started is a red astronomer’s flashlight, an inexpensive sketchpad, and a sharp pencil or two. Before making your sketch, circumscribe a circle—not too small—representing the field of view and note where the cardinal directions fall in the eyepiece. Don’t forget to write down the date and time of the sketch, the telescope and magnification used, and a brief description of seeing conditions.
The eye may not be able to accumulate light like a photograph, but it often can see finer detail. That faint, fuzzy thing you saw last night might not appear as faint or fuzzy once you try sketching it!
{ width: 160, height: 160, defaultImage: '', layers: 'Artimg-AstroBinocs' }

Budding astronomers today have a greater variety of telescopes to choose from than ever before. Some are complex, computerized marvels, while others offer a more basic approach to stargazing. But even with all of these to entice us, none is more versatile than a pair of binoculars. Indeed, when it comes to touring the universe, two eyes are better than one!
Advantages of Two-Eyed Touring
Observing the night sky with binoculars has many advantages. One of the greatest is how friendly and comfortable binoculars feel. Perhaps this is because they can be used either while standing up or sitting down. What could be more enjoyable than casually scanning the heavens with a binocular while lying back in your favorite chaise lounge?
Another great advantage is their portability. Astronomy on the go! While a telescope can be bulky and takes time to set up, binoculars are compact, lightweight, and ready instantly, either for a casual glance at the night sky or for an in-depth study of the universe.
Binoculars show the "real" sky. Astronomical telescopes flip the sky around one way or another, either upside-down, left-to-right, or both. Thanks to both their upright image and wide fields of view, binoculars keep everything as it was meant to be, making it easier to find your way around when comparing the view you see to a star chart.
The wide fields of binoculars also let us enjoy some sky objects that are simply too large to fit into a telescope’s limited field of view. You are probably familiar with some already, such as the Pleiades and the Coma Berenices Star Cluster, but that’s just the start! Dozens of sky sights are better appreciated through binoculars than through telescopes.
Research: Binocular Vision is Better
Beyond aesthetics, research shows that an observer’s visual acuity is greatly improved by using two eyes instead of only one. Binocular vision enhances our sensitivity to subtle differences in contrast, resolution, and color. Some people experience up to a 25 to 40 percent increase in their ability to detect faint objects through a binocular than through a conventional telescope!
That’s a dramatic improvement, but why? Light entering the eye is focused by the lens onto the retina, which converts the image into electrical pulses and sends them onto the brain. The brain then interprets the pulses into the image that we sense. By relying on only one set of pulses (i.e., using one eye), any inconsistencies in the signals will interfere with the final image. With two sets of signals to interpret, however, the brain will merge the pair of electrical messages. The result is the ability to see fainter, lower-contrast objects.
Yes, there are many benefits to touring the universe through binoculars, but perhaps the greatest is that the binocular universe seems much more personal than that viewed through a telescope. By extending our natural, two-eyed view, the cosmos seems drawn to us, and us to it. It is a feeling, a sense of oneness and belonging, that cannot be duplicated any other way.
Choosing Binoculars for Astronomy
The nighttime performance of binoculars depends on the aperture (diameter) of the front (objective) lenses and the magnification provided by the eyepieces. The wider the objective lenses, the more light the binocular will collect and transmit to your eyes. For astronomy, objective lenses of 50mm diameter or larger are recommended. Indeed, 7x50 binoculars (7x power and 50mm objective lenses) are ideal stargazing glasses because they offer plenty of light gathering, good power, bright images, and a wide field of view (which makes it easier to find things). A 10x50 binocular, also a popular size, has the same light-gathering capability but provides higher magnification (10x). The higher magnification may result in a slightly shakier image if you’re holding the binoculars by hand. But for astronomy, it’s advisable to mount the binocular on a tripod anyway, to prevent arm and neck fatigue from prolonged overhead viewing.
Even better for stargazing are "giant" binoculars with 70mm, 80mm, or 100mm objective lenses. Because they admit more light, they can reveal fainter objects. But beware: such binocs are heavy and will require a tripod for support. Big binoculars often come in higher powers such as 14x, 16x, 20x, or even more. With smaller binoculars, high powers like that would yield very dim images, but larger apertures take in enough light to maintain good image brightness as magnification is increased.
Ten Favorite Binocular Targets
1) The Moon — Wow! You’ll see an unbelievable number of craters and rocky mountainous features, all in stunning clarity. Because its surface is so bright, the Moon is best observed during its crescent phases.
2) Jupiter and its Moons — Binoculars will reveal the bright disk of this giant planet, flanked by its four largest Moons, whose positions change nightly.
3) The Milky Way — Scanning along this dense band of stars on a summer night is immensely pleasurable. You’ll see countless clusters, knots, vacant dark patches, and nebulous puffs.
4) Sagittarius Star Clouds — The part of the Milky Way near the constellation Sagittarius ("the Teapot") reveals the richest detail in the night sky. It teems with interesting objects, including the Lagoon, Swan, and Eagle Nebulas, the M24 Star Cloud, and a wealth of open clusters. Use a star chart to help identify them.
5) The Pleiades — This sprawling cluster in Taurus appears as six or seven bright stars to the naked eye, but blooms to several dozen in binoculars.
6) The Andromeda Galaxy — Easy to spot with the unaided eye under a dark summer sky, this majestic "island universe" fills a good portion of the binocular field. You’ll see its bright core and faint disk, perhaps even the dark dust lane around the edge.
7) The Orion Nebula — One of the most beautiful gems in the sky, this expansive winter nebula glows brightly, displaying intricate wisps and tendrils. At its heart is an easily-split double star and a luminous quadruple star, called the Trapezium, which can be resolved with binoculars of 11x or more.
8) The Double Cluster — Residing halfway between the "W" of Cassiopeia and the constellation Perseus, these side-by-side stellar splashes are a true delight to behold in binoculars.
9) Albireo — A bright double star in the head of Cygnus the Swan, notable for its gorgeous color contrast: one star glows yellow, the other blue. Ten-power binoculars will split the pair cleanly.
10) Scutum Star Cloud — This impressive star field contains the compact open cluster called the Wild Duck and some dark, starless patches.
{ width: 160, height: 160, defaultImage: '', layers: 'Artimg-Messier' }
The stars that dot the night sky run the gamut from bright beacons to dim little pinpricks. To get a little more scientific about it, the brightness of a star (or any other celestial object) is described on a scale of "magnitudes". The brighter the star, the lower its magnitude.
Each digit on the magnitude scale represents a difference in brightness of 2.5 times. So, a 1st magnitude star is 2.5 times brighter than a 2nd magnitude star, and a 2nd magnitude star is 2.5 times brighter than a 3rd magnitude star, and so on. Extrapolating further, a star of 1st magnitude is 100 times brighter than a star of 6th magnitude, which is about as faint as you can see with your unaided eyes.
The brightest star is Sirius in the constellation Canis Major; it has a magnitude of -1.4. Polaris, the North Star, is dimmer at magnitude 2.0. There are about 8,500 "naked-eye" stars-stars of 6th magnitude or brighter.
With a telescope you can see much fainter stars-down to 11th magnitude with just a 60mm beginner's telescope, in fact. That's 100 times fainter than what you can see with just your eyes. Not bad!
But sky conditions also affect star visibility. Light pollution, moisture in the air, or atmospheric turbulence can make stars appear dimmer.
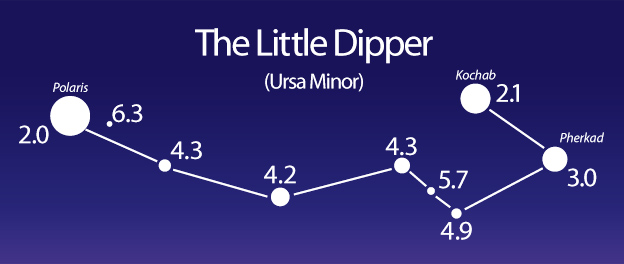
To "rate" your sky conditions on a given night, find the Little Dipper in the northern sky. Compare the stars you see with the chart above, which indicates the magnitudes of some of the stars in the Dipper. What is the dimmest star you can see? That is the naked-eye "limiting magnitude" for that night.
{ width: 160, height: 160, defaultImage: '', layers: 'Artimg-ObservDeepSky' }

One of the most fascinating aspects of the science of astronomy is the concept of distance. Everything in the night sky is so incredibly remote! Even the closest star to our solar system, the Alpha Centauri triple-star system, is 25 trillion miles away. The thousands of other stars that we see every clear night with the naked eye, as well as the millions of stars visible through telescopes and binoculars, are farther still!
Scattered among those distant suns are fascinating sights called deep-sky objects, a general catch-all phrase that includes a wide variety of celestial denizens. These include huge clouds of gas and dust called nebulas, which can be divided further into emission nebulas, reflection nebulas, and planetary nebulas. The first two are associated with stellar birth, while the latter are expanding shells expelled from dying stars. Star clusters form a second grouping of deep-sky objects. Open star clusters are made up of anywhere from a dozen to several hundred young, chiefly blue-white stars. Most of these stellar swarms lie within the spiral arms of our own galaxy, the Milky Way. Globular star clusters, made up of some of the oldest stars known, surround the hub of our pinwheel-shaped Milky Way. Each contains between 100,000 and a million constituents. Finally, beyond our Milky Way, are myriad island universes called galaxies. Some are spiral shaped like our own, while others are elliptical or irregular in appearance.
Messier and NGC: A Lifetime of Treasures
Deep-sky objects are usually designated by catalog numbers, such as M42 or NGC 869. The Messier catalog, is the most famous listing of deep-sky objects. Created by Charles Messier, an 18th-century comet hunter, this catalog consists of 109 of the finest objects the sky has to offer. Finding all of the "M" objects is a great introduction into deep-sky observing, since most are bright enough to be seen even through modest equipment. The New General Catalogue of Nebulae and Clusters, or NGC, was compiled in the 1880's by John Dreyer and based on observations by the father-son team of William and John Herschel. More than 7,800 objects are listed in the NGC, certainly more than enough to occupy the owners of even the largest backyard telescopes for a lifetime.
Spotting deep-sky objects through binoculars and backyard telescopes is one of the most exhilarating, challenging, and thought-provoking aspects of the hobby of astronomy. To help set you off on the right foot, here is our top ten list of splendors. Few celestial sights rival these exciting objects. All are visible through modest amateur telescopes, and most can even be seen with binoculars.
- M44 Beehive Cluster in Cancer (spring)
- M51 Whirlpool Galaxy in Canes Venatici (spring)
- M13 Great Globular Cluster in Hercules (summer)
- M57 Ring Nebula in Lyra (summer)
- M27 Dumbbell Nebula in Vulpecula (summer)
- M8 Lagoon Nebula in Sagittarius (summer)
- M31 Andromeda Galaxy (autumn)
- NGC 869 & NGC 885 Double Cluster in Perseus (autumn)
- M42 Great Orion Nebula (winter)
- M45 Pleiades Cluster (winter)
Beyond the brighter, showpiece members of the Messier and NGC lists are thousands of other deep-sky objects. Most will test your skills as an observer, but that is the thrill of the challenge.
Tips for Deep-Sky Observing
You don't necessarily need to be a veteran amateur astronomer to enjoy deep-sky observing. Here are a few tips from the experts to give you a head start.
- Always try to plan your observing session by knowing what objects you want to look for before venturing outside. By first locating each target object on a star atlas during the day, you can make the most out of the night by heading straight for your preselected sights. List the objects in the order in which they will be found, but limit the selection to no more than a dozen. This way, you won't feel the need to race from one to the next.
- While it is still daylight, check the optical collimation of your telescope. This is especially important with reflectors and Schmidt-Cassegrain telescopes, whose optics may be shifted out of alignment when they are moved. Then, after it is set up at night, check it again to see if it needs any minor tweaking. Also make certain that all optics are clean. A little grime on an eyepiece can make the difference between seeing an object and not.
- Try to find a dark observing site. While it is certainly possible to find deep-sky objects from the center of a city, there is no beating a rural sky. Better still, join a local astronomy club and attend their star parties. Observing is always more fun with a group.
- While some of today's telescopes feature computer-aiming devices, it is best to learn your own way around the sky. Star-hopping is the most popular technique for finding deep-sky objects. All you need, besides a telescope or binoculars, is a star chart of some kind and, for lighting, a red flashlight. Aim your telescope at a known, naked-eye star near the target object, then hop between fainter stars until the telescope is pointed at the target's location.
- Take your time when searching for faint objects and use averted vision. Instead of looking directly at the target area, look off a little to one side of the eyepiece's field of view. This is called using averted vision. The edge of the eye's retina is more sensitive to dim light than the center, which makes it possible to glimpse faint objects. Another trick for spotting difficult objects is to tap the side of the telescope tube lightly, just enough to jiggle the field of view.
- If at first you don't succeed, change eyepieces. It's best to start with low power (20x-50x or so), since images become dimmer at higher powers, and most deep-sky objects are already dim enough! Many people are under the false impression, however, that deep-sky observing can only be done with low magnification. Not true. Medium- to-high power eyepieces are perfect for uncovering small objects like planetary nebulas and galaxies.
- Narrowband light-pollution filters may also prove useful, but really only on emission and planetary nebulas. They enhance the contrast between the object and the background sky.
- Making a record of everything you observe by taking notes and making drawings is a great way to train your eye to see subtle details (and to remember what you see from one observing session to the next). Jot down all important details of the observation, including the object's catalog number, date and time, observing location, telescope and eyepiece(s) used for the observation, sky conditions and any interferences, and a description of the object. Afterwards, keep everything together in a large observing log.
Above all, sit down, relax, and enjoy the view. Dress warmly enough to be comfortable, but not so that you overheat.
As you peer through your eyepiece, remember this: you are seeing an object so distant that its light left there hundreds, thousands, even millions of years ago, and is only arriving here now. You are seeing this cosmic denizen as it was way back then; you're truly looking back in time. Even more amazing, you are not just looking at a photograph ? you are seeing it yourself, with your own telescope! That?s what makes deep-sky observing so exciting!
{ width: 160, height: 160, defaultImage: '', layers: 'Artimg-Astro_Activities' }

There are three "realms" to explore with your telescope. The first is sometimes called the shallow sky: our solar system, including the Sun, Moon, planets, asteroids, and comets. The second is what I call the starry realm: the stars in the immediate neighborhood of our Sun, which make up the familiar patterns of the constellations we see on any clear night. These include double and multiple stars, and variable stars. The third realm is usually called the deep sky: star clusters and nebulae within our own galaxy (the Milky Way), the cloud of globular clusters which orbit around our galaxy, and the countless number of galaxies beyond our Milky Way. All three realms can be studied with any telescope.
The Shallow Sky
The easiest realm for the beginner to explore is that of our own solar system. The Moon is probably the first object at which most people look. It is easy to find, and reveals a rich surface to explore with any scope at any magnification. 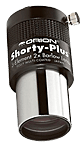 Even at 30x the moon is an enjoyable target. The basic eyepieces supplied with most scopes will provide for fantastic detail.
I usually recommend a Barlow for beginners as it immediately doubles the number of magnifications available with any telescope. It's worth spending a little extra and getting a good quality Barlow, such as the Orion Shorty Plus. Using the example of the SkyQuest XT6, the standard 25mm and 10mm eyepieces will yield 96x and 240x respectively when used with the Shorty Plus. I've found 240x to be the "just right" magnification for the Moon.
The best time to observe the Moon is while it's in its partial phases, because the surface features cast long shadows emphasizing their relief. Full Moon, while pretty to look at, is rather like the desert at high noon: no shadows, so no three-dimensional effects.

Some people find the Moon painfully bright to look at through the telescope. One way to handle this is with a Moon filter such as the Orion Neutral-Density Moon Filter; this will reduce the glare to a comfortable level. Another way is to light up the area where your telescope is located, since the Moon only seems bright because we are viewing it from a dark location in a dark sky. Even using a white flashlight will help a lot. Using a magnification over 200x also cuts the brightness.
The planets are another set of popular targets for amateur astronomers. Beginners often have a hard time spotting them, since they look much like bright stars to the naked eye. A telescope will soon reveal the difference: all the stars in the sky, no matter how large or bright, are so far away from us that they all appear as points of light. All the bright planets immediately show disks even at low magnifications. Venus and Mercury are always close to the Sun, so are mainly visible at sunset and sunrise; neither shows much in the way of surface detail, but will show a clear phase similar to the phases of the Moon. Mars is reddish in color and shows a small disk. Again a magnification of 200x or more is necessary.

Jupiter is probably the most rewarding planet for the amateur. 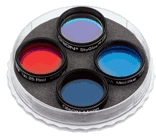 Its four bright moons are easily visible at the lowest magnifications, and can be watched as they change their positions from night to night, and even from hour to hour.
A higher magnification will reveal at least two dark cloud belts on the disk of Jupiter and, if you are lucky, you may catch a glimpse of the famous Great Red Spot, which nowadays is more of a pale salmon color. Colored filters will bring out extra detail.

I've saved the best for last: Saturn is a magnificent sight in any telescope. The rings are easily visible and, if you look carefully, you will spot four or five of its moons circling around it like tiny fireflies.
The Sun itself is also a wonderful object to view, but it requires a special filter and special care to observe safely. I'll talk more about that another time.
The Starry Realm
As I said above, all the stars are so far away that we can only see them as points. However, many stars are either double or multiple. These often provide striking contrasts of color and/or brightness. Two of the finest are visible in the summer: Albireo in Cygnus, a gorgeous pairing of a gold and a blue star, readily seen in any telescope, and Epsilon in Lyra, the remarkable "double double." This looks like a simple double star at first, but as you increase the magnification, you discover that each star in the pair is itself a very close double. Other stars are variable in brightness, and are studied by advanced amateur astronomers.
The Deep Sky
Beyond the stars in our immediate neighborhood lies the deep sky: star clusters, nebulae, and galaxies. Because of their distance, these objects are often faint and hard to see, and usually require a trip to a place with a darker sky, if you normally observe from the city or the suburbs.

Although scopes like Orion's IntelliScopes will guide you to these objects, most other telescopes require a bit of knowledge of the sky and some tools. First of all you will need a good map; Orion's Deep Map 600 Star Chart is a handy "road map" for the sky. Like a road map, it folds into a convenient pocket size, but, unlike most road maps, it is printed on plastic so that it won't get soggy with dew. 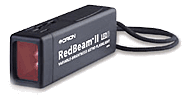 An ordinary flashlight will dazzle your dark-adapted eyes, so a red flashlight is essential for reading your map. I find the Orion RedBeam II flashlight to be particularly handy. Even better is the DualBeam version: it has the same red LEDs, but can switch to white light for observing the Moon and for finding those odds and ends that you drop into the grass at your feet! Both these come with nice lanyards so you can hang them around your neck and never misplace them.
There are so many deep sky objects that it's hard to know where to start. For that, I'd recommend a good guide book, such as Phil Harrington's Star Watch. If you want a better understanding of where all these objects fit in to the universe, I'd also recommend Terence Dickinson's NightWatch, one of my all time favorite books.
With your new telescope and these basic tools at hand, the sky is the limit!
July 2005
Geoff has been a life-long telescope addict, and is active in many areas of visual observation; he is a moderator of the Yahoo "Talking Telescopes" group.
{ width: 160, height: 160, defaultImage: '', layers: 'Artimg-Constellation_Focus' }

For those of us in mid-northern latitudes, it's probably best to start low; the underbelly of Scorpius skirts the horizon, making observation tricky.
The Scorpius Jewel Box is actually two open clusters in close proximity: the top one loose, and the lower one tight. A great binocular target.
NGC 6242 is an open cluster, and NGC 6281 is an open cluster with nebulosity.
C69 or "The Bug Nebula" (aka NGC 6302) is an interesting planetary which looks, at first glance, like a galaxy. The western side of the nebula has a prominent lobe with a tapered end while the eastern side is noticeably blunt.
NGC 6383 is a dim, wide cluster with nebulosity.
M6 is a bright and obvious open cluster which makes for an easy binocular target. Telescopes show rich detail and M6 is seen to be aptly named, "The Butterfly Cluster".
Three globular clusters sit close to Antares. M4 and M80 are well known, but a challenge is NGC 6144 because it sits so close to the 1st Mag red supergiant.
Antares itself is 600 lightyears away and glows with a luminosity 12,000 times greater than our own sun.
This area rewards binocular users generously. There are seemingly endless textures, patterns, star clusters and odd little clouds, all of which are well within the grasp of even basic optical aids.
July 2005
{ width: 160, height: 160, defaultImage: '', layers: 'Artimg-Astro_Activities' }
Late summer is the perfect time to begin exploring the deep sky: the objects beyond our solar system and local stars. Under a dark sky, the Milky Way stretches from the southern horizon to overhead and beyond to the northern horizon. As we look towards Sagittarius, we can see the most brilliant gems surrounding the center of our galaxy.
The birth of stars takes place in diffuse nebulae, clouds of glowing gas laced with dust, deep within our galaxy. After the dust and gas disperse, we are left with galactic star clusters, sometimes called open clusters. The last gasps of dying stars are seen as ghost-like planetary nebulae, looking like stellar smoke rings. On either side of the disk of our mighty galaxy are hordes of densely packed globular clusters, each containing a hundred thousand stars or more. And beyond our galaxy are countless more galaxies. Where to start?
Messier Hunting
Many amateur astronomers follow in the footsteps of Charles Messier, an 18th century observer of comets who made a catalog of objects in the sky which might be confused with comets, to make his searches easier. His catalog of 110 objects includes the brightest and best of the whole cosmic zoo of deep sky objects. Most astronomers refer familiarly to these objects by their "M numbers": the numbers Messier gave them in his list, though many of them have other names.
Take the Tour
If you have a computerized telescope, such as the Orion IntelliScope, you can call up "sky tours" for any particular night in the year. The IntelliScope tour for August starts out with two beautiful galactic clusters, the 6th and 7th objects cataloged by Messier, 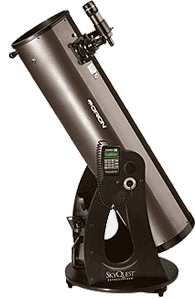 Orion XT10 Intelliscopeknown as M6 and M7. Both these clusters had been described by Ptolemy in the 2nd century as "small clouds," but your telescope will resolve them into hundreds of tiny stars.
The next three objects on the tour are three of the finest diffuse nebulae in the sky: the Lagoon Nebula (M8), the Swan Nebula (M17), and the Trifid Nebula (M20). You have probably seen colorful images of all three made with large telescopes. The view through an amateur telescope is quite different. Our eyes are not sensitive to color in dim light, so we see these nebulae as shades of grey against a black background. In fact, if we try to observe them in the light polluted skies of a city, or on a bright moonlit night, we may not see them at all! These are true "nebulae," the Latin word for cloud, although they are clouds not of water vapor, but of hydrogen and oxygen gas, glowing in response to the bright young stars within them, to which they have just given birth.
Two more objects in the August tour represent the other end of a star?s lifetime. The so-called "planetary nebulae" are shells of gas blown off by stars towards the very ends of their lives. The Ring Nebula (M57) is a tiny smoke ring; you may need to use at least 100x magnification to see that it is a perfect little oval ring, and not a star. The Dumbbell Nebula (M27) is much larger and more diffuse than the Ring; it looks like a small puff of smoke.
The next two August objects are globular clusters, M13 and M92, both in the constellation of Hercules. Unlike galactic clusters, which are relatively small and located within our galaxy, globular clusters are much larger, denser, and located above and below the disk of our galaxy. In a small telescope, they appear like smudges of light, but as the aperture of the telescope increases, more and more of their thousands of stars are resolved into tiny pinpoints of light.
The August tour ends up with another open cluster, M11, and two of the finest multiple stars in the sky: the brilliantly colored Albireo and the Double-Double in Lyra. Use a high magnification on the last, and you will see that each of the "stars" in the double is in fact a very close pair, four stars in all.
You may have noticed that there are no galaxies on the August tour. That?s because our own galaxy, the Milky Way, dominates the August sky, and effectively blocks the light from lesser galaxies. On the whole, galaxies are much more challenging than the objects I?ve discussed here, and are best left until you have more experience with seeing the denizens of the deep.
Nebula Filters
As I mentioned above, planetary nebulae and diffuse nebulae may be hard to see under less than perfect conditions, but there is a way of enhancing their visibility. Both types of nebulae give off light of very specific wavelengths. 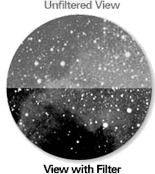 If you place a special filter in front of your eyepiece which only passes the light the nebulae give off, they will shine through, while the polluting light is dimmed. Such filters don?t make nebulae brighter; they just make everything else dimmer. The Orion UltraBlock is such a filter; I have used one for years to observe faint diffuse and planetary nebulae, and also to observe fine structure within the brighter nebulae. Orion has recently introduced a new O-III filter, which is more narrowly tuned to the two main emission lines of oxygen in these nebulae.
I put this new filter to the test on a recent night, using the objects on the August tour. To make matters tough, I made my observations with a bright 10-day-old Moon right in the middle of Sagittarius! The Lagoon Nebula was only 5 degrees from the Moon. I didn?t expect to see much, but the brighter western half of the nebula was faintly visible without a filter using the 25mm eyepiece in the Orion XT6. Using the UltraBlock made the western half much clearer, but switching to the O-III filter made the elusive eastern half plainly visible too. The Trifid Nebula was overwhelmed by the Moon (7 degrees away) without a filter and even with the UltraBlock, but could be seen as a faint glow with the O-III filter. The Swan Nebula was farther away from the Moon, 13 degrees, and was visible without a filter as a vague glow. Its swan shape became visible with the UltraBlock, and stood out very sharply with the O-III filter. The Dumbbell and Ring Nebulae were both about 60 degrees away from the Moon, and so not affected much by its light. Even so, the Dumbbell changed from a diffuse glow to a clear two-lobed shape as I switched to the UltraBlock and then the O-III. The Ring Nebula was the only object where I preferred the unfiltered view. Part of the beauty of the Ring for me is how it sits as an alien ring amidst the stars surrounding it. The filters dimmed the stars so that the ring appeared in isolation without its context.
 So, it's clear that the O-III filter offers enhancement of nebulae over the older UltraBlock. However, the UltraBlock would still be my first choice for scopes smaller than 8 inches aperture, because of the strong dimming effect of the O-III filter. The test objects I studied are among the brightest nebulae in the sky, so they were still visible in the 6 inch scope despite the dimming effect.
As a final test, I took a look for the famous Veil Nebula in Cygnus, the aftermath of an ancient supernova explosion. Even though it was over 70 degrees away from the Moon, it was totally invisible without a filter and with the UltraBlock. But with the O-III, it formed a huge glowing arc across the sky, overflowing my widest field eyepiece.
Deep sky filters are standard equipment in my astronomer's toolbox.
August 2005
{ width: 160, height: 160, defaultImage: '', layers: 'Artimg-Tips_n_Tricks' }

In an earlier article, I wrote about exploring the sky using the a computerized telescope's tour feature. But some telescopes aren't equipped with computerized tours to guide the beginner through the sky. Here is a guide to finding interesting objects in the sky if you don't have computer assistance.
Seeing Versus Finding
There's a difference between finding the location of an object and actually seeing it. Many of the objects we amateur astronomers look at are too faint to be seen with the naked eye. Some are too faint to be visible in our scope's finder. Some may be so faint as to be a challenge to see in the main telescope. Seeing can be difficult. Finding an object, on the other hand, involves pointing the telescope at exactly the spot in the sky where the object is located. This can be done with a computer, or manually using a technique called starhopping. It's not necessary to be able to see an object to point at it with the telescope.
Many beginners make the mistake of looking for objects which are easy to find (because they are close to bright stars or familiar constellations) but which are very hard to see, because they are very faint. For example, many go hunting for the galaxy Messier 101 in Ursa Major because it is located close to two bright stars in the handle of the Big Dipper. Unfortunately, M101 is one of the most difficult objects in Messier's catalog to see because it is large in size and very faint, so its dim light is spread over a large area. Unless you have very dark skies and a trained eye, you can be staring right at M101 and never see it! So it's important, when you're starting out, to go for objects which are both easy to find (located near bright stars or constellations) and also easy to see (bright clear objects, such as double stars and star clusters). Leave the dim galaxies (for the most part) until you have more experience.
Starhopping
Starhopping involves pointing your telescope using known guideposts in the sky: bright stars and constellations. This in turn requires some familiarity with the stars and their grouping. When you first look up into a starry sky, especially from a dark rural site, the view can be overwhelming. You wonder, "How will I ever be able to make sense of all these stars?" Learning your way around the starry sky is very much like learning your way around an unfamiliar city. It helps to have a map. It helps to have a familiar landmark or two to get your bearings. And it also helps to have a friend to show you the way. For a map, you have software programs like Starry Night� which will give you an overview of the territory. You may know a few "landmarks" in the sky to get you going, such as the Big Dipper, Orion, a bright planet, or the Moon. An astronomical friend is also very helpful in the early stages, someone who knows the stars a bit better than you do and can point out some landmarks. You may know such a person already, or you may need to find one by joining a local astronomy club. Although I'm not out there under the stars with you, I hope some of my suggestions here will also help you get started.
The first step is to print out a chart or two to take outside with you. Many of the charts you find in books or magazines are less than helpful for two reasons: they try to show all the sky, and they show it on too small a scale. I prefer to use charts which show only part of the sky, but which are on a large enough scale to approximate the actual spacing of the stars across the sky.
 Go out with this chart and face east. The top of the chart is overhead, the bottom is the horizon. The most obvious object in the eastern sky is Mars, glowing brightly about a third of the way from horizon to overhead. But our targets for tonight are farther away. As I said earlier, the Big Dipper is a poor starting place for deep sky hunting because it lacks bright objects. Let's look instead at Cassiopeia, a constellation which lies almost directly opposite the Big Dipper in the northern sky. In this chart, it's about two thirds of the way from horizon to zenith, an obvious lopsided W shape, visible even under city skies. Once you've identified Cassiopeia, you have some landmarks which will let you point your telescope at a variety of interesting objects.
Besides your star chart, you will need a red flashlight to read it. You will also find it very helpful to have a pair of binoculars with a field of view similar to that of the finder scope on your telescope. I find 10x50 binoculars particularly useful for this. Binoculars let you practice the "hop" in a more natural way than the view through the telescope's finder, which is usually upside down. After I've tried a "hop" a few times with binoculars, I'm ready to repeat it with the telescope finder.
Two Double Stars
Let's start by tracking down a couple of double stars. Many beginners are unaware that many of the stars which appear single to our naked eyes are double or multiple in a telescope. They are great targets for beginners because they are easy to see as well as easy to locate.
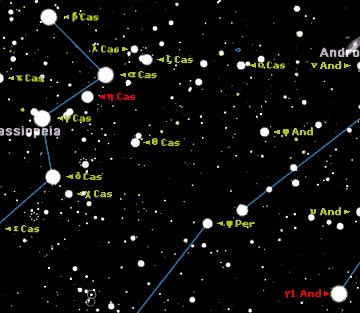 The five bright stars in Cassiopeia which mark the W are named, from top to bottom in this view: Beta β, Alpha α, Gamma γ, Delta δ, and Epsilon ε. We can find our first double star, Eta η Cassiopeiae, by looking a little less than half way between stars Alpha a and Gamma γ. You can see it there in the chart to the right, marked by the Greek letter Eta η. Place the crosshairs in the finder of your telescope on that star, and when you look through the telescope you will see it is actually two stars: a bright yellow one and a fainter red one.
The second double star is a bit farther afield, but illustrates the principles of starhopping. Look at the two top stars of the W, Beta β and Alpha α. Use the distance between these two stars as your "measuring stick." Extend the line from Beta to Alpha by two stick lengths to the lower right, which will take you to the star 51 Andromedae. Continue in the same direction about half the distance again, and you will reach a brighter star, Gamma γ Andromedae. This is our target: in the telescope it will appear as a double star, the two stars a bit closer than Eta η Cassiopeiae, and this time colored gold and blue.
Four Star Clusters
Now let's go after some deeper targets, some of the beautiful star clusters located in or near Cassiopeia. First take a close look at Delta δ Cassiopeia (second from the bottom in the W). In binoculars you will see a fairly bright star below and to the right of it, Chi χ Cassiopeiae. Use the line between Delta and Chi as the base of an equilateral triangle hanging below them, and put the crosshairs of the finder on the lower angle of this triangle. Through the telescope's eyepiece you will see a compact little star cluster, number 103 in Messier's catalog. Imagine a tall thin isosceles triangle on the opposite side of the same baseline, put your crosshairs there, and through the telescope you will see the star cluster NGC 457. It has two bright stars in it which many people see as eyes. Traditionally those are the eyes of an owl, the rest of the cluster forming the erect body of the owl with wings outstretched. But to our modern eyes, it looks rather like the character E.T. in the famous movie. So this cluster is called by some the Owl Cluster and by others the E.T. Cluster!
Let's go hunting farther away. This time use the line joining Gamma and Delta Cassiopeia as your measuring stick and pointer. Go twice its length downward towards the horizon and you should see a fuzzy patch through your binoculars and finder. Through the telescope you will see the Double Cluster in Perseus, one of the wonders of the night sky in any telescope. If you keep going in the same direction towards the horizon you will encounter a line of three bright stars, the last of which is at the center of a little known star cluster, Melotte 20. The trouble with this cluster is that it is so close to us that its stars are spread wide across the sky, too wide to fit in most telescopes, so that they can only be viewed with binoculars or the naked eye. This is one of the star clusters closest to our Sun, also called the Alpha Persei Moving Cluster because the star Alpha α Persei is at its center, and all the stars share a common proper motion across the sky.
And a Galaxy
Now that you've become better trained in starhopping, I'm going to end by giving you a special treat. I said earlier that most galaxies are difficult for beginners to see, but one exception is the Andromeda Galaxy, quite close to Cassiopeia. Here's how to find it. Look closely at the top three stars of Cassiopeia, Beta, Alpha, and Gamma. If you look closely, you'll see that there's a fourth star, Kappa κ Cassiopeiae forming a rather lopsided square with the three brighter stars. Use the line from Kappa to Alpha as your measuring stick, and follow the line from Kappa to Alpha two and a half lengths to the right. Through binoculars and your finder you should see a faint fuzzy patch. Through the telescope you will see a much larger fuzzy patch. Don't expect to see its spiral arms or much else (unless you have very dark skies and a large telescope), but be aware that the light you are seeing is coming from more than two million light years away—that's part of the magic of astronomy!
Geoff has been a life-long telescope addict, and is active in many areas of visual observation; he is a moderator of the Yahoo "Talking Telescopes" group.
{ width: 160, height: 160, defaultImage: '', layers: 'Artimg-Astro_Activities' }
I'm a sucker for action. I love change. My favorite planet is Jupiter because of its rapid rotation, ever-changing moons, and volatile cloud features. I love watching Near Earth Asteroids and comets as they move across star fields. Recently I've become addicted to watching solar flares and prominences in rapid action with my solar telescope. But most of all, I love to observe variable stars.
All stars vary in brightness to some degree. Even our Sun, which seems so stable, changes its brightness as more or less of its surface is obscured by sunspots. But there are stars in the sky that undergo vast changes in brightness and color. Many are highly unpredictable in their behavior, and need years of study to uncover the mechanisms that drive them.
The Variable Zoo
The most famous are the novas and supernovas which suddenly shoot up from obscurity to prominence. Supernovas are relatively rare in our neighborhood. The last one was over 400 years ago in 1604. Novas are more common, several being observable in any given year.
Some stars appear to vary for purely mechanical reasons. These are called eclipsing binaries: two stars in a close orbit where one star eclipses the other, as regular as clockwork. Algol in the constellation of Perseus is a famous example of an eclipsing binary.

Other stars expand and contract slowly because of processes going on within them. The most common of these "pulsating variables" are long period variable stars like Mira in the constellation Cetus. Mira is larger in diameter than the orbit of Mars, and changes size, brightness, and color over a period of just under a year. It ranges over nearly six magnitudes in brightness, meaning that at its brightest, it is a hundred times brighter than when it's at its dimmest. Another group of pulsating variables is called the Cepheids, named after the star Delta Cephei. These have much shorter periods than the Miras, ranging from 1 to 70 days, and their period is closely tied to their luminosity, which has led to their use as measuring sticks to determine the distance of globular clusters and galaxies.

Another group of variable stars is called "cataclysmic variables." These include novas, supernovas, and the so-called "dwarf novas." These last are the stars that interest me the most because they show the most action. My favorite is SS Cygni (TCY 3196-723-1), located close to the open cluster Messier 39. This star normally sits around twelfth magnitude, just visible in a small telescope, but every few weeks it shoots up unpredictably to about eighth magnitude. If you're lucky enough to catch it in outburst, you can actually see it get visibly brighter. Stars like SS Cygni are actually close double stars consisting of a red dwarf and a white dwarf. The white dwarf is surrounded by a disk of gas stolen from the red dwarf which is drawn down into the white dwarf where it ignites, causing the sudden outburst in brightness.

Observing Variable Stars
Professional astronomers realized over a century ago that there were more variable stars in need of study than they could handle, so they enlisted the aid of amateur astronomers to monitor the brightness of a number of stars well suited to amateur observation: stars which changed in magnitude over a wide range and which took a long period to complete their cycle of brightness. For many years this work required no more than a telescope and a good set of charts, and such simple visual observations are still useful today, although nowadays amateurs have access to photoelectric photometers and CCD cameras which are capable of studying just about any star. The American Association of Variable Star Observers acts as a central clearing house for all sorts of amateur variable star observations, providing instruction, charts, and other support, and giving amateurs a simple online system for recording their observations.
Why observe variable stars? Mainly because it's fun! You never know from night to night what you are going to find—remember what I said about action? No special equipment is needed other than a set of star charts which plot the variable star and give the brightness of non-variable stars around it, which are used to estimate the brightness of the variable.
If you are a deep sky observer, you already have one of essential skills of a variable star observer: you know how to locate objects in the sky. It doesn't matter how you do it. I used traditional starhopping for several years, but now I use my Orion SkyQuest XT6's IntelliScope setting circles to locate my variables. Once you've located the variable, you estimate its brightness as compared to other stars on the chart, and record the time of the observation. With a little practice you can make estimates to within a tenth of a magnitude. You can then log onto the AAVSO's web site and enter your observation. Within ten minutes it will be moved into their database of over ten million observations, and you can see your observation on a light curve along with those of hundreds of other observers around the world. What could be neater?!
Unlike most of the observations amateur astronomers make, variable star observations have a serious side. By making a numerical estimate of the brightness of a star at a particular point in time, you are logging a piece of scientific data. The AAVSO maintains records online of every observation submitted to them over the past hundred years, keeping the records available to researchers around the world.
On a typical night, I'll observe about a dozen stars from "my" list of about sixty stars visible at different times of year. I've added the database of the AAVSO's stars to my copy of Starry Night, and use this to prepare finder charts and plan what stars I'm going to observe on a given night. This database can be downloaded from:
- Macintosh:
AAVSO.sit from StarryNight.com - Windows:
AAVSO.zip from StarryNight.com
These files are in compressed format. After you have uncompressed them, you will find both the compiled databases and the text files which they were built from. Move the files ending in ".ssd" to the "Starry Night Pro 5/Sky Data" folder. Macintosh users will have to Ctrl-click on the Starry Night� Pro 5 application and select Show Package Contents to see the Sky Data folder. The next time you run Starry Night� Pro, you should see additional options in the menus for these datasets.
The biggest challenge in finding a variable star is that you're looking for something that may be quite bright, or may be below the magnitude limit of your telescope, totally invisible to you. So what you look for is the star field, the pattern of stars surrounding the variable. Once you've found the field, you then check to see how bright the variable is. You then consult your AAVSO charts to see which stars are closest in brightness to the variable. Comparison stars on the charts are marked with their brightness to the nearest tenth of a magnitude. Because a decimal point might be confused with a faint star, they are left out, so that a 9.7 magnitude star is marked "97" and a 11.4 is marked "114" on the chart. You try to find a couple of stars, one slightly brighter than the variable, one slightly fainter, and then estimate where the variable falls between them.
Equipment for variable star observing
For visual observing as I have described above, the equipment needs are very simple. There are many variable stars within range of a pair of small binoculars, and some that can be observed with the naked eye alone. On the other hand, access to a large telescope lets you follow stars that become very faint at minimum.
I have found it advantageous to use eyepieces with a wide field of view, since they show me more of the sky at any given magnification, and let me see more comparison stars without having to move the telescope about. My favorites are Tele Vue Naglers and Panoptics, and Orion Stratus.
My current strategy is to survey "my" variables using my Orion SkyQuest XT6 IntelliScope. I've programmed the controller with the coordinates of my variables, so I can quickly move through the list. Any variables which are currently too faint to be observable with the 6", I revisit the next night with my larger 11" Dobsonian.
Where to start?
If you're still not sure whether variable star observing is for you, I'd recommend reading Starlight Nights by Leslie Peltier (Sky Publishing). Peltier was the finest variable star observer of the 20th century, and his book is an entertaining introduction to a wonderful man and his love of the stars. It's probably my very favorite astronomy book.
The AAVSO web site includes everything you need to get started. It has a complete observing manual
I'd recommend starting on stars that are easy to find and visible all year round, such as these stars in and around the Big Dipper.
A final warning though: variable star observing is highly addictive. Variable star observers probably spend more time at the eyepiece than any other amateur astronomers because, unlike deep sky or planetary observing, they are not dependent on dark skies or steady seeing. For years I carried out regular variable star observing every clear night from the middle of a large city, even when the Moon was full. The only thing that can stop you is clouds!
January 2006
Geoff has been a life-long telescope addict, and is active in many areas of visual observation; he is a moderator of the Yahoo "Talking Telescopes" group.
{ width: 160, height: 160, defaultImage: '', layers: 'Artimg-Astro_Activities' }
The poet Walt Whitman said, "I do not want the constellations any nearer, I know they are very well where they are." But where are they, exactly? Constellations cover the sky. They also look flat — the stars all appear to be at the same distance. Appearances can be deceiving.
We often refer to stars that look bright as "big," and to their fainter companions as "small" stars. Are the bright ones really big? Are the faint ones actually small? Maybe the bright ones are closer and the fainter ones are farther away. Could it possibly be any other way? This is astronomy so the answer is "yes!"
The distance to any celestial object is one of the most important things we can know about it. Without that single critical piece of data, everything else is almost meaningless. To understand the structure and organization of things celestial, we must know distances. The Hipparcos satellite has provided us with accurate and precise stellar distances, revolutionizing our picture of the universe.
With Starry Night� it's easy to find distances to individual stars. In doing so, we discover that some nearby stars are dim, and some bright stars are nearby. We also find that some of the brightest stars are very distant. When a distant star is also a bright star, it means the star is highly energetic; shining with hundreds or thousands of times the output of our Sun!
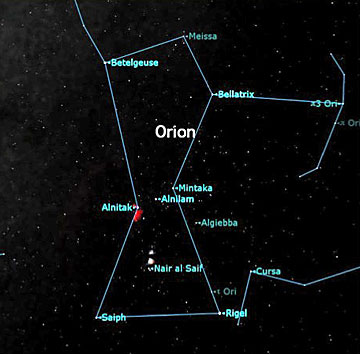 Figure 1: Some stars in the constellation Orion are much further away than others.
At this time of year, a prominent constellation is Orion (figure 1). Orion hosts some of the brightest stars in Earth's sky. Are they near or far? Table 1 tells us Orion's stars lie at distances ranging from 243 to 1,360 light years. Rigel is brightest with a magnitude of 0.2. (Magnitude describes brightness. The lower the number, the brighter the star.) Rigel is 777 light years away and 51,000 times as bright as the Sun. Bellatrix is closer at 243 light years, fainter at magnitude 1.6, and only (!) 6,000 times as luminous as our Sun.
Table 1. The Stars of Orion
| Star | distance (lightyears) |
Mag | Times Brighter Than our Sun |
| Betelgeuse | 429 | 0.4 | 59,000 |
| Bellatrix | 243 | 1.6 | 6,000 |
| Meissa | 1069 | 3.4 | 12,000 |
| Alnitak | 826 | 1.7 | 47,000 |
| Alnilam | 1360 | 1.7 | 112,000 |
| Mintaka | 919 | 2.3 | 28,000 |
| Algiebba | 906 | 3.3 | 21,000 |
| Saiph | 724 | 2.1 | 19,000 |
| Rigel | 777 | 0.2 | 51,000 |
Table 2. The Stars of the Southern Cross
| Star | distance (lightyears) |
Mag | Times Brighter Than our Sun |
| Gacrux | 88 | 1.6 | 1,300 |
| Delta Crucis | 364 | 2.8 | 3,200 |
| Acrux | 321 | 0.8 | 30,000 |
| Mimosa (Becrux) | 353 | 1.3 | 21,000 |
| Rigel Kentaurus (Alpha Centauri) |
4.4 | -0.04 | 2 |
| Hadar | 526 | 0.6 | 79,000 |
| Epsilon Centauri | 377 | 2.3 | 4,600 |
Table 2 shows information for stars in the Southern Cross (figure 2). Notice Rigel Kentaurus, also known as Alpha Centauri, our nearest stellar neighbor. It is bright at magnitude -0.04, and lies 4.4 light years away. But it has only twice the luminosity of the Sun. Now you know why we can't begin to understand stars until we know their distance.
 Figure 2: The stars of the Southern Cross and Southern Pointers vary in distance, but not over as great a range as those of Orion.
To really get a grip on stellar distances, we have to build a scale model. Try it. It's easy! Assume your doorstep is the Sun, and one step represents one light year. Start walking the distances to the stars in the Southern Cross or Orion.
Four steps will take you to Alpha Centauri. The Southern Cross stars will have you strolling from 88 to 364 steps, or roughly 70 to 300 metres. Orion will give you more exercise. You'll take 243 steps (200 m) to get to Bellatrix. Walking to Alnilam will take 1,360 steps. By then you'll be about 1 km from your door!
Try this with friends or a school class. With one person for each star, you'll soon have a 3-D constellation model that is definitely not flat.
The stars in a constellation are not bound to one another. They are random groupings of stars upon which we have imposed recognizable patterns. Different cultures have created different (and equally valid) constellation groupings. Astronomers have established 88 officially recognized constellations. These are based on the classic Greek and Roman star patterns, with boundaries defined by a celestial coordinate system.
A constellation's stars may lie in the same direction on the sky, but they are not connected to one another. Any star visible to the unaided eye can be anywhere from a few to a few thousand light years distant. The constellations are indeed very well where they are: extending far into the reaches of the starry night sky. Enjoy their distant light!
February 2007
{ width: 160, height: 160, defaultImage: '', layers: 'Artimg-Astro_Activities' }
Getting a new telescope, especially for the first time, is a thrilling experience. A telescope or binoculars of any size will open the universe to you. Here then is a list of bright and easy objects to help you get acquainted (or perhaps re-acquainted) with your telescope.
Tip: Use Starry Night� to find and print out star charts for these objects.
Our Solar System

The Moon
Many exquisite details can be seen on the lunar surface with nothing more than the smallest of telescopes or binoculars. In fact, no other object in the solar system will show you more detail than the Moon.
Seasoned Moon watchers know that the best time to observe the Moon's features is when they are near the terminator (the line that separates the lit and unlit portions of the Moon). The interplay between light and shadow bring out a three-dimensional aspect to the craters and ridges that is lost once the area becomes fully lit.
The Moon is the ideal first target for a new telescope user — it is easy to find and the view will not disappoint.
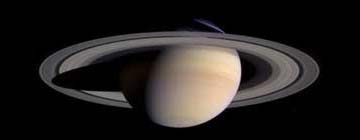
Saturn
It will blow you away — your mind that is. To earthbound eyes, Saturn is a bright orange star. Binoculars will accentuate Saturn's color and show its largest moon Titan, an 8th magnitude object.
But to see Saturn in all its glory you'll want to view it through a telescope. Share this moment with others; it's one of the greatest pleasures in amateur astronomy!
A magnification of at least 30X is required to see Saturn's rings clearly. The first thing you'll notice is how the ring system seems split into two. The void between rings A and B is named the Cassini Division and stands out as a dark dividing lane that is easily seen in small telescopes. Ring C, known as the Crepe ring, lies inside rings A and B and is more challenging to detect. Saturn's fainter outer rings cannot be seen with a small telescope.
You can find Saturn well positioned for viewing in the eastern sky at around 11 P.M. from mid-northern latitudes.
Within Our Milky Way Galaxy
Perseus Double Cluster
The night sky is full of jewels — in this case a pair of sparkling earrings. The Perseus Double Cluster (NGC 869 and 884) is made up of a pair of bright and large open clusters embedded in the faint glow of the Milky Way. The double cluster is visible without optical aid but binoculars are required to separate the two clusters, which are half a degree apart. A telescope gives the best view of the Double Cluster, with many stars of differing brightness visible. NGC 869 is more tightly packed than NGC 884. Both clusters are about 7000 light years away and are part of the Perseus arm, one of the spiral arms of our Milky Way. The two clusters are a few hundred light years apart.
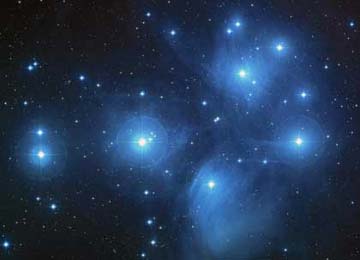
Pleiades Cluster (M45)
The Pleiades is the most famous of all open star clusters, containing around 500 members set against a black velvet sky. This young and bright open cluster is easily visible to the unaided eye and resembles a smaller version of the Big Dipper. At least 6 hot blue stars are readily visible and keen eyed observers can see more. Because of its large diameter, 2 degrees, M45 is best seen in binoculars (but a telescope will help you see the fainter members).
In some ancient cultures, ceremonies to honor the dead were held on the day when the Pleiades reached its highest point in the sky at midnight (this is around Halloween). Ancient Aztecs believed the Pleiades would be overhead at midnight the day the world ended.
Messier 41 (M41)
M41 is an open cluster about half a degree in diameter. 4 degrees to the north of M41 is Sirius, the brightest star in the sky. M41 is a naked eye cluster containing several bright stars, the brightest of which is a reddish star located near the center. The cluster is best seen under low power in telescopes. It was possibly noticed by Aristotle around 325 BC.
Orion Nebula (M42)
Easily visible to the naked eye as a fuzzy patch in the middle of Orion's sword (the ancients depicted the constellation of Orion as a Hunter). What we call the Orion Nebula is just the central part of a larger cloud that stretches across several hundred light years. Four bright stars in a parallelogram near the nebula's center form the Trapezium. These hot young stars heat up the surrounding gas clouds, causing the nebula to emit light.
Try to view the Great Orion Nebula on every possible occasion with any type of optical instrument as well as with the naked eye. The wealth of detail visible in this nebula is simply outstanding. Intricate wisps, shapes and the contrast between brighter and darker regions never ceases to amaze. A dark sky far away from city lights will help.
Outside Our Galaxy
Andromeda Galaxy (Messier 31)
The Andromeda Galaxy is one of the most magnificent objects in the night sky and undoubtedly the most famous galaxy outside our own Milky Way. Easily visible as a hazy patch to the naked eye, the galaxy covers as much of the sky as 5 full moons put together. Binoculars will show Andromeda in its entirety with a clear brightening towards the center. Binoculars will also show two of Andromeda's companion galaxies, M32 and M110. Careful observation of the nuclear region with a telescope will reveal faint dust lanes and other structures.
M31 was once thought to be a nebula inside our galaxy, but in 1923, astronomer Edwin Hubble showed that it lies outside the Milky Way. M31 is now thought to be about 2.9 million light years away. It is over 150 000 light years across, and has a mass 1.2 trillion times that of our Sun.
January 2006


Why Buy From Orion
- 30 Day Money Back Guarantee
- Safe & Secure Shopping
- Next Day Shipping
- Easy Returns
- Sale Price Guarantee
- Free Technical Support

- 800-447-1001
- Telescope.com
- © 2002- Orion Telescopes & Binoculars All rights reserved
- DMCA/Copyright
- Terms and Conditions
- Privacy & Security
![]()


About Orion Telescopes & Binoculars
Since 1975 Orion Telescopes & Binoculars has been offering telescopes for sale direct to customers. Now an employee-owned company, we pride ourselves on an unswerving commitment to best quality products, value and unmatched customer care. Our 100% satisfaction guarantee says it all.
Orion offers telescopes for every level: Beginner, Intermediate, Advanced, and Expert. From our entry level beginner telescopes for amateur astronomers to our Dobsonian telescopes to our most advanced Cassegrain telescopes and accessories, you can find the best telescope for you. Because we sell direct, we can offer you tremendous value at a great price. Not sure how to choose a telescope? Orion's Telescope Buyer's Guide is a great place to start.
Orion binoculars are known for quality optics at a great price. We offer binoculars for every viewing interest, including astronomical binoculars, compact binoculars, waterproof binoculars, birding binoculars, and sport and hunting binoculars.
Orion's telescope and astrophotography accessories will enhance your telescope enjoyment without breaking the bank. Expand your viewing experience with accessories ranging from moon filters to power-boosting Barlow lenses to advanced computerized telescope mounts. Capture breathtaking photos with our affordable astrophotography cameras. And when you're stargazing, Orion's telescope cases and covers, observing gear, red LED flashlights, astronomy books and star charts will make your observing sessions more convenient, comfortable and meaningful.
At Orion, we are committed to sharing our knowledge and passion for astronomy and astrophotography with the amateur astronomy community. Visit the Orion Community Center for in-depth information on telescopes, binoculars, and astrophotography. You can find astrophotography "how to" tips and share your best astronomy pictures here. Submit astronomy articles, events, & reviews, and even become a featured Orion customer!
sales, new products, and astronomy.