


{ width: 160, height: 160, defaultImage: '', layers: 'Artimg-BBC_StarsOfWinter' }


![]() Orion is proud to partner with BBC Sky at Night Magazine, the UK's biggest selling astronomy periodical, to bring you this article as part of an ongoing series to provide valuable content to our customers. Check back each month for exciting articles from renowned amateur astronomers, practical observing tutorials, and much more!
Orion is proud to partner with BBC Sky at Night Magazine, the UK's biggest selling astronomy periodical, to bring you this article as part of an ongoing series to provide valuable content to our customers. Check back each month for exciting articles from renowned amateur astronomers, practical observing tutorials, and much more!
Astronomer Will Gater delves into the incredible astrophysics behind some of the season's most famous luminaries
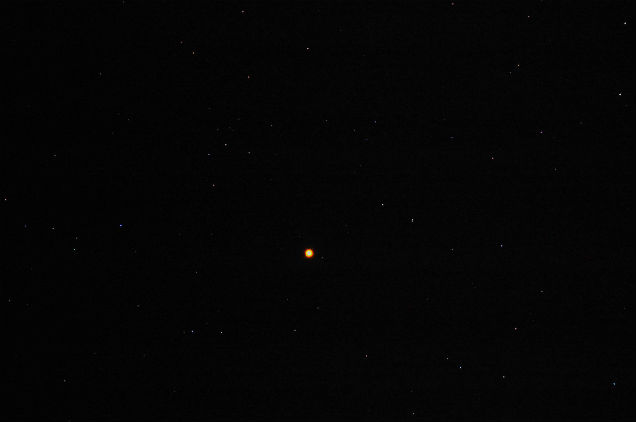
Betelgeuse by Reid H.
Betelgeuse
Of all the stars in the winter sky, Betelgeuse (Alpha Orionis) is arguably the one that prompts the most excitement and intrigue. To the eye it looks like a sparkling, orange-hued point of light, but decades of scientific study — some conducted using the most powerful astronomical facilities in existence today — have shown that a thrilling story is unfolding far away.
"Betelgeuse is a red supergiant with a radius in optical light of about 4.5 astronomical units — in other words, almost the size of the orbit of Jupiter," says Dr Anita Richards, who has studied the star as part of her research at the University of Manchester's Jodrell Bank Centre for Astrophysics.
Betelgeuse hasn't always been this bloated, ruddy leviathan however. It was once a hot O-type star, like Mintaka in Orion's Belt is. It would have had a blueish-white color and would have also been more massive than it is now — perhaps around 20 times the mass of the Sun.
"Such massive stars have much hotter cores than the Sun with faster nuclear fusion, using up most of their hydrogen [in] a few million years," explains Richards. "Fusion [of] heavier elements such as helium and carbon takes over, but the outer layers cool and expand; the increase in size means that the luminosity grows as the star becomes redder."
It's this process that has created the Betelgeuse we know today, but it's what will happen at the end of its life that excites many astronomers. "It will probably take at least a hundred thousand years for Betelgeuse to exhaust [its] fuel for nuclear fusion," says Richards. "Finally when it runs out, its inner layers are no longer supported by radiation pressure and collapse, releasing roughly as much energy in an instant as the Sun radiates in 8,000 million years — a supernova."
This violent detonation will be a truly breathtaking sight in our skies. "It will be brighter, as seen from Earth, than any other supernova in recorded history so far," says Richards, "as brilliant as the full Moon and visible in daylight."
Where to find it
Betelgeuse is easily visible on the left shoulder of Orion as you look at it with the naked eye. Key to finding it is identifying Orion itself, which is probably best achieved by locating the unmistakable trio of stars known as Orion's Belt. Betelgeuse is just under 10� to the north-northeast of any of them.
Rigel
Like its bright companion Betelgeuse, the brilliant star Rigel (Beta Orionis) is a supergiant, nearly 80 times the size of our Sun. But even to the naked eye there's one striking difference between these two stellar behemoths: their colors. Betelgeuse is orange-white while Rigel sparkles with a blue tint. Why the difference? It all comes down to their temperatures. The hotter a star is the bluer it tends to shine, while cooler stars glow more red. And indeed Betelgeuse's surface temperature is about 3,300�C while Rigel's is roughly 11,800�C.
Where to find it
Rigel is one of the few stars in the winter sky that is so bright that it can be seen easily from heavily light-polluted city centres and suburban areas. From a dark-sky site it is a blazing point of light at the right foot of Orion.
W Orionis
Less famous than either Betelgeuse or Rigel, the scientific story behind the star known as W Orionis is no less intriguing. It has an atmosphere that swirls with large amounts of carbon.
"For a star to become carbon rich, something called the dredge-up needs to happen several times so that carbon from the inner parts of the star gets to the surface and [is] released to its atmosphere," explains Dr Lizette Guzman Ramirez, an ESO Fellow based at the Leiden Observatory in the Netherlands.
This churning has occurred within W Orionis as it has aged. The carbon can absorb blue wavelengths of light from the star; this, combined with its relatively cool temperature, means it has an exquisite red hue — something that's obvious through a telescope.
Where to find it
Although it's on the cusp of naked-eye visibility, it's easier to hunt down mag. +6.1 W Orionis with binoculars. One way of finding it is to imagine a rough equilateral triangle tilted on its side, the base of which is marked by Mintaka and Bellatrix (Delta and Gamma Orionis). W Orionis is at the apex.
Practical project
The deep red of W Orionis is a wonderful sight to see, but it's even clearer in photos. In this project we'll use a simple astrophotography technique to bring out the star's striking color and all you need is a DSLR, a lens with a focal length of 50mm or similar and a static photo tripod. First mount your camera on the tripod, check W Orionis is in the view and then focus the image. Then take four or five 30-second exposures and stack them together in software such as Startrails to create an image that shows the star field 'trailing' as the Earth rotates. By using a 50mm lens you should be able to capture some of Orion's other bright stars in the field of view and so when you compare their trails to that of W Orionis the remarkable ruddy hue of the latter should be very obvious.
The Trapezium Cluster
Cast your eyes towards the stars of Orion on a crisp winter's night and you may — if you're far enough away from the ravages of light pollution — be able to glimpse a fuzzy star at the heart of the Hunter's sword. What you are seeing is in fact not a star but the magnificent Orion Nebula, M42. This enormous, sprawling, mass of dust and gas clouds some 1,350 lightyears from us shines in our night skies due to a cluster of hot, young stars embedded within it, known as the Trapezium Cluster.
These infant stars are thought to have emerged from the nebula roughly one million years ago. Their story began as material in the nebula coalesced together to form dense clumps within the then cold, dark clouds. These clumps grew and grew until nuclear fusion reactions fired up in their cores and the stars within the cluster were 'born'.
As the stars started to shine they began to emit huge amounts of powerful radiation, which streamed out into the gas and dust around them. Slowly a vast cavern — whose sweeping walls glowed brightly due to this onslaught of intense ultraviolet radiation — was sculpted into their maternal nebula too. And that's what we see when we look at the Trapezium Cluster and the beautiful Orion Nebula around it today: an extraordinary tableau of star formation sketched in ethereal celestial light across the winter sky.
Where to find it
The Trapezium Cluster sits within the bright central part of the Orion Nebula, which is itself located within a pattern of stars often referred to as Orion's Sword. The easiest way to find M42 is to scan your telescope south from the central star in Orion's Belt, called Alnilam (Epsilon Orionis), by a little over 4� until you come across the nebula and the embedded cluster.
Practical project
Few celestial objects are as captivating as the Orion Nebula seen from a dark-sky site, but for keen stargazers just starting out in astronomy spying the four most prominent stars of the Trapezium Cluster, within M42, is a rite of passage; so in this project we're going to cover a few additional tips for tracking them down. Assuming you've managed to locate the Orion Nebula in your telescope using our tips above, the first thing to note is that the Trapezium itself is much smaller in angular diameter than you might think — you'll need to use a magnification of at least 75-100x to get a pleasing view of it. As we've already mentioned, the cluster resides in the brightest part of the nebula, but if you need another signpost to it, look for the nearby 'dark' region of nebulosity that 'points' the way to it.
Aldebaran
Compare Aldebaran (Alpha Tauri) to Betelgeuse and you'd be forgiven for thinking that the two are very similar stars — they're alike in color and not very different in brightness. Both are swollen, ageing stars in fact, but Betelgeuse is much more massive. "Aldebaran is only about 1.3 times the mass of the Sun," says Dr Anita Richards. This means that Aldebaran's eventual demise will be very different from Betelgeuse's. Instead of creating a supernova it will slowly shed its outer layers to form a beautiful glowing planetary nebula with a white dwarf at its centre.
Where to find it
At the start of January Aldebaran is high in the south at around 21:45 UT. The V of the Hyades star cluster is a helpful signpost to the star, but if you have trouble finding that use an imaginary line extending northwest from Orion's Belt to point you in the direction of the stars of Taurus, and thus the Hyades.
Sirius
No discussion of the science of the winter stars would be complete without mentioning dazzling Sirius, the alpha star of Canis Major. There's no other star that rivals it in the heavens at this time of year, and it's the brightest star in Earth's night sky full stop. So why does Sirius appear so impressive in our skies? Well, it's a relatively bright star in itself but it's also very close to us too at a distance of 8.6 lightyears. To put that in perspective, brilliant Rigel in nearby Orion is over 100 times farther away!
Where to find it
Though Sirius may be bright, if you're new to astronomy finding which one of the dazzling stars in the winter sky it actually is can still be a challenge. Thankfully there's a little trick you can use. If you can find the much more recognisable Orion's Belt, it actually 'points' in the direction of Sirius, if you follow the line of the belt down from right to left.
The Pleiades
If the Trapezium Cluster in the Orion Nebula is a vision of the birth of stars, then the magnificent Pleiades, or M45, in the constellation of Taurus shows what happens as these glittering collections of stars age and evolve. After open star clusters emerge from their maternal nebulae they drive away the gas and dust around them before slowly scattering into the surrounding Galaxy.
That's precisely what we're seeing when we look at the many members of the Pleiades, which are thought to be 125 million years old — we're looking at a grouping of young stars that are no longer swathed in the dense, often glowing, nebulosity associated with their formation. Over time the stars within the Pleiades will likely disperse further.
In fact it's thought that our very own star, the Sun, may have once belonged to a star cluster like M45. Astronomers believe they've even been able to track down one of the Sun's siblings, a star within the constellation of Hercules known as HD 162826. Its composition and orbital history within the Milky Way matches the Sun's, yet it is now 110 lightyears from us.
Where to find them
The Pleiades sit about 14� to the northwest of the bright star Aldebaran. At the end of January you'll find the cluster high in the southwest sky around 21:15 UT. If you can't spot it with the naked eye try scanning along a line roughly northwest from the Hyades star cluster with a good pair of binoculars.
About The Writer
Will Gater is an astronomy writer and journalist. Visit his website willgater.com and follow him on Twitter at @willgater.
Copyright � Immediate Media. All rights reserved. No part of this article may be reproduced or transmitted in any form or by any means, electronic or mechanical without permission from the publisher.
{ width: 160, height: 160, defaultImage: '', layers: 'Artimg-BBC_messier' }

![]() Orion is proud to partner with BBC Sky at Night Magazine, the UK's biggest selling astronomy periodical, to bring you this article as part of an ongoing series to provide valuable content to our customers. Check back each month for exciting articles from renowned amateur astronomers, practical observing tutorials, and much more!
Orion is proud to partner with BBC Sky at Night Magazine, the UK's biggest selling astronomy periodical, to bring you this article as part of an ongoing series to provide valuable content to our customers. Check back each month for exciting articles from renowned amateur astronomers, practical observing tutorials, and much more!
How a Frenchman's 18th-century list of objects to avoid became the definitive catalog for amateur astronomers
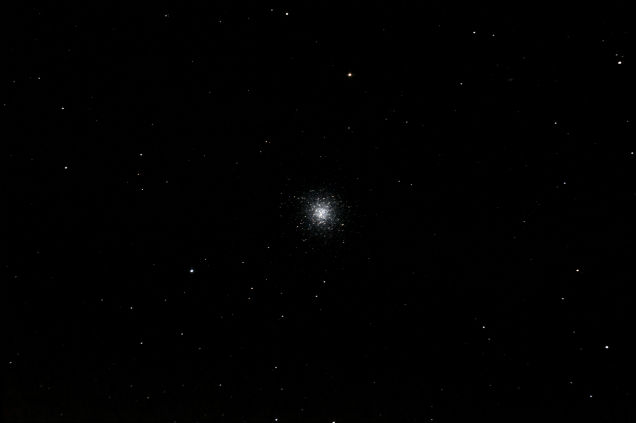
Messier 13 by Laurie A.
For budding and seasoned stargazers in the northern hemisphere, the Messier Catalog is the most famous observing list of astronomical deep-sky objects. Within the 110-strong catalog are examples of every known deep-sky object — a good assortment of galaxies, open and globular star clusters, nebulae and one supernova remnant: the famous Crab Nebula in Taurus, which is also the first object in the catalog. It bears the designation Messier 1, commonly written as M1.
Messier's catalog has become so ingrained into astronomical lore that objects are commonly described by their Messier number. So 'M42' is often used in place of, or in addition to, the name of the object, in this case the Orion Nebula.
The irony of this useful catalog is that it was never intended to be a list of objects for observers to hunt down with their telescopes: rather, it was a list of objects to avoid. This is because Charles Messier, the French astronomer who created the catalog, was a comet hunter, and many comets appear as faint, fuzzy blobs in the sky — just as deep-sky objects do. So he assembled these deep-sky objects into a list of 'red herrings', in order to make sure they could be discounted during his cometary searches. He conducted these in his observatory, a wood and glass structure atop a tower in the medieval H�tel de Cluny in Paris.
Growing Number
The Messier Catalog first arrived on the scene in 1771 as a list of 45 objects. Ten years later it had been expanded to 103, with some of the later observations being undertaken by Messier's assistant Pierre M�chain. The catalog stayed at this size for over 100 years. There were some interesting developments in the 20th century, as astronomers and historians made seven additions to the list. These were not just arbitrary objects, but ones that Messier and M�chain made observing notes about shortly after the final version of the catalog was published. It was only in 1967 when M110, a faint dwarf elliptical galaxy in the constellation of Andromeda, made its way into the catalog as the final officially recognised object.
There are several reasons why Charles Messier's 'list of objects to avoid when looking for comets' has become so readily accepted as targets to seek out with a telescope. One is that it isn't too long: 110 objects makes it a nice, manageable number. So manageable, in fact, that some amateurs like to undertake Messier marathons, where they endeavour to observe all 110 objects in one night.
Another reason is that Messier used a variety of different sized scopes in his comet searches, including a 3.5-inch refractor. The objects in his catalog don't need massively powerful instruments to be seen: they're within reach of small amateur telescopes.
Finally, it's a reasonably comprehensive list, encompassing almost all of the wondrous sights that novice stargazers would wish to see, many of them bright objects.
Of course, the Messier Catalog is not the only list — there are more than 110 objects out in space after all. The New General Catalog (NGC), for example, lists nearly 8,000 objects, followed by an extension known as the Index Catalog (IC) that adds more than 5,000 on top. You'll also find that many objects appear in multiple catalogs: M42, the Orion Nebula, is also designated as NGC 1976. However, the NGC and IC lists are little more than databases of deep-sky objects. They have less appeal for amateur astronomers because many of their entries are too faint to see without a professional telescope.
There is, however, one other list that's worth a mention: Patrick Moore's own compilation, the Caldwell Catalog. This is, in effect, an extension to the Messier Catalog. It includes many more bright, deep-sky objects that are perfect for you to train your telescope on from your back garden.
Top Naked-Eye Messier Objects
M42
RA 05h 35m 17s dec. -05� 23' 28"
The Orion Nebula is a vast cloud of dust and gas — what's known as an emission nebula, and is a star-forming region. It's easy to spot with just your eyes as a misty patch below the three belt stars in the constellation of Orion.
M45
RA 03h 45m 48s dec. +24� 22' 00"
The Pleiades, also known as the Seven Sisters, is an open star cluster in the constellation of Taurus. Depending on your eyesight and how dark the sky is at your location, you'll be able to see between six and 12 stars.
M13
RA 16h 41m 42s dec. +36� 28' 00"
The hundreds of thousands of stars that make up the Great Globular Cluster in Hercules are just visible to the eye from dark locations. It's one-third of the way south of a line between the stars Eta and Zeta Herculis.
M31
RA 00h 42m 42s dec. +41� 16' 00"
The Andromeda Galaxy is without doubt the most distant object visible to the naked eye, being about 2.8 million lightyears away. Find it in the constellation of Andromeda as a faint smudge in very dark, Moonless skies.
Top Small-Scope Messier Objects
M81
RA 09h 55m 33s dec. +69� 03' 55"
Looking at Bode's Galaxy in the constellation of Ursa Major with a 3- to 4-inch scope, you'll see it as the brighter of two fuzzy patches close to each other in the night sky. The second patch is another galaxy, the fainter M82.
M51
RA 13h 30m 00s dec. +47� 16' 00"
The Whirlpool Galaxy in the constellation of Canes Venatici is a face-on spiral galaxy. Small scopes reveal the basic shape and the smaller companion with which it is interacting. Larger instruments reveal more structure.
M3
RA 13h 42m 12s dec. +28� 23' 00"
This globular cluster, also in Canes Venatici, is an easy target for a small telescope - though it can be tricky to locate. It's one of the largest and brightest globulars in the sky; a small scope will reveal great detail and a compact core.
M57
RA 18h 53m 35sdec. +33� 01' 45"
The Ring Nebula in the constellation of Lyra is a shapely planetary nebula, and one of the easiest of its kind to observe. With a 3- to 4-inch scope it's easily seen as a misty but quite defined oval patch.
Copyright � Immediate Media. All rights reserved. No part of this article may be reproduced or transmitted in any form or by any means, electronic or mechanical without permission from the publisher.
{ width: 160, height: 160, defaultImage: '', layers: 'Artimg-BBC_Satellites' }

![]() Orion is proud to partner with BBC Sky at Night Magazine, the UK's biggest selling astronomy periodical, to bring you this article as part of an ongoing series to provide valuable content to our customers. Check back each month for exciting articles from renowned amateur astronomers, practical observing tutorials, and much more!
Orion is proud to partner with BBC Sky at Night Magazine, the UK's biggest selling astronomy periodical, to bring you this article as part of an ongoing series to provide valuable content to our customers. Check back each month for exciting articles from renowned amateur astronomers, practical observing tutorials, and much more!
The Moon isn't the only object orbiting the Earth you can take a look at

International Space Station by Jimmy E.
There are two types of satellite visible in the night sky — natural ones like our Moon and artificial ones that we have placed up in orbit. Of all the artificial ones, the International Space Station, or ISS, is probably the best known. Easy to predict, its constant, often bright passage across the heavens is a sight that instills wonder.
Humankind's orbital outpost typically appears as a dot, which gets brighter as it passes across the sky before fading again. Sometimes the ISS appears bright and then fades abruptly from view. The fading occurs when the ISS's trajectory takes it into Earth's shadow, and as most sightings tend to be in the early evening the disappearance occurs when the ISS has reached the eastern half of the sky. If you're an early riser, Earth's shadow will be to the west. This causes the ISS to instantly 'switch on' as it passes out of the shadow back into full sunlight.
Solar power
It's the interaction of sunlight with the surface of a satellite that makes things interesting. Spacecraft that have large reflective areas can flare in brightness, sometimes quite significantly. The best flares are caused by a group of satellites known as the Iridium constellation: 'constellation' being the collective noun for a group of satellites. When you see one of these spacecraft brighten rapidly, this is what's known as an Iridium flare.
The science behind the flare is unremarkable in that each satellite in the constellation has three large flat, reflective antennas. When the Sun's light happens to hit an antenna at the right angle, it will appear bright when seen from a fairly localised region on Earth's surface. What is remarkable, however, is the fact that there are ways to predict, with down-to-the-second accuracy, when a flare can be seen from your location. And we're not talking faint, indistinct flaring here: some Iridium flares can increase the apparent brightness of the satellite's dot from that of a dim star to something brighter than Venus.
The brightest flares tend to be around mag. -8.0, brilliant enough to easily illuminate any thin clouds that may get in the way. In theory, such a bright pass could even cast shadows — not that anyone ever looks behind them when a flare occurs! Not all Iridium flares will reach this brightness, of course; the flare may not be optimal and you may be located away from the position on Earth where the brightness of the flare peaks.
Other satellites can also show flare activity and it soon becomes obvious, especially to meteor imagers, that flaring spacecraft occur all the time. A flaring satellite that reaches peak brightness and is then rudely truncated by the camera shutter closing will look very similar to what you'd expect to see from a bright meteor trail.
It's possible to tell the difference by looking carefully at the brightest end of the trail. If the trail looks perfectly smooth and is cut off squarely at the brightest end, then it's either a rare meteor trail interrupted in its prime or — much more likely — a flaring satellite trail that wasn't allowed to complete its display before the camera shutter closed. Iridium flares also tend to record as white trails, while meteor trails often exhibit a pink start changing to green — an effect caused by the excitation of atoms in our atmosphere.
There are over 1,000 operational satellites orbiting Earth and an estimated 21,000 objects larger than 10cm. If you widen the net and include objects down to 1cm in size, the count moves beyond half a million. In fact, on any clear, moonless night, it would be unusual not to see an artificial satellite passing through the constellations, appearing as a moving dot among the stars.
Predicting a pass
There are many different ways to predict satellite passes — some more reliable than others.
Heavens Above
One of the most popular and respected methods is to use the website Heavens Above (www.heavens-above.com). You can create a free account that logs your location and generates visibility predictions for many different satellites. Sky charts accompany visible passes, and clicking on the date of the pass will typically bring up an all-sky chart showing the passage of the satellite among the stars. So long as you have a basic knowledge of the constellations then the track, adjusted for your location, should be pretty easy to identify. As an added bonus, if you don't know the stars that well, then this is a good way to have some fun while learning the night sky.
Other Prediction Sites and Apps
For the slightly more technically minded, there are many excellent programs available to download such as WXTrack (www.satsignal.eu/software/wxtrack.htm), which is able to predict the passage of many satellites directly from a Windows PC. Apps for other operating systems, including smartphones are also available; many are listed in a 'satellite tracking software index' at celestrak.com/software/satellite/sat-trak.asp. Some of these programs are commercial, requiring you to purchase a licence to use them, but there are plenty of freeware options available too.
Ensuring Accuracy
One problem with computer predictions is reliability. This could be down to problems with the program itself, or that you haven't set your location, date or time properly. And if satellite data isn't updated regularly, this too may affect accuracy. If doubts start to creep in, compare the predictions for an easy to identify satellite, such as the ISS, with Heavens Above. If they don't match, update the software's satellite data, and your time and location details, before trying another program.
Copyright � Immediate Media. All rights reserved. No part of this article may be reproduced or transmitted in any form or by any means, electronic or mechanical without permission from the publisher.
{ width: 160, height: 160, defaultImage: '', layers: 'Artimg-BBC_LunarEclipse' }

Orion is proud to partner with BBC Sky at Night Magazine, the UK's biggest selling astronomy periodical, to bring you this article as part of an ongoing series to provide valuable content to our customers. Check back each month for exciting articles from renowned amateur astronomers, practical observing tutorials, and much more!
When most people think of an eclipse, they think of totality, the apex of a total solar eclipse, where the Sun, Moon and Earth are in perfect alignment and the Moon completely covers the Sun. Even here, the Sun's light doesn't completely disappear. With the central brightness gone, it's possible to see the beautiful arcing curves of the Sun's corona, while Earth is plunged into a false twilight.
Totality can only be seen along a narrow corridor, known as the path of totality. Observers situated away from this track will see a partial eclipse of varying magnitude, depending on their distance from it. Some parts of the Earth are so far from the track that they won't see an eclipse at all.
That total solar eclipses can happen at all is the result of a fantastic cosmic coincidence — the Moon is both 400 times smaller than the Sun and 400 times closer to us, meaning they appear to be the same size in the sky — most of the time.
The Moon's orbit around the Earth is not a perfect circle, which causes the Moon's apparent size to change over the course of each month by 14 per cent. When the Moon appears smallest it no longer fills the Sun's disc. When eclipses happen during this time, they are annular instead of total: a thin ring of solar disc remains visible around the edge of the Moon's silhouette, and this can be just as beautiful as totality. There are also extremely rare hybrid eclipses, which transition from total to annular mid event.
We know solar eclipses occur when the Sun, Moon and Earth line up in the sky. Why then don't we see eclipses every month at new Moon? It's because the Moon's orbit is inclined by 5.3� to the ecliptic, the plane in which Earth orbits the Sun. That means that even if the Earth, Moon and Sun are aligned in a straight line as seen from above (known as a 'syzygy'), the Moon may be too high above or too low below the orbital plane to block the Sun's light.
While every eclipse is partial somewhere on the planet, there are some during which the darkest part of the Moon's shadow misses the Earth, meaning there is no totality anywhere on the planet. This happened on 23 October 2014, when there was a partial eclipse that could be seen from North America — but in order to see totality you would have had to have been several hundred kilometers above the North Pole.
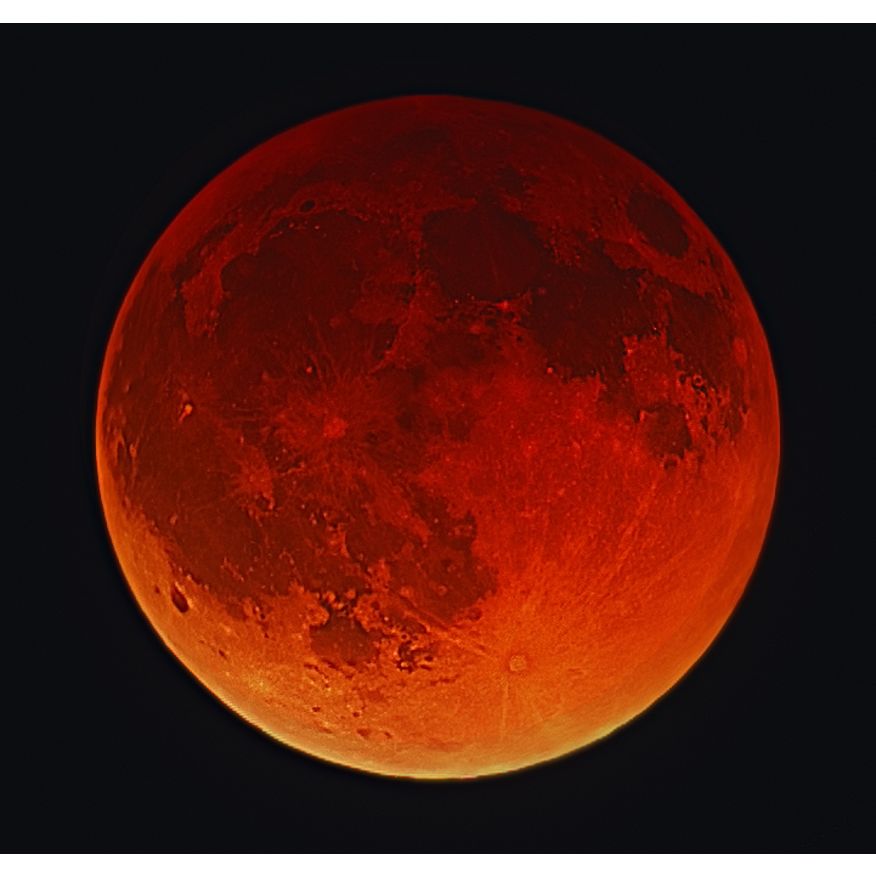
Lunar eclipses, where the Moon passes into Earth's shadow, are much more relaxed affairs than their solar counterparts, typically lasting for over an hour rather than a matter of minutes.
Because the Sun is much bigger than Earth, it splits our planet's shadow into two parts: the darkest, called the umbra, and a lighter outer ring, called the penumbra. The intensity of a lunar eclipse depends on how much of the Moon passes into the Earth's shadow, and which part of the shadow it passes through.
In a total lunar eclipse, the entire Moon passes through the penumbra and into the umbra, gradually darkening until it is completely covered, a point known as totality. During totality no sunlight shines directly on the Moon, but some is refracted onto it via Earth's atmosphere. As our atmosphere filters out blue light, the Moon often gains a strange orange-brown color.
As the Moon goes into eclipse and dims, the sky gets darker too. You may not have realized how bright a full Moon can be. It lights up the sky around it with a blue haze, out of which only the brighter stars are visible. During a total lunar eclipse, the darker Moon means that the fainter stars can come out and we end up with the eerie sight of a deep-red Moon surrounded by twinkling stars.
The darkness of the Moon gets during a total lunar eclipse is described by the Danjon Scale, which runs from L0 through to L4. As the Moon is only lit by light that has passed through Earth's atmosphere, its precise color and darkness will depend on how much dust, volcanic ash and water vapor is in the atmosphere to affect the sunlight's path. The eclipse in 1884, after the huge volcanic eruption of Krakatoa, was so dark that the Moon could only just be made out, such was the amount of dust in the atmosphere.
There are two other types of lunar eclipse: partial, where only a portion of the Moon passes through Earth's dark umbral shadow, and penumbral, where part of the Moon only passes through the lighter, outer shadow. Partial eclipses can be quite noticeable, but penumbral eclipses often only cause a slight dimming.
Lunar eclipses can be observed without optical aids. For solar eclipses, you always need to use equipment with certified filters, or project the event onto a piece of card. The one exception is during the brief window of totality during a total solar eclipse. This is the only time it is safe to look directly at the Sun. The simple rule is: if you're not absolutely sure about safety, don't do it.
The Phases of a Solar Eclipse
First Contact
The point at which the Moon first touches the solar disc, marking the beginning of the eclipse.
Second Contact
The moment the Moon is fully within the solar disc, marking the start of annularity or totality. Partial eclipses do not have second or third contacts.
Greatest Eclipse
The point of totality or annularity.
Third Contact
The instant the lunar disc touches the other side of the solar disc, ending totality/annularity and marking the start of egress.
Fourth Contact
The point when the edge of the Moon's trailing edge breaks contact with the solar disc, ending the eclipse.
Copyright © Immediate Media. All rights reserved. No part of this article may be reproduced or transmitted in any form or by any means, electronic or mechanical without permission from the publisher.
{ width: 160, height: 160, defaultImage: '', layers: 'Artimg-BBC_Jup_Sat_Moons' }

![]() Orion is proud to partner with BBC Sky at Night Magazine, the UK's biggest selling astronomy periodical, to bring you this article as part of an ongoing series to provide valuable content to our customers. Check back each month for exciting articles from renowned amateur astronomers, practical observing tutorials, and much more!
Orion is proud to partner with BBC Sky at Night Magazine, the UK's biggest selling astronomy periodical, to bring you this article as part of an ongoing series to provide valuable content to our customers. Check back each month for exciting articles from renowned amateur astronomers, practical observing tutorials, and much more!
The two huge gas giants are home to a staggering number of natural satellites
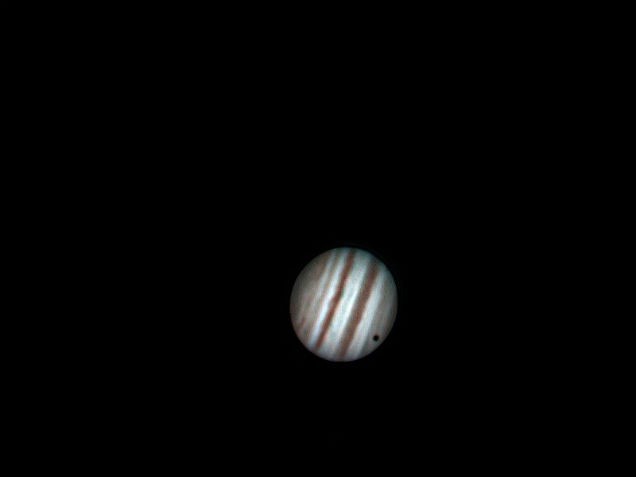
Jupiter's Moon callisto Cast Shadow Onto Jupiter's Cloud Top by Kim Mitchell
Jupiter is grandiose in all respects. Not only is it the largest of the planets — it would take 1,321 Earths to fill the volume of Jupiter — it's also more than likely that it keeps the largest entourage of moons. There are 67 that we know of, and though many of these are fairly small and can't be observed from Earth, the biggest four are easy to spot with just a small pair of binoculars.
These are Io, Europa, Ganymede and Callisto: the Galilean moons, so named because they were spotted by Galileo in the early 17th century.
A minimum size pair for spotting these four moons would be 7x50s, which magnify what your eyes see seven times and have front lenses that are 50mm in diameter. Your view will be much improved by resting the binoculars on a wall or fence, or even attaching them to a tripod with an inexpensive bracket. Through a 3- to 6-inch telescope the moons will appear brighter and fill more of the field of view. Don't worry if you don't see all four: as the moons travel around the planet they may be behind or in front of Jupiter when you're looking.
It's by using a larger scope with a front lens over 6 inches that you start to see detail on the planet itself, and this includes the occasional shadow cast by the Galilean moons.
Moon with a View
Fellow gas giant Saturn has 62 known moons, but only seven are visible. Due to its sheer size, the easiest of Saturn's satellites to see is Titan. This moon has a diameter of 5,150km, which makes it bigger than the planet Mercury. In the moon rankings, it's the second largest in the Solar System, only beaten by Jupiter's Ganymede. It's also the only moon with a substantial atmosphere. When you're gazing at it through your scope, you're not actually looking at Titan's surface but at its nitrogen-rich cloud tops. In terms of brightness, Titan can reach mag. +8.4, putting it well within the reach of binoculars, while with a small telescope you'll have no trouble seeing it.
The remaining six moons are all within the grasp of a 6-inch scope. In order of brightness, after Titan comes Rhea, which shines at mag. +9.7, Tethys at mag. +10.3, Dione at mag. +10.4, Enceladus at mag. +11.8 and then quirky Iapetus.
The unusual nature of this last moon quickly became apparent to its discoverer in 1671, the Italian astronomer Giovanni Cassini. He first saw the moon on the western side of Saturn but found it missing on a later search, when it should have been on the eastern side.
It wasn't until 34 years later, when telescopes had improved, that Cassini finally saw Iapetus to the east, because when it's here it's almost two magnitudes fainter. This is why it had been impossible to see it before. Cassini deduced, correctly, that this was because the moon has one very bright hemisphere and one very dark one, and is also tidally locked to Saturn.
This means, like our Moon, it always shows the same face to its planet. It follows that we see a different part of Iapetus from our Earthly viewpoint when it is to the east or west of Saturn. As a result, Iapetus varies between mag. +10.1 and mag. +11.9. However, the faintness trophy goes to Mimas, which at mag. +12.9, needs perfect viewing conditions without any light pollution to see comfortably.
Jupiter's famous Galilean moons
IO
Diameter: 3,640 km
The tremendous gravitational pull of Jupiter on this innermost of the four Galilean moons, together with its closeness to the planet, means Io whizzes round Jupiter in just 1.75 Earth days. This fast orbital speed is easily seen in a small telescope: it visibly shifts position in just a few hours.
Europa
Diameter: 3,140km
The second Galilean moon out from Jupiter, Europa should theoretically be visible with the naked eye as it shines at mag. +5.3. But Jupiter's overwhelming brightness means it's difficult to separate moon from planet. Europa's brightness is due to its smooth, icy surface, with perhaps an ocean underneath.
Ganymede
Diameter: 5,260 km
The third major moon out from the planet is not only Jupiter's biggest, it's also the largest moon in the entire Solar System — but only by a whisker. This is a world with a cold ice surface, a large warm ice (possibly water) mantle, a rocky interior and a liquid iron core.
Callisto
Diameter: 4,820 km
The last of the four giant Galilean satellites is Callisto. It is the third largest moon in the Solar System, after Titan, the biggest of Saturn's moons. Callisto's entire icy, ancient surface is covered with impact craters that date right back to the time of the early Solar System.
Saturn's best moons to observe
Titan
Diameter: 5,152 km
The largest of Saturn's moons has a 16-day orbit. At its farthest, you'll find it about five of Saturn's ring diameters from the planet, mag. +8.4 at its brightest, which makes it visible in good binoculars. Titan makes up over 96 per cent of the mass of everything orbiting the planet.
Rhea
Diameter: 1,528 km
The second largest moon of Saturn, ninth largest in the Solar System, and currently the 20th catalogued in distance out from the planet. It makes an orbit in 4.5 days, reaching just under two ring diameters from Saturn. It is mag. +9.7, making Rhea an easy target for a 3-inch refractor telescope.
Iapetus
Diameter: 1,469 km
This is the third largest and most distant of the main moons of Saturn. Its 79-day orbit, which is the most inclined of the inner satellites, takes it out to 12 ring diameters from the planet. The visual magnitude ranges from +10.1 to +11.9, so Iapetus needs about a 6-inch scope to see it at its darkest.
Dione
Diameter: 1,123 km
This moon orbits up to 1.5 ring diameters from Saturn over 2.7 days. Its visual magnitude of +10.4 makes it visible on dark nights with a 3-inch refractor. This is the densest of the moons, meaning it may have a large rocky core. Helene and Polydeuces, two smaller moons, share its orbit.
Tethys
Diameter: 1,060 km
This moon orbits about one ring diameter away from the planet and takes 1.9 days to do so. It has a magnitude of +10.3 and so can be seen in a 3-inch refractor. Tethys has a great canyon that stretches three-quarters of the way round the moon, and two co-orbital moons, Telesto and Calypso.
Copyright � Immediate Media. All rights reserved. No part of this article may be reproduced or transmitted in any form or by any means, electronic or mechanical without permission from the publisher.
{ width: 160, height: 160, defaultImage: '', layers: 'Artimg-BBC_SeeingTransparency' }

![]() Orion is proud to partner with BBC Sky at Night Magazine, the UK's biggest selling astronomy periodical, to bring you this article as part of an ongoing series to provide valuable content to our customers. Check back each month for exciting articles from renowned amateur astronomers, practical observing tutorials, and much more!
Orion is proud to partner with BBC Sky at Night Magazine, the UK's biggest selling astronomy periodical, to bring you this article as part of an ongoing series to provide valuable content to our customers. Check back each month for exciting articles from renowned amateur astronomers, practical observing tutorials, and much more!
The movement of the atmosphere can affect your ability to observe stars and planets to a surprising extent
The weather is generally considered to be the biggest hindrance to astronomy. What's the betting that the night you decide to head out for the night that spell of fine weather changes for the worse? So you'd have thought that when the skies finally clear, your problems would be over. Surprisingly, though, even a clear night may not be the best time to go out and observe.
The issue is the 'seeing'. In astronomy, this doesn't mean how you look at something. It's a term that describes how much the view you see through your telescope is disturbed by what's going on in the atmosphere above you.
At times of good seeing, you'll get sharp, steady views through your telescope. But bad seeing produces turbulent, unstable telescope views of the Moon and shuddering, shaky images of stars. On the other hand, deep-sky objects like galaxies and nebulae aren't as badly affected by bad seeing.
This is thanks to the layers of moving air between you and the object you're looking at, the effects of which are magnified by your telescope. In the atmosphere, air at different temperatures is always moving around and mixing together. Light travels through hot and cold air at different speeds, so it is continually bent this way and that before it finally arrives at your telescope all shaken and stirred.
Sometimes there are very few moments of clarity. One of the best ways to see this distortion is to watch the Sun setting on a clear horizon. It will have a jagged appearance, thanks to the sunlight moving through layers of turbulent air.
The other factor that affects observing conditions is the transparency of the night — just how clear the sky is. After it's been raining, the sky is transparent because the rain clears away particles of dust and smog from the air. However, when it's been raining it also tends to be windy, which means that the seeing is bad. You'll notice that the stars are twinkling because of this. Transparent conditions are, however, good for large, faint objects like nebulae and galaxies, which really benefit from the better contrast. Poor transparency generally means the air is steady with good seeing, but dust and particles are sitting in the still atmosphere. These conditions are good for looking at the Moon and stars.
A good way to think of seeing and transparency is to imagine a swimming pool with a coin resting on the bottom. The water represents our atmosphere and the coin the starry object you're looking at. Through completely still water with no currents, the coin looks still, crisp and clear. In this case the seeing is perfect and so is the transparency. If the water is made to move — causing ripples — the coin's image will shake around; the transparency is still good but the seeing is bad. And if some milk is spilt in the pool so you can't see the coin very clearly, the transparency will be reduced.
It goes to show that you're at the mercy of the atmosphere ... and that moments of clarity are a wonderful thing.
Clear and present
You can't do anything about 'high-level seeing' — the air currents far above you — but you can influence the 'low-level seeing' to create steadier air conditions immediately around you and your scope. Here's how:
1. Leave your scope outside to cool to the ambient temperature, eliminating any air currents in the tube.
2. Observe on grass rather than concrete. Concrete absorbs more heat from the Sun and radiates it out to the air above it for longer.
3. Air currents tend to stay low to the ground, so it can be a good idea to raise up your scope on a platform.
4. If you build an observatory, make it using thin materials such as wood that can cool quickly.
5. The geography of your observing site affects how air behaves. Being near the sea gives you calmer air than if you're near a range of hills, where air is forced upwards, causing turbulence.
Using the Antoniadi Scale
It's very useful to note down what the seeing is when you're observing. Many astronomers use the Antoniadi scale as a measure of what the atmosphere is up to. It's a five-point scale using Roman numerals. I indicates the best conditions, while V describes the worst.
I. Perfect seeing, without any quiver of turbulence whatsoever.
II. Slight shimmers; moments of stillness last several seconds.
III. Average seeing; larger air tremors blur the view.
IV. Poor views, with constant troublesome undulations of the image.
V. Bad views with severe undulations; so unstable that even quick sketches are out of the question.
Copyright � Immediate Media. All rights reserved. No part of this article may be reproduced or transmitted in any form or by any means, electronic or mechanical without permission from the publisher.
{ width: 160, height: 160, defaultImage: '', layers: 'Artimg-BBC_Myth' }

![]() Orion is proud to partner with BBC Sky at Night Magazine, the UK's biggest selling astronomy periodical, to bring you this article as part of an ongoing series to provide valuable content to our customers. Check back each month for exciting articles from renowned amateur astronomers, practical observing tutorials, and much more!
Orion is proud to partner with BBC Sky at Night Magazine, the UK's biggest selling astronomy periodical, to bring you this article as part of an ongoing series to provide valuable content to our customers. Check back each month for exciting articles from renowned amateur astronomers, practical observing tutorials, and much more!
Eight of the biggest astronomical myths, collected and comprehensively busted to help you become an expert in no time at all

Meteor (Perseid's) and M45 (Pleides) by Mark Bell
The Moon can't be seen in the daytime
There's a common conception that just as the Sun can only be seen in daylight hours, the Moon only comes out at night. But Earth's rotation means that the Moon must be above the horizon for 12 hours out of every 24, regardless of the length of the night. As such, the Moon is often somewhere in the daylit sky. Whether we see it is down to two things — its altitude in the sky and its phase.
Polaris is the brightest star in the sky
Polaris is certainly among the most famous, being the star closest to the north celestial pole, but this usefulness does not make it the brightest in the sky. Spend an evening outside and it will become obvious that this honor falls to Sirius, in the constellation of Canis Major.
Stars twinkle
'Twinkle, twinkle, little star' has a lot to answer for. Stars often appear to flicker in the night sky, but this has nothing to do with the star and everything to do with our turbulent atmosphere. Once it reaches Earth, starlight is reflected, bent and contorted by this turbulence, until it reaches your eye. Viewed from space, stars would not twinkle at all.
Earth's distance from the sun causes the seasons
Not so — Earth is actually closest to the Sun during the northern hemisphere's winter. The real reason is due to Earth's 23.5-degree axial tilt, which means each hemisphere gets varying durations of sunlight over the year.
Polaris has always been the pole star
Polaris' position next to the north celestial pole is a temporary one, a result of Earth wobbling on its axis as it spins. The change is about 1 degree every 72 years, with a full cycle taking around 26,000 years. In 3,000 BC the pole star was Thuban in Draco, but in 2,000 years time it will be Errai in Cepheus.
Shooting stars are really stars
If you have ever wished upon a star, you may be shocked to learn it wasn't a star at all. What you saw was the bright flare of a piece of debris, likely to be no bigger than a grain of sand, burning up in our atmosphere. They are properly known as meteors. If a fragment makes it to Earth's surface, it is called a meteorite.
The point of a telescope is to magnify celestial objects
While telescopes can make the denizens of the night sky appear bigger, this isn't their primary purpose. Their main function is to gather light, using a lens or mirror depending on the design, so that we can see objects too dim to view with the naked eye.
The Moon has a dark side
The phrase 'dark side of the Moon' is often and erroneously used to refer to the Moon's far side, which means something subtly different. The far side is the hemisphere of the Moon permanently turned away from Earth, but calling it the dark side implies it never sees any sunlight — which is not the case. The lunar far side goes through the same cycle of phases as we see on the near side from Earth, with the only period it can technically be called the dark side being the time of full Moon.
Copyright � Immediate Media. All rights reserved. No part of this article may be reproduced or transmitted in any form or by any means, electronic or mechanical without permission from the publisher.
{ width: 160, height: 160, defaultImage: '', layers: 'Artimg-BBC_StargazingSkillls' }

![]() Orion is proud to partner with BBC Sky at Night Magazine, the UK's biggest selling astronomy periodical, to bring you this article as part of an ongoing series to provide valuable content to our customers. Check back each month for exciting articles from renowned amateur astronomers, practical observing tutorials, and much more!
Orion is proud to partner with BBC Sky at Night Magazine, the UK's biggest selling astronomy periodical, to bring you this article as part of an ongoing series to provide valuable content to our customers. Check back each month for exciting articles from renowned amateur astronomers, practical observing tutorials, and much more!
Is your son or daughter the next Patrick Moore? We look at ways you can encourage the astronomers of the future!

Winners of the 2015 SCAS Striking Sparks program pose with their Orion XT6 Classic Dobsonian telescope awards alongside proud sponsors, teachers and parents.
Ever since I can remember I have loved astronomy. As a boy of seven I used to gaze out of the window at the stars, curious about their names and the patterns that make the constellations. I learned much by myself, but it wasn't until I started at secondary school that, through some friends, I was introduced to our local astronomical society.
If, as a child, you had particularly encouraging parents who already knew something about the subject or were curious enough to learn with you, you were off to a good start. Joining an astronomical society is the perfect next step in the stargazing journey. These clubs offer friendship and experience — not to mention access to telescopes — and could even provide the spark that leads to a career in astronomy.
Summer Stargazing
Many societies take a break in August, but that's not because there's no astronomy to be done. In fact, for kids especially, this time of year has quite a number of benefits for stargazing. Though it doesn't get dark until fairly late there's no school to worry about, so a couple of late bedtimes on clear, starry nights hopefully won't be too much of a problem. Plus, the nights are usually considerably warmer at this time of year, so even though you still have to wrap up, you don't need to suffer the coldness associated with winter stargazing.
You don't need a telescope either: many fine deep-sky objects, such as globular cluster M13 in Hercules or the Coathanger asterism in Vulpecula, can be seen with a good pair of binoculars.
On that note, though, one thing that has massively improved since my early stargazing days is technology. One great tool is the video telescope eyepiece. This is linked to a screen to give live feeds of what the telescope is seeing &mash; particularly handy if you're out stargazing with several children and would rather not have them come to the eyepiece single file.
If you're thinking of running a star party for your kids, make sure you have a back-up plan in case the weather takes a turn for the worse. A space quiz with some chocolate prizes goes down a storm!
Wow-Factor Sights
The Milky Way
Equipment: Naked eye.
Where it is: Visible from summer through Christmas, running across the sky from the south to southwestern horizon.
What you'll see: A misty meandering river of light — it's made up of the combined light from millions of stars. For the best views, head out to a countryside location.
Fun fact for kids: This is just the visible section of our Galaxy, which contains between 200 and 400 billion stars in total.
The Pleiades
Equipment: Naked eye or binoculars.
Where it is: In the constellation of Taurus, the Bull.
What you'll see: This open cluster is known as the Seven Sisters, which is roughly the number of stars you can see with the naked eye. It's also a lovely sight in binoculars, which will reveal several dozen more stars.
Fun fact for kids: This family of several hundred stars sits about 400 lightyears from Earth.
The Moon
Equipment: Binoculars or telescope.
Where it is: Varies, but close to the ecliptic.
What you'll see: Head outside when the Moon is in a crescent or gibbous phase to see craters, mountains, valleys, escarpments, rilles and more. Steer clear of the time around full Moon - there are too few shadows to reveal the incredible surface detail on our satellite.
Fun fact for kids: The surface of the Moon covers roughly the same area as Africa.
Great Events for Kids
Be Galileo (or Einstein, or whoever!)
Instead of just having a general talk on, say, Galileo, why not ask around the club for someone with thespian tendencies? They could dress up and play the famous Italian astronomer, describing his own inventions and discoveries. It's a simple way to liven up the subject for young minds and you could have a lot of fun, too.
Treasure hunts
One meeting could be created as a themed 'mission', with stations around the society's hut or field containing challenges that need to be solved to complete the mission. By doing so, the younger members of the club would get to understand some aspect of astronomy. Each station could hold riddles, puzzles or simple questions.
Space writing, poetry or drawing competition
You don't need to narrow this one down, just allow minds to run wild! The competition could be inspired by a talk, such as the 'Be Galileo' event. You could also open it up to local schools, in which case the local newspaper might be interested. Put up a small telescope as a prize and the publicity could bring in some new faces to your club.
Copyright � Immediate Media. All rights reserved. No part of this article may be reproduced or transmitted in any form or by any means, electronic or mechanical without permission from the publisher.
{ width: 160, height: 160, defaultImage: '', layers: 'Artimg-BBC_IntroducingMoon' }

![]() Orion is proud to partner with BBC Sky at Night Magazine, the UK's biggest selling astronomy periodical, to bring you this article as part of an ongoing series to provide valuable content to our customers. Check back each month for exciting articles from renowned amateur astronomers, practical observing tutorials, and much more!
Orion is proud to partner with BBC Sky at Night Magazine, the UK's biggest selling astronomy periodical, to bring you this article as part of an ongoing series to provide valuable content to our customers. Check back each month for exciting articles from renowned amateur astronomers, practical observing tutorials, and much more!
The Moon was made way back when a large chunk of cheddar the size of Mars hit Earth. True? No! Hold on to your Double Gloucester as this myth, and others, are about to be disproved!
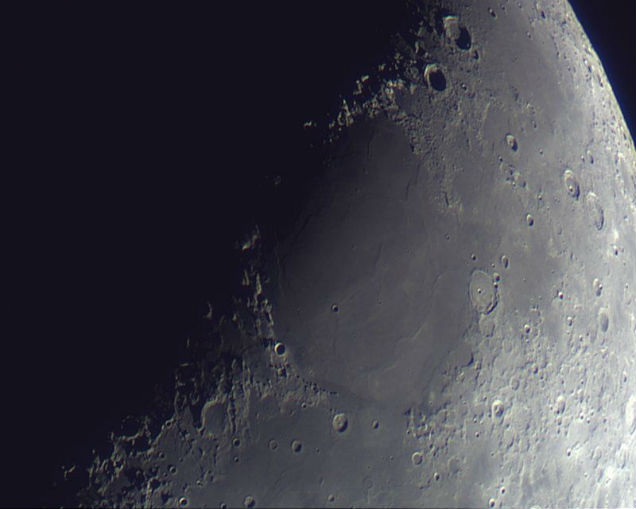
Sea of Serenity by Craig Heaton
To state a fact: the Moon is always around somewhere in the sky at some time or other. It sounds obvious, but this concept is wrapped up in urban myth and provoked a great discussion among planetarium presenters recently. The myth in question has two parts, both of which are entirely wrong: firstly, the Moon comes out at night; and secondly, it's invisible during the day. No names will be mentioned here to protect the guilty, but I was told by a science teacher just the other day (which makes the following even worse to absorb), that the myth is taught in a particular primary school because the pupils would be uncomfortable with the truth. I'd suggest that maybe the wrong teacher is in charge of science.
Myth-Busting
Understanding the Moon's orbit around Earth and the corresponding way it is lit by the Sun, which leads to its phases, is not easy. However, with a bit of patience it is possible to appreciate why the Moon can be visible during the day and does not only 'come out' when it's dark at night.
The question really should be: why don't we notice the Moon during the day? The simple answer is that the sky is brighter during the day than at night, so the Moon is not as prominent. There are lots of other reasons why, such as the fact that evenings are the part of the day when we generally have more time to gaze at the sky, whereas we're all busy rushing around during the day.
So, yesterday, after one such busy day at work I took the time as night approached to do some stargazing and watched the full Moon rise over the trees in the field in front of our house. To the naked eye, this is when the Moon is most magnificent: a low, golden-tinged globe slowly being carried into the sky by the rotating Earth. It's when the Moon is low that it's possible to notice this movement the most and, if you have time, it's worth noting where it is an hour later — you may be surprised how far it has moved.
A couple of other things that are deserving of special attention are the Moon's color and its movement across the sky as it orbits Earth.
The Moon moves at a blistering Mach 3, which is three times the speed of sound at sea level. The stronger goldish-to-reddish color of the rising Moon, as opposed to the grey-white view when it's higher, is explained by the fact that when it's low to the horizon, light from the Moon gets filtered through Earth's atmosphere. All the particles that make this up scatter the blue light, which leaves mostly red light to reach us when we're watching the spectacle on the ground.
A Moving Moon
As for the Moon's own travels, try and find a star very close to its left side. An hour later the Moon will have passed over the star, which should now be sitting to the Moon's right. The Moon may not completely cover the star, sometimes the star will just graze its top or bottom. You'll have more success seeing this if the Moon is not full, as its light washes out most nearby stars.
The passing of the Moon in front of the star or planet, blocking it, is known as an occultation and these are listed in the handbook of the British Astronomical Association. If you've never seen a star being blinked out by the Moon, then you have an assignment — go out and see one! Even better is a planet: Venus or Saturn are my favorites. Saturn is especially good: with a scope you can watch as the rings are slowly covered by the Moon, dipping in and out of the lunar valleys before finally disappearing.
Earthshine
The Sun is the main object that lights the Moon, but Earth also has an effect. Our planet is over 3.5 times the diameter of the Moon, so we reflect more light onto its surface than the Moon gives us when it is full. This is called earthshine and it can be seen as a faint glow on the unlit part of the Moon when it is a thin crescent (before and after a new Moon).
Phases of the Moon
The word Moon is responsible for our word 'month': one mooneth (or thereabouts) was the measurement of the time it took for the Moon to complete one orbit of the Earth in relation to the Sun. Although it's given in schools as 28 days, the Moon's changing appearance (it's cycle of phases) takes just over 29.5 days. This is known as the Synodic Month. It represents the period from one full Moon to the next (or any other identical phase, for example half Moon to half Moon).
The Sun is always shining on one half of the Moon — how much of the lighted side we see depends on where the Moon is in orbit around Earth. The new Moon happens when the Moon sits between us and the Sun, and so the far side is lit (this is also the only time a solar eclipse can occur).
As the Moon moves around Earth and each day passes, we see more and more of its lighted side, a waxing (growing) evening crescent first, then half Moon, waxing gibbous and finally full Moon. At this point, the Moon sits on completely the opposite side of the sky to the Sun. Now everything reverses and the waning (shrinking) phases go through gibbous, half and waning morning crescent, finally back to new.
Observing the Moon
The Moon: it's big, round and bright. Anyone can discover its finer details, whether it's with the naked eye or binoculars.
Some astronomers seem to get a complex about the Moon. It's not that they're affected by it in werewolfish ways, but rather they develop a loathing for our large, rocky satellite. Why? Well, these usually friendly astronomers come to see it as a natural light polluter, washing away all the faint, small and fuzzy galaxies and nebulae they like to view. To them, the Moon is more of a nuisance than an object that's worthy of observing.
This is a real shame as the Moon has so much to offer. There's simply no truth in the assertion that when 'you've seen it once, you've seen it all' — with binoculars and small telescopes the appearance of the Moon can change dramatically from one hour to the next. Another reason it's so good is that it's easy to find. There's no star-hopping or fiddling with finderscopes, as the Moon quite plainly hangs about just waiting for you to look at it.
Magnify the view
The Moon is a stunning object to look at, but there are times when binoculars or a telescope are the only things that'll do it justice: for example, the first few days after new Moon through to just before full Moon. During this period, when the Moon is waxing, we see a sunlit, happy side and a contrasting unlit, spooky side.
The views of the bright side give us the names of the phases: crescent, half, gibbous and full. After full Moon the phases reverse as it starts waning; these are equally worth a look. However, the post-full phases are generally seen very late in the night, when most people prefer to sleep.
The zone between the light and dark sections of the Moon is known as the 'terminator', and this is the place to concentrate on for the most stunning lunar views. It's along the waxing Moon's terminator that, if you were standing on the lunar surface, the Sun would be rising. The low light hits its mountains, craters, valleys, crinkly ridges, rilles, escarpments and all manner of other volcanic and impact features, casting dramatic shadows across the stark landscape. The view is further enhanced by largely flat, dark areas of solidified lava known as the lunar seas, over which shadows can stretch for tens of kilometres. All of this gradually changes as the Moon spins on its axis, but even at this slow rate you will be able to see hour-by-hour movement.
That the Moon spins on its axis may seem strange, as we know the same side always faces Earth. We are actually able to see 59 per cent of its surface as the Moon 'wobbles' up and down and from left to right, an effect known as libration.
We only see the one face because a long time ago the molten material inside the Moon caused it to become tidally locked to Earth. This 'synchronous rotation' means that the Moon spins once on its axis in exactly the same time it takes to orbit Earth. You can get an idea of how this works if you imagine yourself observing from the Sun. Over the course of a month you would see the Moon spin once.
Of course, leaving Earth takes a bit of mastering, but once you can imagine it, understanding the Universe becomes a breeze.
Latin Lingo
When you look at a map of the Moon, you'll notice that its physical features all have Latin names because they were named a long time ago when Latin was more widely used. Here's what those names mean in modern English.
| Catena | Chain of craters |
| Dorsum | Mare ridge |
| Dorsa | Group of mare ridges |
| Lacus | Lake |
| Mare | Seas |
| Mons | Mountain range |
| Montes | Mountain range |
| Oceanus | Ocean |
| Palus | Marsh |
| Promontorium | Cape |
| Rima | Fissure |
| Rimae | Group of fissures |
| Rupes | Escarpment |
| Sinus | Bay |
| Terra | Landmass |
| Terrae | Highlands |
| Vallis | Valleys |
Lunar Atlases
There are many atlases and wall charts vying to help you find the various craters, mountains and features of the Moon. They have their strengths and weaknesses, and you'll find some easier to use than others.
Watch out for any that flip the Moon so that south becomes north, or make any other change to orientation. These are fine for seasoned astronomers who use a specific telescope setup to observe the Moon, but for those of us who switch between correcting lenses, terrestrial telescopes, binoculars and the like, go for a plain and simple map with north at the top. It's also an advantage to have one with high-quality pictures.
Wall charts are also good for getting a general idea of where things are on the Moon. However, they're less use at the eyepiece unless they're safely wrapped up in a dew-proof coating, so it's worth getting a laminated version.
Experiencing Eclipses
Why do eclipses occur so infrequently? It all has to do with the Moon's tilted orbit.
Over the course of a year the Sun moves across the sky on a path known as the ecliptic. It rises in the east and sets in the west, in essence appearing like it travels around Earth.
If the Moon orbited Earth in this same plane, then each month we would get an eclipse of the Sun (when the Moon passes between the Sun and Earth) and an eclipse of the Moon (when the Earth is between the Sun and the Moon). We don't, however, as the Moon's orbit is tilted at an average of 5� from the ecliptic.
Most months this means that from our point of view on Earth, the Moon moves above or below the Sun at new Moon, and above or below Earth's shadow at full Moon. We only get an eclipse when the Moon's orbit intersects the ecliptic and all three bodies are in the correct alignment.
Due to a fantastic coincidence, the Sun is 400 times bigger than the Moon, but around 400 times further away. This means that they appear to be the same size. The Moon just covers the Sun during a total solar eclipse, allowing us to witness its ghostly outer atmosphere, known as the corona.
Top Ten Moon Sights
Our celestial neighbour has enough to keep astronomers busy for a lifetime, but here are 10 highlights for telescopes and binoculars.
Crater Grimaldi
Size: 173km across
Type: Basin
Appearance: Visible even to the naked eye, this dark basin reveals fantastic detail through binoculars and telescopes, such as eroded walls, ridges and low hills.
Rimae Sirsalis
Size: 425km long
Type: Rille system
Appearance: This series of fault lines is visible even in a small telescope, which will reveal Sirsalis's main crack running straight for over 300km through a cratered environment.
Crater Copernicus
Size: 94km across
Type: Impact crater
Appearance: One of the Moon's recognizable features and the result of quite a recent impact, a scope reveals terraced crater walls and central peaks rising from the floor below.
Vallis Alpes
Size: 155km long
Type: Valley and rille
Appearance: A clean gouge through a mountainous region, the 18km-wide fault line can be easily visible in small scope and binoculars as a dark stripe in a lighter landscape.
Crater Plato
Size: 109km across
Type: Lava-filled impact crater
Appearance: In binoculars and small telescopes the beauty of this crater is its jagged rim with 2km high mountains compared to its smooth lava-filled floor.
Montes Alpes
Size: 3.4km maximum height
Type: Mountain range
Appearance: Through binoculars you will just be able to make out this rangle of peaks; with a telescope they start to reveal really good detail, especially if the terminator is close by.
Montes Teneriffe
Size: 2.5km maximum height
Type: Mountain range
Appearance: When caught in the right angle of sunlight this 110km-long mountain range reveals good detail among its peaks using a small scope and around 150x magnification.
Mons Piton
Size: 2.2km in height
Type: Mountain
Appearance: Lying on its own in the flat region of the Mare Imbrium, use a small telescope when the Sun's illumination is low to reveal the shadow cast by this lone peak.
Rupes Recta
Size: 110km long
Type: Rille
Appearance: This popular target for binoculars and small telescopes is another fault line where the lunar surface suddenly drops by 300m. It's best seen when close to the terminator.
Vallis Rheita
Size: 450km long
Type: Valley
Appearance: A long, wide valley that many think is the result of a sustained meteor bombardment. A small telescope will show the crater Rheita next door has a central peak.
Copyright � Immediate Media. All rights reserved. No part of this article may be reproduced or transmitted in any form or by any means, electronic or mechanical without permission from the publisher.
{ width: 160, height: 160, defaultImage: '', layers: 'Artimg-BBC_Clusters' }

![]() Orion is proud to partner with BBC Sky at Night Magazine, the UK's biggest selling astronomy periodical, to bring you this article as part of an ongoing series to provide valuable content to our customers. Check back each month for exciting articles from renowned amateur astronomers, practical observing tutorials, and much more!
Orion is proud to partner with BBC Sky at Night Magazine, the UK's biggest selling astronomy periodical, to bring you this article as part of an ongoing series to provide valuable content to our customers. Check back each month for exciting articles from renowned amateur astronomers, practical observing tutorials, and much more!
Groups of stars against the blackness of space, clusters make great observational targets for the amateur astronomer

M3 Globular Cluster by Doug Hubbell
When you gaze up at the night sky, it looks like a lot of stars are on their own. But a solitary-looking star may be a member of a vast group that's travelling through space as a unit. If we wind the clock back millions of years, we may find these stars forming in the same vast cloud of dust and gas.
Known as open clusters, these families of anywhere from a few dozen to a few thousand stars are created in the dusty spiral arms of our Galaxy. They travel together through space, but gentle tidal forces eventually cause the stars to move apart until they begin to merge into the general starry background.
There are many fine examples of newer and older clusters out there, perfect for looking at with binoculars. As a rule of thumb, you can pretty much assume that the younger the open cluster, the more compact it appears, since the stars haven't had much time to drift apart.
There is another variety of star cluster out there: the globular cluster. These are much bigger than the open sort, consisting of hundreds of thousands or millions of generally reddish, older stars. Whereas open clusters are found and made within the plane of our Galaxy, globular clusters form a halo around it and their creation is much less well understood.
In terms of observing, this all means that the majority of open clusters are found in or close to that misty river of stars stretching across the sky, the Milky Way, while globular clusters are seen all over the sky. When looking at them with the naked eye you'll see only fuzzy patches, but a pair of binoculars will reveal some truly spectacular gems.
What To See: Deep Sky
Outstanding Open Clusters
M45
Constellation: Taurus
RA 03h 45m 48s, dec. +24� 22' 00"
The Pleiades, or Seven Sisters, is one of the most splendid clusters in the night sky. With the naked eye, six stars of the cluster are easy to see, but counting up to 10 is possible. The cluster actually contains many hundreds of stars, and a decent pair of binoculars will be able to reveal many of them.
NGC 869 and NGC 884
Constellation: Perseus
RA 02h 19m 00s, dec. +57� 09' 00
This is the 'Sword Handle', a wondrous double cluster with two star clusters sitting side by side. They are both 0.5� in diameter and are easily visible to the unaided eye. Try sweeping the area with binoculars — the hundreds of stars, set against the backdrop of the Milky Way, make for a fine sight.
M7
Constellation: Scorpius
RA 17h 53m 54s, dec. -34� 49' 00"
Also known as the Ptolemy Cluster, this appears to be twice the size of the full Moon. To the eye, the 80 stars of the cluster appear as a bright clump in the Milky Way, but through binoculars the stars are resolved.
M35
Constellation: Gemini
RA 06h 08m 54s, dec. +24� 20' 00"
This cluster contains upwards of 200 stars and can just be seen with the unaided eye on good clear nights. Binoculars bring out the brightest 20 or so stars, while the rest form a diffuse oval wash behind.
M44
Constellation: Cancer
RA 08h 40m 06s, dec. +19� 59' 00"
Known as the Beehive Cluster, M44 contains hundreds of stars and can be seen as a misty patch with the naked eye. Binoculars are the best way to see M44: through them you'll see a dozen or so of its brightest stars.
Great Globulars
M13
Constellation: Hercules
RA 16h 41m 42s, dec. +36� 28' 00"
Known as the Great Globular Cluster, this is the best of its kind in the northern hemisphere. From a dark site, M13 can just be seen with the unaided eye, but its bright, round form is a stunning sight through a pair of binoculars.
M5
Constellation: Serpens
RA 15h 18m 36s, dec. +02� 05' 00"
This is thought to be one of the oldest of all globular clusters. It is easily found in binoculars and has a slightly oval-shaped appearance. What you'll see is a fuzzy blob, hinting at the vast number of stars it contains.
M22
Constellation: Sagittarius
RA 18h 36m 24s, dec. -23� 54' 00"
One of the brightest globular clusters, M22 is easily visible with the unaided eye, and a great sight through binoculars. It's larger than M13, which is impressive, but its place in the Milky Way's river of stars makes this a real jewel in the crown.
M3
Constellation: Canes Venatici
RA 13h 42m 12s, dec. +28� 23' 00"
This is another stunning globular cluster. It can just be seen with the unaided eye, but binoculars will reveal its bright, round shape that holds around 500,000 stars. 274 of these are known to be variable, the largest number in any known globular cluster.
M15
Constellation: Pegasus
RA 21h 30m 00s, dec. +12� 10' 00"
Looking like a slightly more compact M13, this densely packed object is an ideal target for binoculars. It appears as a round smudge with quite a compact central region, giving this distant star cluster a real sense of depth.
Copyright � Immediate Media. All rights reserved. No part of this article may be reproduced or transmitted in any form or by any means, electronic or mechanical without permission from the publisher.
{ width: 160, height: 160, defaultImage: '', layers: 'Artimg-BBC_Galaxies' }

![]() Orion is proud to partner with BBC Sky at Night Magazine, the UK's biggest selling astronomy periodical, to bring you this article as part of an ongoing series to provide valuable content to our customers. Check back each month for exciting articles from renowned amateur astronomers, practical observing tutorials, and much more!
Orion is proud to partner with BBC Sky at Night Magazine, the UK's biggest selling astronomy periodical, to bring you this article as part of an ongoing series to provide valuable content to our customers. Check back each month for exciting articles from renowned amateur astronomers, practical observing tutorials, and much more!
These shining arks of stars come in all shapes and sizes, many the result of cosmic collisions
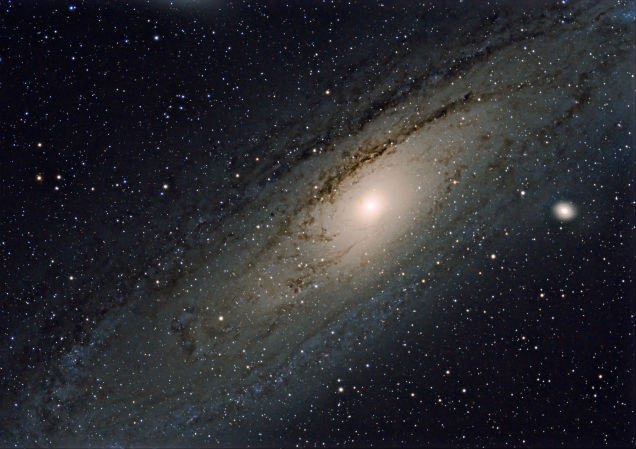
Andromeda Galaxy by Steve Peters
Galaxies are concentrations of millions or billions of stars, gravitationally bound together along with gas clouds and pockets of dust. There are probably over 100 billion of them in the Universe. Some of the largest nearby galaxies appear in the night sky as faint smudges of light, but it was only in the early 20th century that astronomer Edwin Hubble proved that they actually exist well beyond the Milky Way. Before then, they were thought to be spiral-shaped nebulae on the outskirts of our own Galaxy.
Hubble also established that galaxies vary in shape and size. Two-thirds have distinctive spiral patterns, while the rest range from neat ellipticals to irregular blobs. They can be dwarves containing millions of stars or giants harbouring trillions. Astronomers are still piecing together why this is the case, but collisions and mergers seem to be important in determining how a galaxy evolves. Central black holes also seem to govern how gas is consumed and when stars are formed within these cosmic conurbations.
Hidden Mass
Galaxies are much more massive than they look. Around 90 per cent of their mass is not in luminous stars and gas, but in unseen 'dark matter'. It's arranged in a spherical halo, which governs the motions of the stars within. This invisible cocoon explains why the outskirts of spiral galaxies spin faster than if they were influenced by the quantity of stars and gas alone. Dark matter also governs how galaxies clump together under gravity to form filaments and clusters. Yet dark matter remains an enigma, and astronomers are still trying to discern what it is. It must be exotic as it does not absorb or emit light.
Spiral galaxies such as the Milky Way are named for the arcs of bright stars that corkscrew into their centres. The spiral is a density wave embedded in a flattened disc of stars and gas that is arranged around a central bulge. Bright stars form where gas clouds are compressed. The disc is full of young stars and gas, and tends to be blue; the bulge appears redder. Discs form when a cloud of gas collapses under its own gravity, spinning faster as it shrinks vertically. Spirals are common across space, apart from in the centres of galaxy clusters, where discs are easily destroyed by collisions.
Shaped like rugby balls, elliptical galaxies are much like the bulges of spirals, but lack any disc. They contain little gas, and few stars are being formed within them. Old, red stars are the norm, travelling on inclined elliptical orbits. Groups of elliptical galaxies are often found in the centres of galaxy clusters.
Lenticular galaxies are lens shaped, their classification falling between spirals and ellipticals. Many are similar to spiral galaxies, containing a relatively small disc and large bulge, but lacking the spiral arms. These may be faded spirals, in which star formation has ceased. Others are likely to be the result of galaxy collisions, which could have ripped off part of a larger disc, or shut down star formation after a vigorous burst.
Irregular galaxies do not fall into any of the other main classification categories — they have no distinctive shape. This may be because they have been distorted in a collision or they may have formed that way. Some dwarf galaxies condensed in a haphazard manner from gas clouds and haven't settled into an ordered state.
What To See: Deep Sky — Glimpsing Galaxies
The Andromeda Galaxy, M31
Constellation: Andromeda
RA 00h 42m 42s, dec. +41� 16' 00"
The magnificent Andromeda Galaxy is the nearest large galaxy to the Milky Way, and it is possible to see it with the naked eye. Under dark, Moon-free skies, you should be able to find this spiral galaxy as a faint misty patch a short distance from the band of the Milky Way without optical aids. Using binoculars, you'll find it with little or no difficulty. It will be oval in appearance — although you won't be able to make out any of the individual stars within it. Through a 6-inch telescope the galaxy appears as a larger, elongated oval shape with a core that shows up as a slightly brighter area.
The Whirlpool Galaxy, M51
Constellation: Canes Venatici
RA 13h 30m 00s, dec. +47� 16' 00"
The Whirlpool Galaxy is a magnificent face-on spiral located in Canes Venatici. It can be found not far from mag. +1.9 Alkaid (Eta (—) Ursae Majoris). You'll need a large telescope to see its spiral arms clearly.
The Triangulum Galaxy, M33
Constellation: Triangulum
RA 01h 33m 54s, dec. +30� 39' 00"
M33 can just be seen with the naked eye under pristine dark skies, but light pollution means binoculars at least. It sits between mag. +2.2 Hamal (Alpha (a) Arietis) and mag. +2.1 Mirach (Beta (b) Andromedae).
The Sombrero Galaxy, M104
Constellation: Virgo
RA 12h 40m 00s, dec. -11� 37' 23"
Located just within Virgo, this spiral galaxy is easy to see in any scope. A 6-inch instrument shows an elongated glow, but its defining characteristic is a dark dust lane that cuts across the south of the central halo.
M81 and M82
Constellation: Ursa Major
RA 09h 55m 33s, dec. +69� 03' 55"
These galaxies in Ursa Major, M81 or Bode's Galaxy (co-ordinates above)and M82 the Cigar Galaxy, are close to each other in the sky, so we're treating them as one sight here. With a small telescope and a low magnification eyepiece, you'll be able to see them in the same field of view.
The Leo Triplet
Constellation: Leo
RA 11h 18m 55s, dec. +13� 05' 32"
The Leo Triplet is comprised of the spiral galaxies M65 (co-ordinates above), M66 and NGC 3628, and lies about halfway between mag. +3.3 Chertan (Theta (θ)Leonis) and mag. +6.6 Iota (ι) Leonis. Larger telescopes will show them clearly. Another group, M95 and M96, is nearby.
The Pinwheel Galaxy M101
Constellation: Ursa Major
RA 14h 03m 12s, dec. +54� 20' 57"
This face-on spiral galaxy is comparable in size to the Milky Way, and while it can be spotted in binoculars its magnitude of +7.9 means you'll need dark skies and a 6-inch telescope to see its spiral arms.
Copyright � Immediate Media. All rights reserved. No part of this article may be reproduced or transmitted in any form or by any means, electronic or mechanical without permission from the publisher.
{ width: 160, height: 160, defaultImage: '', layers: 'Artimg-BBC_AP_GuideTheSun' }

Orion is proud to partner with BBC Sky at Night Magazine, the UK's biggest selling astronomy periodical, to bring you this article as part of an ongoing series to provide valuable content to our customers. Check back each month for exciting articles from renowned amateur astronomers, practical observing tutorials, and much more!
View our nearest star in all its glory, with BBC Sky at Night Magazine's safety-aware guide to solar imaging
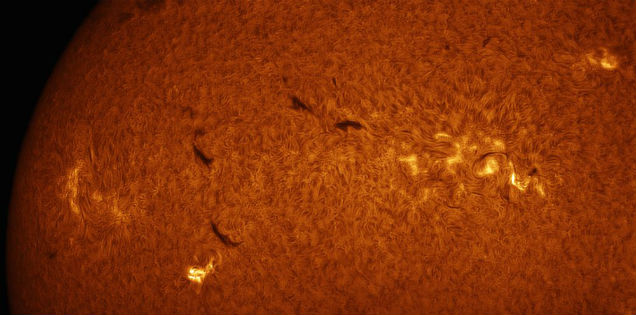
Hydrogen Alpha Closeup by Jimmy E.
Taking an image of the Sun is a fascinating astronomical pursuit that gives you the opportunity to study a star close-up. There are other advantages to solar imaging: it can only be done during the day, when the temperature is normally quite pleasant, and with plenty of light around you can say goodbye to fumbling around with red light torches.
The Sun has a visual activity cycle that is about 11 years long. The cycle starts at what is called a 'solar minimum', when activity is low. Roughly five to six years later activity reaches its peak at a point known as 'solar maximum', before receding back to solar minimum once more. The amount of detail you'll be able to capture depends on the type of kit you use, but there's usually something interesting and different to see from one day to the next, whatever equipment you have.
Of course, there are downsides to overcome. It's difficult to see your computer screen in sunlight and there's a real danger from the intensity of light — it's one of the only times that astronomy can pose a risk of physical injury. Over the next few paragraphs, we'll look at how to address these issues and how to image the Sun safely using different methods. We'll also discuss some of the solar features that are visible using different types of equipment and tell you how to take the best images of them.
So, if you're fed up with sitting outside under a cold, dark and frequently misty night sky, let's see if we can tempt you to come over to the light side.
Need to Know — The Dos and Don'ts of Solar Viewing
The Sun is a dangerous object and only the correct kit should be used to observe or image it. Never look through or even point an unfiltered reflector or compound telescope like a Schmidt-Cassegrain at the Sun: you'll cause physical damage to your eyes and the scope. Never use solar filters that attach at the eyepiece end of your scope, either — these may crack under the intense heat. Don't take risks by using uncertified filters. A piece of welding glass may look dark but it could still let through wavelengths that may damage your eyes. The golden rule when working with the Sun: if in doubt, don't do it.
What You'll Learn in This Article:
Equipment
Solar imaging equipment ranges from basic white light filters to precision narrowband filter systems. We discuss how to get started with white-light solar imaging and how to advance using hydrogen-alpha and calcium-K filters.
Technique
Constellation: Orion
We take you further into the world of solar imaging and explain the different types of narrowband filter systems available. We'll explain why certain filters are expensive and what benefits you're getting for your money.
Masterclass 1
White light imaging is the simplest way to start your solar journey. We'll discuss a number of methods for imaging the Sun. Our walkthrough will show you how to set up your kit for imaging with a white light filter and how to make your first capture.
Masterclass 2
An introduction to the dynamic world of hydrogen-alpha imaging using an entry-level Personal Solar Telescope (PST). We'll discuss how to take your first PST images and show you how to process them for maximum effect.
Software
As well as software to help you understand exactly what it is you're looking at, you'll need packages to control your camera, process your captures and make those final tweaks.
EQUIPMENT
From filters to scopes — all you need to capture the Sun
When taking images of the Sun it's important to use the right tools for the job. The dangers involved in pointing a telescope at the Sun mean that only proper certified equipment should ever be used.
Solar telescopes come in two varieties — those that are dedicated to the purpose and those that have just been temporarily adapted for safe solar viewing. A standard, equatorially driven mount makes a perfect platform for either variety, since the Sun's motion across the sky is not significantly different from that of the stars.
White Out
White light imaging involves removing most of the harmful light that could reach your camera sensor. There are various ways to do this, including projection using a 'Herschel Wedge', or by fitting a white light filter over the front of your scope. Projection and Herschel Wedges are discussed in 'Masterclass 1' (see below), but both are limited for use with refractors. The more flexible option is to use a white light filter such as Baader AstroSolar Safety Film. This type of filter is easy to make, and can be used with all telescope types. Never use cheap solar filters that fit onto eyepieces.
A white light filter will show sunspot groups that will appear and rotate across the disc over the course of a couple of weeks. But for really dramatic views, you'll need to use a narrowband filter that lets only a specific wavelength of light through, such as hydrogen-alpha or calcium-K. These filters are more expensive than white light filters and can only be used for solar work. Don't confuse deep-sky hydrogen-alpha filters with solar ones — deep-sky filters should never be used for imaging the Sun.
The cheapest hydrogen-alpha scopes are the Coronado PST and Lunt LS-35. They record all manner of exotic phenomena including solar prominences.
Both instruments have small apertures, but if you want something larger, you'll have to spend more. Both hydrogen-alpha and calcium-K filters are available pre-fitted into dedicated solar telescopes or as 'kits' that can be used to convert night-time scopes for narrowband solar work.
Whichever filter system you opt for, once it's been fitted, imaging the Sun is no more complicated than imaging the Moon. To capture the finest detail, a high frame rate camera like a webcam or planetary camera will produce the best results. For extra magnification, just use a Barlow lens. If you want to fit the entire disc in the frame, use a focal reducer. But do note that this kind of smaller scale is only possible with certain telescope and camera combinations.
Tech Talk — Cameras for Solar Imaging
DSLR
DSLR cameras are well suited for taking shots of the Sun through white light filters, but less so for narrowband filter shots where special processes are required to extract detail. Single images are also prone to atmospheric distortion.
Webcams
The effects of atmospheric seeing can be reduced by using webcams. These work very well for white light filtered imaging but the Bayer matrix colour filters fitted to a webcam's sensor will reduce its sensitivity when using narrowband filters.
High Frame Rate Cameras
As with other Solar System targets a mono, high frame rate camera will produce the best results, especially when used with narrowband filter systems. The high frame rates these cameras can achieve are ideal for reducing seeing effects.
Cooled CCD Cameras
A monochrome, cooled, astronomical CCD camera can work well with narrowband-filtered images. The best technique is to take lots of short-exposure images and stack them together using a registration and stacking program such as RegiStax.
Need to Know — Which Mount?
Solar imaging at low magnification can be done using a fixed mount such as a tripod, but a driven, polar-aligned, equatorial mount will make life much easier. While the Sun's apparent motion across the sky isn't quite the same as that of the stars, it is close enough not to have to worry about it while carrying out a typical imaging session, and a standard RA drive will do a perfectly adequate job.
As with any other type of imaging, a stable, heavy-duty mount is highly recommended to help avoid any unwanted wobbles.
TECHNIQUE
Tips and tricks for successful solar imaging
The techniques used to image the Sun are similar to those used to capture images of the Moon and planets. The difference is that the intensity of the light from the Sun must be reduced. There are different filter systems to do this and it's important only to use certified ones.
The best camera for imaging the filtered Sun, especially if you intend to use any magnification, is a monochrome high frame rate camera like a webcam or a dedicated planetary camera. Colour devices work for white light captures, but they may be lacking when using speciality filters as their in-built colour filters can reduce the sensor's sensitivity.
Two Techniques
Solar imaging falls into two categories: white light and narrowband. White light imaging reduces the amount of sunlight to safe levels, cutting out harmful, invisible wavelengths. With a white light filter on the front of your telescope, the Sun's light is dimmed to safe levels for imaging. The white light filter allows you to capture the Sun's visible surface (the photosphere).
Narrowband imaging is completely different. It calls for filters that are typically many times more expensive than a basic white light filter. The reason for this expense is down to the very fine optical tolerances that need to be met in order for the filters to work. These higher tolerances mean higher costs.
The main narrowband filter types used for solar imaging concentrate on hydrogen-alpha light, which has a wavelength of 656.3nm, plus calcium-K light with a 393.4nm wavelength. Less common filters include those that work with the 589.6nm wavelength of sodium-D light.
Narrow Bandwidths
How good a narrowband filter is can be measured by how wide its 'window' of extra wavelengths is, which lets light through either side of the central wavelength. This is also known as bandwidth. Narrowing the bandwidth allows ever-finer surface detail to be picked out. A low-cost hydrogen-alpha filter, like one from a Coronado PST, has a stated bandwidth of less than 0.1nm. Bandwidths can get narrower, to 0.05-0.03nm, and this is where the cost comes in: filters with windows this narrow can cost many thousands of pounds. Stacking two matched filters on top of one another — a technique known as double-stacking — can also help reduce bandwidth.
We've said that imaging the Sun is no more complex than imaging the Moon. While this is generally true, the lack of fixed features on the Sun's disc can lead to confusion, especially in relation to its orientation in the sky. Fortunately, if your scope sits on an equatorial mount, the solution is pretty straightforward. Begin by rotating the camera so that any features visible move parallel to the bottom edge of the imaging frame when you slew your scope in RA. The north edge of the Sun is found by using a finger to apply gentle upward pressure to the front of the tube. The last edge of the Sun visible if this motion were continued would be its northern edge if you're in the northern hemisphere, or southern edge if you're in the southern hemisphere. Finally, apply a similar pressure to push the tube over to the west. Again, the last edge of the Sun that would be visible if the motion were continued would be its western edge.
The Sun's axis tilts relative to Earth and changes throughout the year. A program called TiltingSun can help you visualise this tilt when you come to image the Sun (see 'Software' below for more information).
Pro Pointer — Viewing our Nearest Star in Three Different Ways
White Light
A white light view reveals the Sun's visible surface or 'photosphere'. With good seeing, a 4-inch or larger scope will reveal the photosphere's mottled texture. Called solar granulation, this looks a bit like lots of rice grains packed together. The photosphere looks darker at the edge of the disc due to a phenomenon known as limb darkening and it's here that you might find bright patches called faculae.
If the Sun is active, there may be sunspots on view too. Larger spots typically appear in groups called sunspot groups, pictured, or active regions. A typical sunspot has a dark centre known as the umbra, surrounded by a lighter region known as the penumbra.
Hydrogen-Alpha
Through a hydrogen-alpha filter, the photosphere is hidden under a blanket of hydrogen known as the chromosphere — only light from this outer layer gets through.
'Dark mottles' formed by dark jets of hydrogen are known as fibrils. Seen edge-on at the Sun's limb, fibrils look like tiny spikes and are known as spicules. Active regions are marked by huge swirls of hydrogen tracing intense magnetic field lines, in and around which bright regions called 'plage' appear. Where magnetic tension erupts, there are vast releases of energy from bright flares. Snake-like clouds of hydrogen known as filaments float above the chromosphere. When at the edge of the Sun, they are known as prominences.
Calcium-K
A calcium-K filter reveals detail in a low part of the chromosphere immediately above the photosphere. Consequently, the view is not dissimilar to that seen through a white-light filter. There are, however, some subtle differences — for example, a calcium-K filter is especially good at bringing out detail in and around active regions.
Bright plage can be seen within these regions and remain visible right across the Sun's disc. Solar granulation is hidden from view but the calcium-K Sun does show a large-scale network of bright interlinked paths known as the chromospheric network. Bright prominences may also be imaged as they extend off the edge of the calcium-K Sun.
MASTERCLASS 1
Cheap and easy, using a white light filter is a popular way to image the Sun
Imaging the Sun in its natural 'white' light is an inexpensive way to get into solar photography. When you pay attention to the safety issues, it can be a very rewarding way to monitor our nearest star.
One of the most basic methods is to use solar projection. For this you'll need a small refractor, ideally mounted on a driven equatorial mount. With your scope pointing away from the Sun, fit a non-plastic, low-power eyepiece and ensure the finder is removed or capped. Watching the scope's shadow on the ground, turn it to point directly at the Sun. A piece of stiff white card held behind the eyepiece will catch the Sun's image, while a tweak on the focuser will bring it into sharp relief. A card shield taped to the objective end of the tube may help improve contrast if the projection is difficult to see.
Now set your camera to automatic and take a shot of the image on the card screen. If the image comes out too bright, try moving the screen away from the eyepiece or, if you have manual controls, try under-exposing the shot. This basic method is capable of showing the photosphere, limb-darkening, sunspots and faculae — it is, however, only suitable for refractors.
A more sophisticated method, also limited to use with refractors, is to use a device called a Herschel Wedge inserted in the eyepiece holder. The wedge basically blocks most of the harmful heat and light from the Sun, reducing its intensity to safe viewing levels.
Using a Filter
A more universal method that is suitable on any type of telescope is to use a white light filter such as Baader AstroSolar Safety Film or a Solar Filter. See 'Step by step' below for instructions on imaging with a solar filter.
With a filter fitted you can image the Sun just as you would the Moon. In fact, the same constraints apply because the Sun's light is just as susceptible to our turbulent atmosphere. Stills cameras such as DSLRs are good for low-power shots, but webcams or, preferably, high frame rate planetary cameras are more suited for close-ups. For optimal results, however, screwing a solar continuum or green imaging filter onto your camera's nosepiece may enhance contrast in sunspot detail and solar granulation.
High frame rate captures are processed in the same way as lunar or planetary captures: by sending the capture file through a stacking program such as RegiStax or AviStack. See 'Software' below for more on processing solar images.
Tech Talk — Finding Your Focus
Focusing is a critical skill to master in any form of astronomical imaging — without it, you'll get poor results. If you're just starting out, accurate focusing can be quite hard to get to grips with, which can make the whole imaging experience rather frustrating. There's no real reason why this needs to be the case, so here are a few tips on how to get your images as sharp as possible.
First, make sure your camera is securely locked into your telescope's eyepiece holder and that the focuser tension adjustment is set firm. You want to be able to move the camera back and forth quite easily, but you also want it to stay where you've put it. Locate a high-contrast part of the Sun. For white light imaging, the best target is the Sun's edge. For more exotic filters, the Sun's surface is normally sufficiently detailed for you to lock onto that. Even here, though, it's good practice to choose a sunspot group or perhaps a dark hydrogen-alpha filament to give you a better focus target.
With a gentle grip on the focuser, move in towards focus, getting slower as you appear to be reaching the critical point. When you do reach this point, keep going, coming out of focus again on the other side. Then reverse direction again, passing slowly through focus, this time from the other side. Do this a few times until you're confident that you can recognise the real focus position; then adjust the focuser until you're in that position.
Need to Know — Seeing the Sun
Earth's turbulent atmosphere interferes with sunlight on its journey to your telescope and this makes fine detail on the Sun's surface appear to wobble and distort. Known as 'seeing', the Sun's own heat can make matters worse, causing heat thermals as the day starts to get going.
For white light imaging, poor seeing means the difference between viewing solar granulation or not, so it's a good idea to try and choose periods when the seeing is good. Mid to late morning is often ideal because it's a time before the Sun's heat has had a chance to take full effect.
Step by Step — How to Set Up and Capture Solar Images
1. Fitting the Filter
With the scope pointing away from the Sun, remove its lens cap and fit the solar filter; remove or cap the finderscope too. Make sure everything is securely fastened. If required, use a bit of low-tack electrical tape to hold the main filter in place securely. This is especially important on a windy day.
2. Line Up with the Sun
Lining the telescope up with the Sun without the use of a finderscope isn't as hard as it sounds. Without looking along the tube towards the Sun, roughly align the scope and then look at its shadow. As the scope approaches the correct alignment, so the tube shadow will reach minimum size.
3. Keep It in the Dark
If you find it hard to see detail on your laptop's screen in sunlight, you'll need a dark enclosure. A simple one can be made by putting a blanket over your head and the computer, but for something more sturdy, try placing the laptop in a closed cardboard box with a slit cut in it so you can see the screen.
4. Insert your Camera
If you have one, screw a solar continuum or green imaging filter onto your camera's nosepiece. Insert the camera into the eyepiece holder of your scope and fine-tune the scope's position so that an image can be seen on your computer's screen. Locate the Sun's edge and focus roughly.
5. Settings and Focus
Using the highest frame rate, reduce gain and then exposure until the image is correctly exposed and contains no white. If you can't, you may need to use a neutral density filter. Rotate the camera so that any spots visibly move horizontally across the frame while slewing in RA. Finally, fine focus the image.
6. Capture
For low image scale (magnification) setups showing all, or at least a large portion, of the Sun's photosphere, aim to capture 500-800 frames. Increase this to around 2,000 frames for larger image scales. If your control software offers it, reduce gamma slightly to make granulation and spot detail easier to pick out.
MASTERCLASS 2
Capturing hydrogen-alpha detail with a PST
The Coronado PST revolutionised hydrogen-alpha solar observing because it was both cheap and portable. However, as far as imaging was concerned there were a few hiccups, mainly due to a lack of inward movement when focusing high frame rate cameras and webcams. This resulted in being unable to reach prime focus, hindering the scope's usefulness for solar imaging.
But there are solutions. One of the easiest is to take the front lens off a standard 2x Barlow and screw it into the camera's nosepiece. The view isn't quite prime focus but it's not far off, and focus can generally be reached. You can also buy a low-profile nosepiece that puts the camera closer to the eyepiece holder.
Using a PST
The PST is a low-power instrument. Its 40mm objective works at f/10, giving a focal length of 400mm. Consequently, image scale tends to be quite modest and the PST is excellent for overview shots of the Sun's hydrogen-alpha disc. In terms of the camera, a monochrome, high frame rate camera is best. Colour cameras, including webcams, are fitted with a matrix of colour filters that severely reduces sensor sensitivity when working at one specific wavelength.
The PST is threaded for a standard photographic tripod, but if you can mount it on a driven equatorial mount you'll find things a lot easier. With the scope mounted, use its shadow on the ground to point it roughly at the Sun. Fine pointing can be achieved by getting the bright spot (a small Sun image) in the centre of the PST's built-in solar finder. You can then look through a low-power eyepiece in the PST's eyepiece holder to finish off the job if this proves necessary.
Screw the lens from a 2x Barlow into your camera's nosepiece and insert it into the PST's eyepiece holder. It's a good idea to place your head and laptop under a blanket or inside a dark cardboard box to make the screen easier to see. Once done, you should be able to see an image, probably unfocused, on-screen. Carefully focus using the thumbscrew at the base of the PST's body. If the image appears over-exposed at this point, that's fine — just make sure the Sun's edge and any visible prominences are as sharp as possible.
Once done, set your camera's gamma, contrast and brightness to their zero (default) settings. Using the highest frame rate available, decrease the gain and then the exposure so that the surface appears detailed but not over exposed — there should be no white showing. If the image is dim to start with, begin using a lower frame rate. Rotate the PST's tuning ring so that you achieve maximum hydrogen-alpha contrast in the centre of the image.
For the low image scale images that the PST offers, aim to record 500-800 frames per capture.
Tech Talk — How Dedicated Solar Scopes Work
At the heart of many hydrogen-alpha telescopes is an optical device known as a Fabry-P�rot etalon. This creates an optical cavity by bringing two optically flat glass plates together, separated by a precise gap. The two parallel facing surfaces are semi-silvered. As light enters the cavity through the first plate, it reflects back and forth between the semi-silvered surfaces. The reflecting beams interfere with each other so that certain wavelengths reinforce while others cancel out — this is a physical process that's known as 'constructive and deconstructive interference'.
The light that eventually passes out through the semi-silvered surface of the second plate contains bright wavelength peaks and dim wavelength troughs. A plot of wavelength vs intensity of this light looks a bit like an upside down comb, the peaks being represented by the tips of the comb's teeth. By passing the etalon's output through a less precise 'blocking' filter, it's possible to strip off all the unwanted 'comb teeth' and let just the one of interest through. The width of this peak defines the quality of the etalon and dictates how good a view you'll eventually get at the eyepiece or camera.
SOFTWARE
Programs every Sun worshipper should have
For best results in solar imaging, you'll need software for camera control and for grading and stacking multi-frame movie files, as well as for tweaking the end results. In addition, one highly recommended support program is TiltingSun, which is available from www.atoptics.co.uk. This provides valuable information about the Sun's orientation with respect to the Earth. TiltingSun can also be used to generate a grid that you can overlay onto your own image via a graphics editing program.
As far as webcams are concerned, there are more astro-specific camera control programs available such as wxAstroCapture (arnholm.org/astro/software/wxAstroCapture/) and K3CCDTools (www.pk3.org/Astro/index.htm?k3ccdtools.htm).
Higher end cameras typically come with their own control software, but even here there may be better options such as Lucam Recorder (www.astrofactum.de/Astrofactum/LucamRecorder/index.htm), which is capable of controlling numerous high end cameras from Lumenera and The Imaging Source.
The main registration and stacking contenders are both freeware. RegiStax (www.astronomie.be/registax) has been the mainstay of both beginner and experienced imagers for a while. A relative newcomer is AviStack (www.avistack.de/index_en.html), which is also proving to be a popular choice with astro-imagers. Both of these programs run on fairly modest computers but, as always, a bit of processing power and added memory will help speed things up a little.
For final tweaks, a layer-based graphics editor is a must — Adobe Photoshop or the freeware GIMP (www.gimp.org) are undoubtedly great choices. These can also be used to apply false color to monochrome solar images.
Tech Talk — Check Your Settings
Different camera control software can have different setting options, but the most common settings are 'exposure', 'gain', 'gamma', 'contrast', 'brightness' and 'frame rate'.
Typically, gamma, contrast and brightness should be left at their zero (default) levels. It might be tempting to adjust gamma down to improve surface detail clarity but, in reality, this can be emulated using a graphics editor after image capture.
Exposure, gain and frame rate need to be adjusted so that you get a strong signal at the fastest frame rate possible. If you can keep the gain as low as possible to achieve this, you'll also reduce the level of noise.
Step by Step — Refine and Sharpen Your Images with Post-Processing Software
1. Registax
Pass your capture files through a registration and stacking program such as RegiStax or AviStack. If you're using RegiStax 6, select your capture file, click 'Set Alignpoints' and then 'Align'. Drag the bottom slider to include the best frames on the 'RegiStrationgraph' and click 'Limit'. Click 'Stack' to finish the process.
2. Wavelets
Wavelets can sharpen your images. A typical PST result (using the 2x Barlow lens trick referenced earlier), sharpens well with 'Wavelet-scheme: Linear' and 'Wavelet-filter: Gaussian'. Check the 'Use linked wavelets' box and set the first slider to 30. Once you've found a scheme that suits you, save it via the 'Save Scheme' button.
3. Save and Load
Save your processed result as a 16-bit PNG or TIFF file and load it into a layer-based graphics editor like Photoshop. If necessary, crop the image to remove any white borders that may have appeared during the registration and stacking process. Duplicate the base layer for safety and work on the duplicate layer.
4. Working With Features
For images including prominences and surface, duplicate the working layer and make the top layer active. Select everything in the background sky down to the curved limb. Expand, feather the selection by two pixels, delete its content and deselect. Make the lower layer active. Adjust the mid slider.
5. Tweaking
Tweak the surface (top) layer by adjusting its 'Curves' to taste. A contrast tweak can work wonders. If applicable, tweak the prominence (next layer down) in the same way. Try to keep the join between surface and prominences as natural as possible. When you're happy that both layers look correct, merge them together.
6. Apply False Color
Make sure the mono image is in RGB mode and open its 'Levels' adjustment. Move the red channel's mid slider towards the black (left) end of the histogram. Move the green channel's mid slider slightly towards the black end too. Move the blue channel's mid slider slightly towards the white end of the histogram.
Copyright � Immediate Media. All rights reserved. No part of this article may be reproduced or transmitted in any form or by any means, electronic or mechanical without permission from the publisher.
{ width: 160, height: 160, defaultImage: '', layers: 'Artimg-BBC_Nebula' }

![]() Orion is proud to partner with BBC Sky at Night Magazine, the UK's biggest selling astronomy periodical, to bring you this article as part of an ongoing series to provide valuable content to our customers. Check back each month for exciting articles from renowned amateur astronomers, practical observing tutorials, and much more!
Orion is proud to partner with BBC Sky at Night Magazine, the UK's biggest selling astronomy periodical, to bring you this article as part of an ongoing series to provide valuable content to our customers. Check back each month for exciting articles from renowned amateur astronomers, practical observing tutorials, and much more!
Whether they glow on their own or reflect the light of nearby stars, these clouds of gas and dust are popular targets
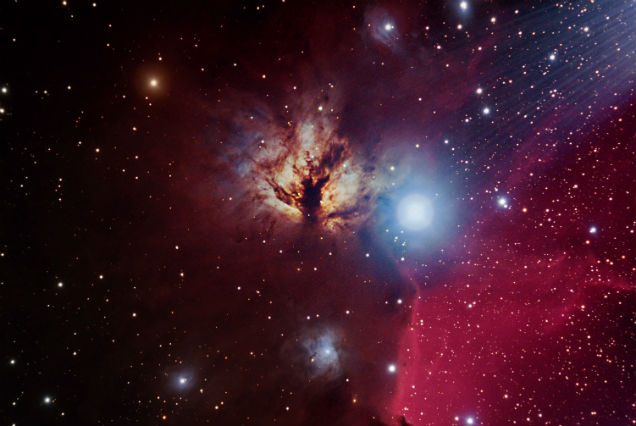
Flame Nebula by Doug Hubbell
Nebulae are clouds of gas and dust that are scattered throughout the Milky Way, mainly in the galactic disc, and it's here that stars are born. The word is Latin for 'little mists' — long ago, we considered all deep-sky objects to be nebulae, galaxies included, because they were faint fuzzy patches in the otherwise black night. These days, not only can we differentiate between nebulae and galaxies, but we know that several types of nebula exist.
The most famous nebula of them all, M42 in Orion, is what's known as an emission nebula. Nebulae of this type have a glow of their own, a result of stars within or nearby ionizing the gas cloud. On the other hand reflection nebulae, like the one around the Pleiades star cluster in Taurus, are only visible because there are some stars nearby that light up the gas and dust, just as the Sun lights up a cloud in an otherwise blue sky.
Dark nebulae, such as the Horsehead Nebula, don't glow at all, as they are so dense they absorb light. They are only visible because they are in front of a bright nebula or field of stars. We effectively see a silhouette of the cloud, but no detail in it.
You might think that planetary nebulae, such as the Ring Nebula in Lyra, have something to do with planets, but you'd be wrong. They get their name because, through a telescope, many have the appearance of a faint, small, fuzzy disc and can look a lot like a planet. These nebulae are formed during the death of a star of similar mass to the Sun. As it grows unstable, the star puffs off its gaseous atmosphere to form clouds around it. Stars larger than the Sun end their days explosively in a supernova, leaving a spectacular remnant in their wake.
Astro images will reveal that many nebulae have vivid colors — typically red in emission nebulae from ionized hydrogen atoms and hues of blue stars in reflection nebulae — but the view through binoculars or a telescope will be quite different. Visually, nebulae appear in shades of grey.
Stellar Nurseries
Nebulae are where stars are created. One idea of how it all starts is that a shockwave from a nearby supernova explosion compresses the cloud. Once the density of the gas passes a critical point, gravity takes over. Gravity causes clumps of the nebula to pull together. The pressure at the center of the clumps builds and the temperature rises dramatically. If there is enough gas to fuel the process, the region can become a protostar. If the temperature in the clump reaches 10 million degrees Celsius, the nuclear furnace that powers stars ignites. Over tens of millions of years it settles into normal life and joins what's called the main sequence, like our own Sun.
What To See: Deep Sky — Amazing Nebulae
The Orion Nebula, M42
Constellation: Orion
RA 05h 35m 17s, dec. -05� 23' 28"
M42 is the brightest nebula in the night sky and the only one that can be seen with the naked eye. With a casual glance below the three belt stars of Orion in a dark, light-pollution free sky, you'll see this emission nebula as a small misty smudge. A pair of binoculars will begin to reveal its curving shape. With a small telescope, you will start to see some structure. In the heart of the Orion Nebula are four stars. These are part of the Trapezium open cluster, named because of the shape the four stars form. It's the radiation from these stars that is energizing the entire nebula and causing it to glow.
The Crab Nebula, M1
Constellation: Taurus
RA 05h 34m 32s, dec. +22� 00' 52"
M1 is what remains of a cataclysmic stellar explosion witnessed from Earth in 1054. It can be spotted with a small telescope, but it's best seen through a really large aperture instrument — only then does its texture start to emerge.
The Lagoon Nebula, M8
Constellation: Sagittarius
RA 18h 03m 37s, dec. -24� 23' 12"
This easily noticeable emission nebula can be seen as a brighter patch with the beginnings of a core in 10x50 binoculars, even sitting where it does within the constellation of Sagittarius — a busy and star-rich area of the Milky Way.
The North America Nebula, NGC 7000
Constellation: Cygnus
RA 20h 59m 17s, dec. +44� 31' 44"
It takes a bit of practice to see emission nebula NGC 7000, also known as the North America Nebula, as it's such a large object. It's close to the bright star Deneb in Cygnus, and the surrounding area contains many targets for binoculars.
The Omega Nebula, M17
Constellation: Sagittarius
RA 18h 20m 26s, dec. -16� 10' 36"
This glowing emission nebula and star-forming region sits among the star fields of Sagittarius. It has a curved shape that can be likened to the Greek capital letter omega, Ω, hence its name, though it is sometimes called the Swan Nebula.
The Dumbbell Nebula, M27
Constellation: Vulpecula
RA 19h 59m 36s, dec. +22� 43' 16"
This fascinating and relatively bright planetary nebula appears as a misty oval in small telescope, with the Milky Way providing a marvelous backdrop. The 'dumbbell' shape only becomes apparent through large instruments.
The Horsehead Nebula, Barnard 33
Constellation: Orion
RA 5h 40m 59s, dec. -02� 27' 30"
The Horsehead Nebula, to the south of Orion's Belt in the Orion Molecular Cloud Complex, is a dark nebula that appears silhouetted against a brighter background of nebulosity. You will need a large aperture instrument and dark skies to make it out.
Copyright � Immediate Media. All rights reserved. No part of this article may be reproduced or transmitted in any form or by any means, electronic or mechanical without permission from the publisher.
{ width: 160, height: 160, defaultImage: '', layers: 'Artimg-BBC_Violent_Sun' }

Orion is proud to partner with BBC Sky at Night Magazine, the UK's biggest selling astronomy periodical, to bring you this article as part of an ongoing series to provide valuable content to our customers. Check back each month for exciting articles from renowned amateur astronomers, practical observing tutorials, and much more!
With orbiting telescopes now monitoring the Sun minute by minute, astronomers are witnessing ever more spectacular solar phenomena on our nearest star
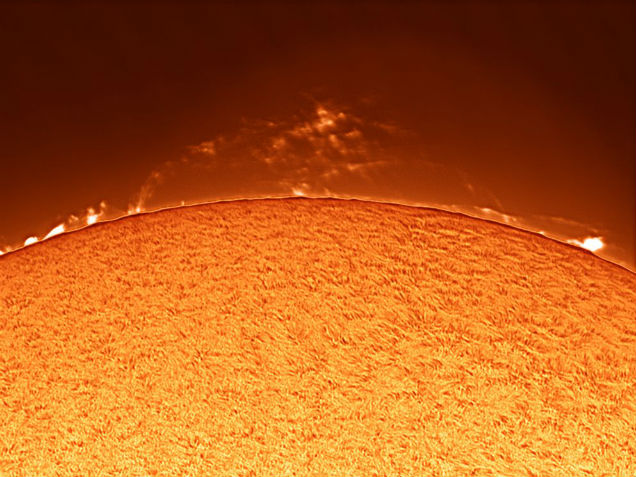
Solar Prominences by Craig & Tammy T.
In early March 2012 amateur astronomers watched with excitement as a monster began to appear over the limb of the Sun. The beast in question was an enormous new sunspot, slowly moving into view as our star rotated. Seething with energy and occasional flickers of activity, the sunspot quickly caught the attention of solar scientists. But unbeknown to those studying it here on Earth, its most violent act was yet to come.
Just after midnight on 7 March 2012 the sunspot let loose a violent blast known as a solar flare, sending waves of energetic radiation surging into the Solar System. Along with this intense burst a huge cloud of plasma, a coronal mass ejection, was flung out at over 3.5 million km/h.
Ferocious solar explosions are not the only violent events that cause the Sun to shudder.
In the 1980s and early 1990s solar scientist Alexander Kosovichev began working in the fledgling field of helioseismology — the study of the Sun's numerous surface and subsurface oscillations. Kosovichev wanted to know what effect solar flares have on their surroundings.
With the help of Valentina Zharkova at Glasgow University, Kosovichev modelled how the shockwave from a powerful solar flare could perturb the solar surface beneath it. Earlier research had indicated that solar flares might be able to boost the oscillations of the solar surface, but Kosovichev and Zharkova's models predicted that something far more dramatic could be produced — a sunquake. "We found that sunquake waves should be observed as expanding circular ripples on the solar surface," recalls Kosovichev. To see if the predictions were correct the scientists would need some way to study the Sun's tumultuous surface in great detail. Thankfully one spacecraft was about to revolutionise our view of our star. Its name was the Solar and Heliospheric Observatory (SOHO).
On 2 December 1995, NASA and ESA launched SOHO and sent it to orbit the Sun 1.5 million km from Earth. Its job was to scrutinise the Sun by observing it across a variety of wavelengths. On the ground, researchers like Kosovichev eagerly awaited the bounty of information the new solar observatory would provide.
"The first flare data was obtained in July 1996. I analysed it, and to my great surprise found the ripples," says Kosovichev. "The observational data corresponded very well to the previously developed flare and helioseismic models. The observations revealed a compact impact on the Sun's surface caused by the downward moving shock, and circular wave ripples travelling away from the impact place." They had found a sunquake.
Rage and Grace
SOHO's Michelson Doppler Imager (MDI) allowed the team to see, for the first time, the surface of the Sun rising and falling due to the shock of a solar flare. "The 'ripple' is observed as a displacement of the solar gases on the visible surface of the Sun," explains Kosovichev. "The MDI instrument measured the gas motions via the Doppler effect, by measuring displacements of the nickel [spectral] line in the Sun's radiation spectrum. When the solar material is moving toward us the wavelength of the radiation is shortened, called blueshift; when it is moving away from us the wavelength of the radiation is lengthened, called redshift. Using this technique the MDI instrument measured the up and down motions of the solar gases very accurately, to a precision of about 20m/s."
The size and speed of the sunquake was sobering. At their fastest, the 3km-high ripples raced across the Sun at more than 400,000km/h. Since that first observation of a sunquake by SOHO, solar scientists have been trying to understand exactly how these incredible events happen and what they can tell us about the Sun. Sergei Zharkov from the Mullard Space Science Laboratory in the UK has recently used NASA's Solar Dynamics Observatory (SDO) to study a pair of sunquakes. "SDO provides essentially continuous coverage of the Sun," says Zharkov. "The spacecraft provides a 4,096 pixel by 4,096 pixel image every 45 seconds."
It's this remarkable rate of observation that makes SDO so powerful, as it allows Zharkov and other solar scientists to watch our star's every twitch. There's a slight problem, however. "Sunquakes are relatively rare events," says Zharkov. "Since SDO's launch a couple of years ago we have seen four more or less confirmed sunquakes. It's possible that they happen but we just don't see them."
Finding a sunquake requires scientists to identify a ripple in a roiling sea of plasma. "The solar surface itself is constantly oscillating," explains Zharkov. "Depending on the strength of the source it may not be easy to find the signal behind all the oscillation that already exists, so that's one possibility [for why we are not seeing them]." Kosovichev also notes that location is a factor in whether a sunquake will be produced. "In many flares the magnetic energy is released high above the solar surface in the corona," he says. "Such flares don't cause significant impacts on the surface and don't produce seismic waves on the Sun."
The Secrets Within
The driving force behind each sunquake is still thought to be the initial solar flare — a product of a twisted, pent-up region of the Sun's magnetic field. "The magnetic field appears to be stable but within it there is quite a lot of energy," says Zharkov. "At some point it becomes unstable and releases all that energy. We see enormous heating and particles being accelerated, with much of the energy from the flare going into interplanetary space."
Yet some of the flare's almost unfathomable ferocity is directed toward the Sun itself. One of the sunquakes that Zharkov and his colleagues observed with SDO recently blasted across the solar surface with the same energy as the detonation of 478 billion tons of TNT.
Remarkably, the quakes themselves could work like a huge sonar device, allowing helioseismologists to study the interior of the Sun. "The shape of the ripples contains information about how the waves are created," Zharkov explains. "Several groups are now trying to analyze the ripples to decode the information they hold about the subsurface structures that they pass through."
Even with these latest observations, the exact mechanism by which sunquakes are produced is still unclear, says Zharkov, and several theories are being considered. "One involves some of the particles from the flare creating a pressure pulse, which generates a sunquake. The second theory, called 'backwarming', also proposes that a pressure pulse causes the quake, but this time the pulse is caused by the heat from a solar flare radiating towards the photosphere. Another scenario suggests that the recoil of the magnetic field during a flare creates a force with enough energy to generate a sunquake." Zharkov and his colleagues in the solar science community are now looking at the data produced by the SDO to establish which theory fits the bill.
While the mystery surrounding sunquakes rolls on, other images from SDO are throwing up yet more surprises. In September last year researchers from Aberystwyth University stumbled across an incredible event occurring within the Sun's fiery atmosphere.
"My colleague Xing Li had been browsing quick-look, low-resolution data from SDO and happened to see this strange event," recalls Huw Morgan from the Aberystwyth team. "He had the foresight to download the full resolution data, which confirmed the event's uniqueness and beauty."
The high-resolution images from SDO revealed a startling maelstrom of activity, the appearance of which would have been familiar to many of us — Li had spotted a swirling solar tornado. But even the boldest Earthly storm chasers would baulk at the enormous scale of this solar leviathan. The spinning vortex of plasma stretched more than 150,000km above the Sun's surface — that's more than 10 times Earth's diameter — swirling at a staggering 300,000km/h.
Unusual and Unexplained
According to Morgan there have been reports of tornadoes on the Sun as far back as the early 1900s, but the one studied by the Aberystwyth researchers stands out for several reasons. "It was very large, and the rotation was coherent for many hours," Morgan reveals. "Short-lived, smaller tornadoes often become apparent before a prominence eruption. This one remained in place for several hours. The strange dynamics within the structure were also quite unique."
As yet the team aren't sure how often solar tornadoes like the one spotted by Li form, but they're making progress in trying to understand what might be causing them. The tornado probably begins with a prominence — a huge wisp of plasma reaching up from the Sun's surface.
"The prominence that turns into a tornado is quiet for a few days prior to the event," says Morgan. "We believe that the Sun then pumps out helical magnetic fields like a Slinky into the prominence, activating the whole structure. Magnetic disturbances occur at the bases of the helices, which then pump plasma into the magnetic fields. As the plasma follows the helical shape, it appears as a tornado when we view the structure along the axis of the helix."
On the surface, understanding the detailed physics of a ferocious solar tornado might not seem that important to us, 150 million km away here on Earth. Yet the team's research into the helical magnetic fields in the Sun's atmosphere may well help to explain other violent events that can affect us.
"Perhaps this is one way that coronal mass ejections are formed," Morgan says. "Understanding such phenomena is a very important part of our work since they can have an impact on Earth and our society."
As the Sun becomes more and more active, scientists will no doubt relish the opportunities that solar maximum can provide. With the likelihood of more solar flares, eruptions and activity on the Sun's surface, who knows what new events they'll observe. What's clear is that with an impressive collection of solar observatories watching intently from space, we'll have a front-row view of the turbulent phenomena that define our violent star.
Copyright � Immediate Media. All rights reserved. No part of this article may be reproduced or transmitted in any form or by any means, electronic or mechanical without permission from the publisher.
{ width: 160, height: 160, defaultImage: '', layers: 'Artimg-BBC_SeasonsOfMars' }

![]() Orion is proud to partner with BBC Sky at Night Magazine, the UK's biggest selling astronomy periodical, to bring you this article as part of an ongoing series to provide valuable content to our customers. Check back each month for exciting articles from renowned amateur astronomers, practical observing tutorials, and much more!
Orion is proud to partner with BBC Sky at Night Magazine, the UK's biggest selling astronomy periodical, to bring you this article as part of an ongoing series to provide valuable content to our customers. Check back each month for exciting articles from renowned amateur astronomers, practical observing tutorials, and much more!
Not only does the Red Planet have seasons just like ours, they're also easy to see, writes Paul Abel
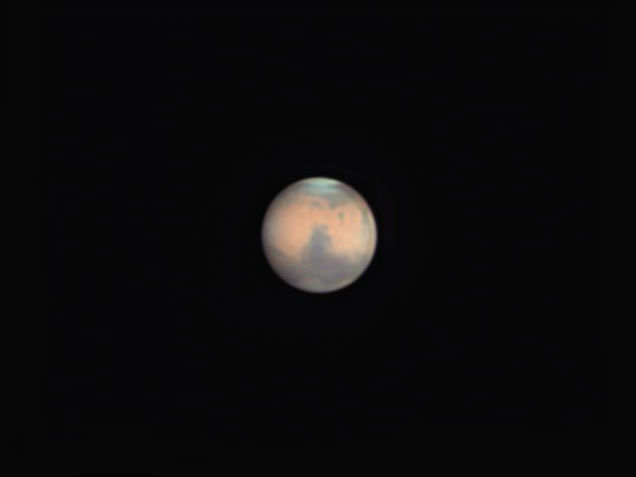
Mars by Jimmy E.
The changing of the seasons here on Earth can be quite spectacular. In many regions the whole landscape is transformed by the onset of spring: as the cold winter snows retreat and the days become longer, trees come into blossom and hibernating animals awaken. The people of ancient civilisations were particularly keen observers of these cycles, since their existence depended upon knowing when to plant seeds and harvest crops. It is no wonder that they constructed huge monuments to mark important dates like the spring equinox.
The well-defined seasons of winter, spring summer and autumn are the result of the Earth's 23.5° axial tilt. If the northern hemisphere is tilted towards the Sun it experiences summer, while the southern hemisphere experiences winter. Over the course of a year, both hemispheres experience all of the seasons, although because Earth's orbit is slightly elliptical they are not of equal length — summer in the northern hemisphere is longer than it is in the south.
Seasonal Similarity
Earth is not alone in having an axial tilt — all of the planets do, from Mercury's fractional 0.03° to Uranus' massive 82.2°. But Mars' tilt is the closest to Earth's at 25.2° and as such it experiences similar seasons — although being farther from the Sun means they last for longer.
Consequently, Mars is a very dynamic world, where the changing of the seasons can produce dramatic, planet-wide changes that are visible in small telescopes.
Mars has been closely scrutinised by Earthbound astronomers from the middle of the 19th century onwards, and although our early ideas about Martian seasonal changes being due to vegetation were wrong, the fundamental idea that its seasons have a lasting effect on its features is correct. All you need to do to see just how much Mars' surface has changed is compare a map of Mars from the 1950s to a current one.
In order to keep track of seasonal changes, we need to devise a calendar for Mars. Astronomers use a quantity called Martian solar longitude, or 'Ls', which is measured in degrees. Mars' orbit is divided into 12 months represented by 30° segments. For Mars' northern hemisphere, 0-90�° is spring time, 90-180° is summer, 180-270° is autumn and 270-360° is winter. Just like Earth, the Martian hemispheres experience opposite seasons, so if it is spring in the northern hemisphere it will be autumn in the south.
Month by Month
By the end of May, Mars will be a reasonably large 18 arcseconds, and its northern hemisphere will be slightly tilted towards us. By the time of opposition, Martian solar longitude has a value of 157°, so it is will be early summer in the north. You can look up the value of Ls in the freeware program WinJupos (www.grischa-hahn.homepage.t-online.de).
The large northern polar ice cap will now have shrunk dramatically, appearing as a small white patch in the far north. As the cap recedes, a dark band can usually be made out surrounding it. This is the Lowell band, which can sometimes be very prominent and appears a dark brown in color. With a 6-inch or larger telescope you may also be able to see an equatorial cloud band, which can give the northern part of Syrtis Major a distinctly bluish cast.
The melting of the north polar cap returns a lot of volatiles into the Martian atmosphere, and over the following months you should keep a look out for bright white clouds and fog patches. There are a number of well known places where they form: the Hellas, Argyre and Chryse basins for example. Sometimes they form around the vast shield volcano Olympus Mons or the other volcanoes in the Tharsis Plateau. Clouds and fogs sometimes encroach into the darker albedo features; you can enhance their contrast using a blue filter such as a Wratten number 80 (W80). If they form on the sunward limb, you can watch them dissipate as Mars rotates and the late morning Sun disperses them.
By the end of July, solar longitude on Mars will be 195°. Summer will have now given way to autumn and it will be slowly getting colder in the north. However, spring will have arrived in the south and the southern ice cap will now start retreating, and by the start of August the dust storm season will be underway. This is the time to keep a look out for storms which usually start off as small orange clouds. They may remain small or they can continue to develop until they have encompassed the entire globe, hiding all but the most prominent features.
By October, the southern hemisphere will be tilted towards us. It will be spring in the south, and if you have access to an 8-inch telescope you should be able to follow the shrinking of the south polar cap over the next couple of months. By the end of November, Martian solar longitude will be 271°, marking summer solstice for the southern hemisphere. The Martian disc will now be small, but imagers with large telescopes should still be able to pick out any dust storms.
Mars' Shifting Ice Caps
The extent of Mars' frozen poles varies greatly with the seasons.
The polar ice caps of Mars can be very striking and can be glimpsed in a 4-inch telescope when prominent. The caps wax and wane with the planet's seasons. At the time of opposition, it will be summer in the north, and so the northern ice cap will have shrunk to a small white patch, and it will probably be quite difficult to see.
As we move into September, Mars' southern hemisphere will start to tilt towards us. It will be spring in the south, and from the end of October onwards you should be able to watch the large south polar cap start to shrink. A blue Wratten 80 filter will help enhance the polar regions. By December, Mars will be quite small, and so you'll need at least an 8-inch telescope and a magnification of 250x or more to see the south polar cap.
Dust in the Wind
Tiny dust storms can develop into planet-wide events.
Although the Martian atmosphere is not very substantial, it can still produce winds that can develop into dust storms. The storms begin as small orange clouds, and can grow quite rapidly. There are three categories:
- Local: Small yellow-orange clouds usually less than 2,000km in size, but can encompass whole regions (such as the Hellas basin).
- Regional: These are much larger and may affect a whole hemisphere.
- Global: These cover the entire planet, and may hide the surface features for many months at a time.
In 2001, a dust storm was observed in the Hellas basin and developed into a global event shortly after. Another famous global dust storm occurred in 1971, obscuring the entire planet just as the Mariner 9 spacecraft arrived.
Dust storm season usually starts at a Martian solar longitude of 180°, so for this apparition the season starts in early July and will continue for the rest of the year. Small yellow clouds show up well in a red Wratten 25 filter, while a green filter can help to enhance larger storms.
A Martian Calendar
The 12 months of Mars, and some events to expect in them:
| Martian Month | Martian Solar Longitude (Ls) | Event |
|---|---|---|
| 1 | 0-30° | Spring equinox (northern hemisphere) at Ls=0� |
| 2 | 30-60° | Autumn in the south |
| 3 | 60-90° | Northern ice cap shrinking; white cloud activity |
| 4 | 90-120° | Summer solstice (northern hemisphere) at Ls=90� |
| 5 | 120-150° | White cloud activity still possible (March, April) |
| 6 | 150-180° | Autumn equinox (northern hemisphere) at Ls=180� (June) |
| 7 | 180-210° | Start of dust storm season (July, early August) |
| 8 | 210-240° | Spring in the south (August, early September) |
| 9 | 240-270° | Winter solstice (northern hemisphere) at Ls=270� (October, November) |
| 10 | 270-300° | Southern hemisphere now tilted towards us (November, December) |
| 11 | 300-330° | Winter for the northern hemisphere; Mars is now very small |
| 12 | 330-360° | End of dust storm season |
About The Writer
Dr. Paul Abel is an astronomer at the University of Leicester. Listen to him on BBC Sky at Night magazine's Virtual Planetarium.
Copyright � Immediate Media. All rights reserved. No part of this article may be reproduced or transmitted in any form or by any means, electronic or mechanical without permission from the publisher.
{ width: 160, height: 160, defaultImage: '', layers: 'Artimg-BBC_MoonMan' }

![]() Orion is proud to partner with BBC Sky at Night Magazine, the UK's biggest selling astronomy periodical, to bring you this article as part of an ongoing series to provide valuable content to our customers. Check back each month for exciting articles from renowned amateur astronomers, practical observing tutorials, and much more!
Orion is proud to partner with BBC Sky at Night Magazine, the UK's biggest selling astronomy periodical, to bring you this article as part of an ongoing series to provide valuable content to our customers. Check back each month for exciting articles from renowned amateur astronomers, practical observing tutorials, and much more!
How a view through a telescope as a boy kindled a life-long love of our planet's only natural satellite.

Mare Nectaris, Fracostorius and Piccolomini by Ronald Piacenti Jr.
I had my first telescopic view of the Moon when I was seven years old. A family friend, Major AE Levin, had his observatory in Selsey and I went there (long before I came to live there myself) to use his 6-inch refractor. The Moon was our first target; I looked through the eyepiece and saw the mountains, the craters and the valleys, obviously without understanding what they really were. I was fascinated, and I remember saying, "When I grow up I'm going to study the Moon." I did.
Of course, things were different in 1930. We knew much less about the Moon than we do now; it was thought that the atmosphere might be substantial enough for thin clouds to form and that a certain amount of volcanic activity might linger on. Our ignorance was complete about the far side, which is always turned away from Earth. As for travel there — well, even after the end of the Second World War, one very senior astronomer, Richard van der Riet Woolley, made the categorical pronouncement that the whole idea of space travel was "utter bilge".
So to me, as a boy, the Moon seemed to be far out of reach. All the same, I wanted to find my way around. So when I acquired my 3-inch refractor in 1933, I set about it. That telescope cost �7.10/-. I saved up for it and it remains one of my treasured possessions.
My observing and recording method worked for me, and I believe it will also work for other newcomers, so it seems worth passing on.
Lunar formations seem to alter in appearance according to the changing angle of solar illumination, and this can be really confusing. The large walled plain Maginus provides a good example of this. When seen near the terminator it is imposing, with peaks in its wall casting long shadows across its floor, but under high illumination it is difficult to identify at all. It was once said that "the full Moon knows no Maginus". Some craters with very dark floors (Plato, Billy, Grimaldi) or very bright walls (Aristarchus, Proclus) can be located whenever they are sunlit, but are exceptions rather than the rule.
What I did was take an outline map and make a pious resolve to make three drawings of every named object under different lighting conditions. The whole project took me over a year. I still have those sketches. Scientifically, of course, they are of no value, but when I finished the project I could find my way around the Moon more easily than I could my then home town of East Grinstead.
One lesson I learned during this project: don't try to draw too large an area at the same time; concentrate upon one thing. For example, the great dark-floored crater Plato is 109km in diameter. When drawing it, make it at least an inch across. Do the main outline first, then change to a higher magnification and fill in the fine details.
A new mare?
Today, a telescope such as my 15-inch reflector can be used to take photographs of the Moon far better than any professional observatory could have managed only a few decades ago. CCDs and similar devices have revolutionised everything. I didn't have CCDs, and depended on my eyes alone. But it was then possible for the amateur to make interesting discoveries and I thought I'd made two, though for one of them I later found out that I was 30 years too late.
When I finally took off my RAF uniform in 1945, I returned to the Moon. I was lucky enough to be given access to really large refractors, notably the 33-inch at Paris, the 27-inch at Johannesburg and the Lowell 24-inch at Flagstaff in Arizona, but I still used the modest reflectors in my own observatory at East Grinstead (it was 1967 before I settled down at Selsey). I concentrated on the formations right on the Moon's limb, which are very foreshortened and are carried in and out of view depending on the libration.
In the late 1940s I drew what seemed to be the edge of a mare, most of which was on the far side so that I could only see a tiny part of it — and then only under extreme libration. It wasn't on the maps I had. I called it Mare Orientalis, the 'Eastern Sea', and sent my results to the British Astronomical Association's Lunar Section. I was convinced that I was the first to see it. But ... I wasn't. It is clearly shown in the map produced in 1906 by the German astronomer Julius Franz — who also called it the Eastern Sea (because it lay at the eastern limb; much later the International Astronomical Union reversed east and west). Of course, we now have detailed maps of the far side, and know that the Mare Orientale is a vast ringed structure, unlike anything else on the Moon. At about the same time, I drew the large limb crater now named Einstein. I think I was probably the first to see this. Not that it matters!
An enduring fascination
At least my maps of the libration areas were used. The Russians asked me for them, and of course I sent them — they made me an honorary member of the USSR scientific society, and invited me to Moscow, despite the Cold War. I was an insignificant member of a very large team, but it was an exciting period, followed by the lunar landings. I was doing the TV commentaries during the Apollo missions; I was on the air when Apollo 8 carried men round the Moon for the first time. I was also broadcasting when Neil Armstrong made his "one small step" onto the barren rocks of the Sea of Tranquility. I can't remember my exact words, and unfortunately the BBC have lost all the tapes, but it was a moment never to be forgotten.
After Apollo, I concentrated my Moon observations on TLP, or transient lunar phenomena (a term I believe I invented). Much work remains to be done here, and there is no doubt that TLP are real; the Moon is not totally inert, though major upheavals belong to the remote past. The next stage will be the setting up of lunar bases, and the Moon will at last become a living world.
At the age of 86, I cannot hope to see this, or to carry out much more observation, but my interest and enthusiasm are as great as ever. A Moon man I've always been; a Moon man I'll remain to the end of my days.
Copyright � Immediate Media. All rights reserved. No part of this article may be reproduced or transmitted in any form or by any means, electronic or mechanical without permission from the publisher.
{ width: 160, height: 160, defaultImage: '', layers: '2008-08-01_Solar_eclipse_progression_with_timestamps-small' }

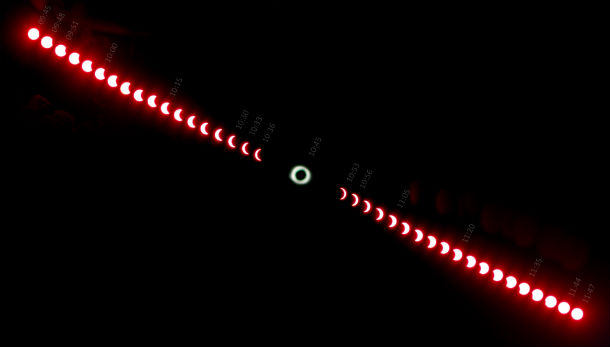
Photo courtesy of Kalan [CC BY 3.0], via Wikimedia Commons
As I mentioned in my last article, a total solar eclipse is a symphony of light and shadow, and you are the conductor. While key events will occur on schedule, only you can orchestrate how and when to observe the phenomena accompanying them. The following timetable of events can help prepare you for what to expect and when to expect it, for maximum enjoyment.
The Timetable
First contact (the eclipse begins). Look for a tiny black notch in the Sun's western limb. Like a finger striking a piano key three times in succession, the event occurs first in a telescope, then in binoculars, and finally to the unaided eye. Be sure to know exactly when and where to look along the Sun's limb to see it.
First 30 minutes. Make notes on the environment:
- Record the appearance of, and colors in, the landscape, sky, and clouds: Focus your attention along the horizon (north, south, east, and west), as the most dramatic changes will occur there.
- What is the quality of light, hard or soft? Hard light creates well-defined, high-contrast shadows; soft light renders shadows difficult to distinguish. The eclipse will start off hard but become increasingly soft, as totality nears.
- Open your senses: what's the temperature? Is there a wind? If so, what's the direction? How are birds and animals behaving? What sounds do you hear? How does the air smell (sweet, dry, moist)?
If you have a telescope with a safe solar filter, stare at the Moon's advancing limb. Does a band of light materialize just beyond it? It's an optical illusion — a bright afterimage of the Moon's black silhouette.
~ half eclipsed. Has the temperature dropped? Feel any wind or breezes? Project solar crescents onto your white cardboard: Use your fingers, straw hat, colander, or pinhole projector. Look for them occurring naturally on the ground under a tree (from sunlight shining through tiny spaces between leaves).
~ 30 minutes before totality. Repeat your observations of the environment. The intensity and quality of light should have changed perceptibly. If you cast a shadow of your finger against your card, it will appear fuzzier on one side than on the other; it will be fuzzier on the side where the Sun is being eclipsed. Move your finger further from the card, and it will appear more curved.
~ 20 minutes before totality. Repeat your observations of the environment: Colors should have begun to fade like an old print. You may see deeper into shadows as the quality of light softens. The eastern sky should turn yellow, while the western sky will look brooding.
~ 10 minutes before totality. Repeat your observations of the environment: The Moon's shadow should now be visible on the western horizon looking like a gathering squall. Bright planets should now be visible. The temperature may have dropped significantly. Birds may behave erratically.
~ 4 minutes before totality. Repeat your observations of the environment: birds may start to roost, cows and other animals may appear confused. Wedges of tangerine light will infiltrate the sky above the north and south horizons. The western sky looks dark and ominous.
~ 2 minutes before totality. Look for shadow bands — alternating dark and light bands that wash across the ground like waves in a pool. This atmospheric phenomenon arises when light from the Sun's narrowing crescent interacts with turbulent bundles of air in Earth's atmosphere.
~15 seconds before totality. The solar crescent breaks like quicksilver into delicate beads of sunlight. Called Baily's Beads, they are the dying rays of sunlight passing through lunar valleys.
~10 seconds before totality. Baily's Beads "dry up" — blinking out until one last one, the Diamond Ring, forms on the eastern limb of the Moon.
REMOVE YOUR ECLIPSE VIEWING GLASSES NOW!
~ five seconds before totality. Face west and sweep your eyes back and forth across the sky from north to south to see the large and spooky Moon's shadow crashing into the Sun in concert with the death of the Diamond Ring. Your descent into darkness has begun!
Second contact (Totality)! The Sun's ethereal corona will immediately steal your attention. If you're lucky, you will also catch a brief glimpse of the Sun's red middle atmosphere (chromosphere) and a bloody finger or two extending into the corona; these are actually giant prominences — eruptions of huge quantities of gaseous matter spewing from the Sun's surface.
Mid-totality. Repeat your observations of the environment. The sky does not turn completely dark during totality. The Sun's corona is about as bright as a full Moon, so it illuminates the landscape softly with a pearly light. The sky will glow orange beyond the blanket of the Moon's shadow, so the look and feel of the sky is more like deep twilight with a few bright stars and planets.
Third contact (end of totality).
PUT YOUR ECLIPSE VIEWING GLASSES BACK ON NOW! ...
Repeat all the observations above ... but in reverse.
Fourth contact. The Moon separates completely from the Sun, and the magnificent show is over.
CAUTION: Never look at the Sun, either directly or through a telescope or binocular, without a professionally made protective solar filter installed that completely covers the front of the instrument, or permanent eye damage could result. When using a truss tube telescope to view the Sun, both a properly fitting solar filter and light shroud are required.
 |
Stephen James O'Meara is an award-winning visual observer, whose writings, lectures, and numerous books on amateur astronomy have inspired observers across the globe to see the sky in new and wonderful ways. A contributing editor for Astronomy magazine, Stephen is an avid "eclipse chaser", having witnessed a dozen total solar eclipses dating back to 1959 (when he was 3 years old). |
{ width: 160, height: 160, defaultImage: '', layers: 'Solar_eclipse_1999_4_NR-small' }

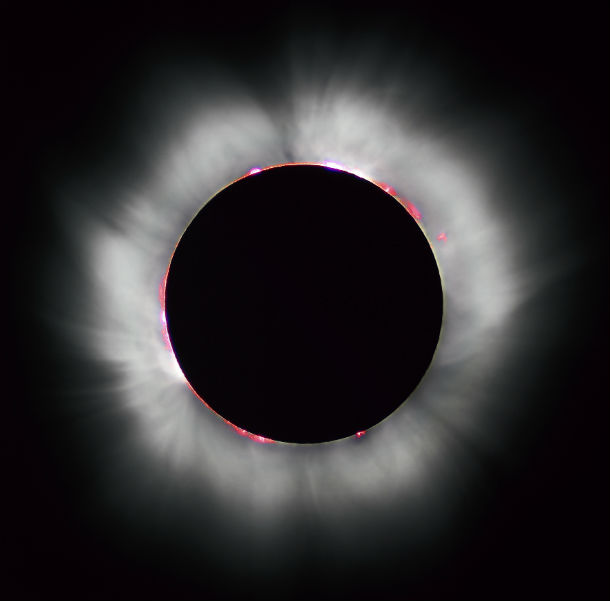
Photo courtesy of Luc Viatour [CC BY-SA 3.0], via Wikimedia Commons
A total solar eclipse is a symphony of light and shadow, and you are the conductor. Here's a list of items you may wish to have at the ready before the performance begins and why:
- Safe solar filters (for direct viewing). If you intend to observe the partial phases of the eclipse, you will need specialized solar filters designed specifically to protect your eyes. See You Can Watch Totality Without Eye Protection for more details about solar filters.
- A large white card (for projection). You don't need eye protection if you decide to project a magnified image of the partial phases. Here's what you do: if you have binoculars, cap one of its front lenses and turn your back to the Sun. Hold the binoculars over your shoulders (with the uncovered front lens pointing toward the Sun). Move the binoculars around and watch their shadow until you see an image of the Sun, which you can project onto the card; the view will be upside down. The further the card is positioned from the binoculars, the larger the image will be. If you do not have binoculars, make a smooth round hole in the card with a pin and use it to project a smaller view onto any surface (another large white card will do)
- Another large card (for artistic pinhole projection). Feeling artistic? Use your pin to make a fanciful design in another large card, and project the Sun through it when partially eclipsed; you'll see your creation made of multiple solar crescents. Test and modify the design on any sunny day before the next solar eclipse.
- A straw hat, colander, or other item with tiny holes will project multiple solar crescents — no artistic talent required.
- Creature comforts. Make sure you're comfortable and well stocked; the partial phases last about 90 minutes, both before and after totality, and you may be exposed to direct sunlight for a good part of the day, so be prepared (hat, sunscreen, etc.). Have plenty of water and food (cooler box with ice), and take portable chairs and a table. Make yourself at home.
- Watch or timepiece. Part of your pre-eclipse preparations should be to know the times of first, second, third, and fourth contact at your eclipse-viewing site (See A Timetable of Eclipse Events for definitions). A timepiece will help you prepare for the onset of these important events. You may also want to record the times of certain phenomena as you see them.
- Notebook, pens/pencils, sketchpad, art supplies, voice recorder. Don't rely on your memory; so much happens to the Sun, Moon, and environment during an eclipse, that you may want to record the most memorable events — the color and details of the eclipse, changes in light and color in the sky and landscape, the behavior of birds and animals, etc. — as they happen in your preferred style of note taking.
- Thermometer, flag, compass, and chocolate bar in wrapper. As the solar eclipse progresses, especially near totality, the temperature may drop noticeably; some people like to melt a chocolate bar in its wrapper during the partial phases, to see if it will harden during totality. Winds may also rise, fall, or shift direction, all of which is fun to record.
- Red flashlight. If you intend to take notes during totality, be sure to use a red flashlight, otherwise you will temporarily ruin the way your eyes adapt to the dark.
- Large white sheet. Lay a large white sheet flat and smooth on the ground and use it to watch for dim shadow bands (long alternating bands of light and dark) that slither across the ground in the minutes just before and after totality. Your compass can also be used to mark the cardinal directions around the sheet, so you can tell in which direction the bands move.
- Cameras and accessories.If you plan on taking pictures, make sure you have your camera and accessories: lenses, cable release, batteries and spares, selfie stick, tripod, etc. If you intend to video the event, consider turning it on in the minutes leading up to totality and letting it run until the end of totality to capture the emotion of the event.
- A car (full tank) and a good map. You never know what curve balls Mother Nature might toss your way. If clouds threaten your chances of seeing totality, you may have to drive a ways to get to clearer skies, i.e., do an eclipse chase (see An Unforgettable Eclipse Chase). To do so, you'll want a full tank of gas and a good map with the eclipse path and center line plotted on it.
It's always best to show up at least an hour before the start of the total solar eclipse. This gives you time to assess the weather, do an eclipse chase (if necessary), or set up your equipment without rushing. As always, enjoy the event and have fun.
CAUTION: Never look at the Sun, either directly or through a telescope or binocular, without a professionally made protective solar filter installed that completely covers the front of the instrument, or permanent eye damage could result. When using a truss tube telescope to view the Sun, both a properly fitting solar filter and light shroud are required.
|
Stephen James O'Meara is an award-winning visual observer, whose writings, lectures, and numerous books on amateur astronomy have inspired observers across the globe to see the sky in new and wonderful ways. A contributing editor for Astronomy magazine, Stephen is an avid "eclipse chaser", having witnessed a dozen total solar eclipses dating back to 1959 (when he was 3 years old). |
{ width: 160, height: 160, defaultImage: '', layers: 'Artimg-BBC_ImagingMoon' }

![]() Orion is proud to partner with BBC Sky at Night Magazine, the UK's biggest selling astronomy periodical, to bring you this article as part of an ongoing series to provide valuable content to our customers. Check back each month for exciting articles from renowned amateur astronomers, practical observing tutorials, and much more!
Orion is proud to partner with BBC Sky at Night Magazine, the UK's biggest selling astronomy periodical, to bring you this article as part of an ongoing series to provide valuable content to our customers. Check back each month for exciting articles from renowned amateur astronomers, practical observing tutorials, and much more!
Whether you have a phone camera or a pro camera, we show you how to take your first lunar astrophoto.

Crater Copernicus by Bob S.
The silvery Moon riding high in the sky on a crisp winter's night is a perennially alluring sight, and for the photographers among us its smooth seas, mountains and crater-flecked plains present a similarly inescapable attraction. For those just starting out in astrophotography, the Moon's brightness and large apparent diameter make it a superb target to cut your astro imaging teeth on. Indeed, nowadays you need little more than a smartphone camera and small telescope to snap detailed images of our satellite's spectacular, rugged surface.
Here, we're going to explore some of the basics of lunar imaging, from the techniques that can produce great results to the features and phenomena that make ideal subjects for beginner shots. We'll also use key astro imaging skills — such as composition and tracking a target — in two step-by-step projects.
Afocal Imaging
Capturing the view through your telescope with a smartphone.
If you own a small scope then you may have already tried one of the simplest methods for grabbing a picture of the Moon: afocal imaging. This is a fancy name for something that's really very simple - holding your camera up to the eyepiece of the telescope and snapping the view.
Traditionally, point-and-shoot cameras and the like have been used for afocal imaging with great success, but now - in the age of the camera-equipped smartphone - wonderfully detailed, sharp images can be captured with just the mobile in your pocket. One of the main challenges of afocal imaging is keeping the camera aligned with the eyepiece so that the Moon stays in view. Special adaptors are available to buy that will hold a smartphone or digital camera in place to make this easier, but if you're going the handheld route then we recommend using a low power eyepiece at first.
Basics of High Frame Rate Imaging
Learn how to cut through the wobbles of our atmosphere to create sharp lunar images.
Hold a digital camera or smartphone up to the eyepiece of a telescope and snap the Moon's disc afocally and you're likely to notice that from shot to shot the sharpness in the image varies. In one area of an image you might capture a crisp view of a crater field, whereas elsewhere in the shot the image is slightly blurry. In the next shot another area may be sharper or the whole disc may be noticeably soft.
This variation in detail from moment to moment is all down to the turbulent undulations of the atmosphere high above us. When astronomers talk of good 'seeing' conditions, what they mean is that these undulations are less pronounced and the view is steadier. But even on a 'normal' night there may be very brief moments of steadiness that provide a fleeting, sharp, view of the lunar surface. What if there were some way we could capture these transient moments and combine them all into one really sharp image?
This is precisely the principle behind high frame rate lunar imaging. By using a webcam or a specialist high frame rate camera and a computer, astrophotographers can capture a short video of hundreds, perhaps even thousands, of individual frames. Then, using software such as RegiStax (www.astronomie.be/RegiStax) or AutoStakkert (www.autostakkert.com), the frames from these videos can be sorted and only the best selected. These are then stacked together to form a final image that is carefully sharpened to produce a shot that's beautifully detailed.
Focal Length and Composition
Learning how to place your target properly within the image frame will improve your astrophotos.
When it comes to composition, the choice of what focal length to image the Moon at naturally makes a tremendous impact on the final picture.
A short focal length DSLR lens will produce a wide view, with the Moon appearing tiny - perfect for conveying a sense of the great expanse of surrounding sky or incorporating a large-scale atmospheric phenomenon.
Using a longer focal length lens, or small refractor, will change the feel of the image entirely: here faraway trees, hills or buildings can be brought right up close with the disc of the Moon looming over them. And then there's the high-magnification world of high frame rate imaging, where the field of view is generally very small. Even here it's worth considering where in the shot to place the surface feature you're imaging, and whether a carefully planned mosaic could draw the viewer's eye more effectively.
Step-by-Step: Capture the Full Moon as it Rises
Image the full Moon rise with a DSLR or bridge camera, a lens or small refractor, and a static tripod.
1. Choose your location
An interesting foreground makes for an attractive moonrise shot. A sea horizon offers a dramatic setting if you're planning to use a longer lens, especially with the atmosphere distorting and reddening the Moon's disc. Alternatively a high vantage point can give a great sense of depth and distance.
2. Timing and direction
The time the Moon rises and the direction it does so are also vital considerations. Planetarium software such as Stellarium (www.stellarium.org) and smartphone apps such as The Photographer's Ephemeris can be extremely useful for planning precisely where you need to be looking and when.
3. Set up your equipment
Set up 10-15 minutes before moonrise, just in case you have kit issues that need addressing. If you're at a new site, this will also give you a chance to choose the best view or foreground for the photo. You'll typically only have a short window to get the shot once the Moon is above the horizon, so preparation is crucial.
4. Compose the shot
Think about the composition of your shot. You may have decided on your foreground, but how do you want to include it? With a plain horizon you could offset the Moon, perhaps to include a feature of the landscape. If you have a sea horizon, the moonlight on the water might help create an attractive focal point.
5. Capture the shot
Once the Moon's up, experiment with the exposure and ISO settings to ensure you get detail in your foreground without overexposing the Moon. It's all about waiting for that ideal moment when the Moon's light is balanced with the fading twilight, the clarity of the sky and how high the lunar disc is above the foreground.
6. Edit and enhance
When you've captured your shots, it's worth loading them into photo editing software for final enhancements. Of particular use for moonrise images are the tools that allow you to lighten the 'shadows' or darker regions within an image - this can really help to bring out foreground detail that is slightly underexposed.
Step-by-Step: Imaging Earthshine
Discover how to image the portion of the Moon that's illuminated by the light scattered off Earth.
1. Consult a calendar
Find out when the Moon will be a thin crescent - there's a phase chart in every BBC Sky at Night Magazine, and you can also use smartphone apps or planetarium software such as Stellarium (www.stellarium.org). The four days either side of new Moon are ideal.
2. Get your kit set up
Depending on when you're imaging, the Moon will be relatively low in either the west or east, so ensure you have a clear view. Set up your mount, scope and camera as normal — you'll need a driven mount. We'll be using a DSLR and small refractor or long lens for this tutorial.
3. Bring the Moon into view
Once set up, move or slew your telescope to bring the Moon into the field of view. If your mount can track at the lunar rate, as opposed to the sidereal one, it's a good idea to select that now, especially if you intend to use a longer focal length lens or scope.
4. Focus the image
Getting a sharp image is the key to capturing a great earthshine shot, so confirm that the view is in focus. Here the live preview function on modern DSLRs is particularly helpful. Observing the ragged inner edge of the lunar crescent is a good way to judge the focus.
5. Finalize composition
Next look at the composition of your shot. If your field of view is fairly wide think about including some trees, a distant hedgerow or some buildings. If you're shooting close in, consider how the heavily overexposed crescent and the glow around it will look in the frame.
6. Capture
Be sure to shoot in RAW to give you greater flexibility when it comes to editing. Unlike other forms of lunar photography, earthshine generally requires only single shots. Using a remote shutter release cable will keep the image free from blurring caused by shake introduced when you push the shutter button.
7. Settings
The camera settings required will vary between equipment setups. Exposures of a few seconds at ISO 400-1600 should work, with the lunar crescent being overexposed by necessity. Longer, low ISO exposures, for example, will produce smoother images but may cause foreground blurring as the mount tracks.
8. Tweaks, crops and final edits
Editing programs like Photoshop (paid) and GIMP (www.gimp.org) allow you to tweak the 'Levels' to improve the colour balance, brightness and contrast. You may also like to employ the 'Unsharp Mask' tool to sharpen up fine detail on the lunar disc.
Top Lunar Surface Targets
If you want to try out high-magnification lunar imaging, here are eight top targets to get you going.
Catharina, Cyrillus and Theophilus
These three craters are some of the most photographed on the Moon. For a particularly dramatic shot, image them two days before first quarter.Aristoteles
Crater Aristoteles sits on the edge of the Mare Frigoris. Its intricate ejecta blanket and terraced walls make it a wonderful crater to image when it is being lit from a low angle.Gassendi
You'll find Gassendi on the northern shore of the Mare Humorum. When it comes to imaging it, good seeing conditions are needed to clearly reveal the interesting rille system within.Plato and the Vallis Alpes
The region on the northeastern edge of the Mare Imbrium is rich in attractive targets and the crater Plato and the nearby Vallis Alpes are two that no lunar imager should overlook.Rupes Recta
Also known as the Straight Wall, this huge fault is a fascinating feature to observe and image. You'll need to catch it when it's illuminated obliquely however, otherwise it's practically invisible.Schr�ter's Valley
Vallis Schr�teri, or Schr�ter's Valley, sits next to the prominent crater Aristarchus. Capturing the fine detail of this winding volcanic feature is a good test of a beginner's imaging skills.Tycho's Ray System
The bright material — known as a ray ejecta — blasted across the Moon's surface by the impact that formed the crater Tycho is one of the few lunar features which is best seen at full Moon.Copernicus
One of the most spectacular craters on the Moon, Copernicus has it all. Its grand terraced walls, prominent central peaks and surrounding ejecta blanket make it a great imaging target.
Copyright � Immediate Media. All rights reserved. No part of this article may be reproduced or transmitted in any form or by any means, electronic or mechanical without permission from the publisher.
{ width: 160, height: 160, defaultImage: '', layers: 'Artimg-BBC_visual_observing_07_16' }

![]() Orion is proud to partner with BBC Sky at Night Magazine, the UK's biggest selling astronomy periodical, to bring you this article as part of an ongoing series to provide valuable content to our customers. Check back each month for exciting articles from renowned amateur astronomers, practical observing tutorials, and much more!
Orion is proud to partner with BBC Sky at Night Magazine, the UK's biggest selling astronomy periodical, to bring you this article as part of an ongoing series to provide valuable content to our customers. Check back each month for exciting articles from renowned amateur astronomers, practical observing tutorials, and much more!
Paul Abel's guide to the closer planets shows how to get the best views and sketch the results.
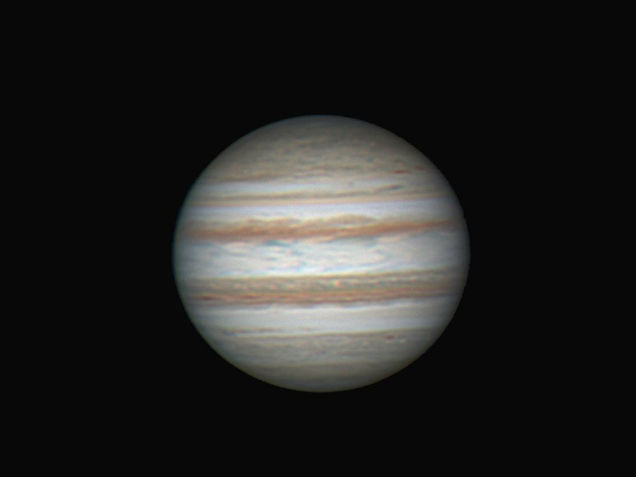
Jupiter by Mark Bell
There was a time before webcams and CCDs when photographic film had a resolution lower than that of the human eye. During this era, the only reliable tools astronomers could rely upon were their own vision and a pencil, but even with these limited resources some startling discoveries were made. The astronomers of this era seem to be like great explorers venturing out into a vast and complex cosmos, their drawings and observations rather like postcards from alien frontiers.
Today, the sensitivity and size of imaging equipment has improved immeasurably. Yet even in the 21st century, there are still areas of amateur astronomy in which visual observers can make valuable contributions. Visual observers need many specialist techniques to obtain reliable results that can go into the scientific record and here we introduce some of these observing skills with the aim of making you a better astronomer. We're going to look at the most rewarding planets for study: Venus, Mars, Jupiter and Saturn.
Venus
Venus can be a challenging object for visual observers, yet in the 1960s it was such astronomers who helped to establish that the planet's clouds have a three-day rotation period. With Venus, a visual observer's main objectives are to obtain disc drawings that correctly show the phase and to record elusive cloud markings.
A cursory telescopic view of Venus will reveal a bright white disc with a phase. The bright cusp caps covering the poles may be glimpsed, but that will probably be the only detail. Don't be put off, though: with time and patience subtle cloud markings come into view. The first thing to do is to find the correct magnification: one that gives a reasonable disc size and is suitable for the seeing conditions. I find 130-160x to be about right. Venus is also best observed in bright skies, as this reduces the glare from the disc.
As with all planets, don't expect to see all the fine details at once — you will need to engage with your visual system (one of the most remarkable adaptive optics kits on Earth). Ask yourself what you can see on the disc and slowly your eyes will respond. Spend about 15 minutes looking at the planet's disc before you start drawing.
To sketch Venus you'll need a circle 50mm in diameter. Draw in the phase and then, with a 2B pencil, gently shade in the subtle cloud markings. Eyepiece filters are a great help as they allow you to see into different depths of the atmosphere. Red and blue filters help to enhance cloud markings, while a yellow filter will bring out the polar collars.
The Schr�ter Effect
Look at Venus when it's predicted to be at half phase and you'll notice that the phase is actually slightly less than half. This is the Schr�ter effect, where Venus's observed phase is always less than the theoretical one, and it is particularly prominent in a blue filter.
The phenomenon was first recorded by Johann Schr�ter in the 1790s, and is due to light being scattered in the thick Venusian atmosphere. You can record it for yourself: on your drawing: simply measure the distance (in mm) with a ruler from the limb to the terminator and divide this distance by 50 to get the observed phase of Venus. Do this for all of your drawings and you can plot the decreasing phase against time on a graph and show how the effect changes over the course of an elongation.
Mars
The ochre disc of Mars is full of subtle, slowly changing features. Mars is a world of vast volcanoes, continent-sized canyons and majestic deserts. It's not uncommon for fogs to collect in the basins such as Hellas and Argyre, and the volcanoes attract brilliant clouds at their summits. Martian meteorology changes over the course of a few hours, and it can all be recorded and studied visually.
The well-defined Martian seasons produce different phenomena. During the apparition of 2013-14, it was springtime in the northern hemisphere, and the brilliant north polar cap shrank dramatically as it sublimated away. Recording the retreat and advance of the polar caps is important as it reveals information about the Martian climate.
The dust-storm season occurs during spring and summer in the southern hemisphere. Telescopically, these storms resemble small orange clouds, and they can engulf the entire planet. It may take many months for the dust to clear and afterwards there may be changes to the dark albedo features. You can track the progress of large dust storms, recording their size and changes to local surroundings. A green filter helps enhance them.
Mars tolerates high magnification well because red light is less affected by Earth's turbulent atmosphere. At powers of 300x, dark albedo features like the Syrtis Major will show a multitude of subtle structure.
Drawing Mars requires some patience. You can't spend any longer than 15 minutes doing so as Mars's rotation will have moved the features away from where you've placed them in the drawing. Sketch the phase first if it is present, then the polar caps. Spend seven minutes putting down the obvious features and use the remaining time to put in any bright clouds you can see. A blue Wratten No. 80A filter helps enhance white clouds. Aim to make two to three drawings over a night to show how the clouds change.
Jupiter
The restless clouds of Jupiter have generated plenty of work for visual observers for hundreds of years. Through a telescope, this gas giant is differentiated into darker belts and brighter zones. Powerful jet streams carry large storms along, presenting us with an ever-changing cloudscape.
Jupiter has a large disc and magnifications of 160x or more are sufficient to reveal a lot of fine detail. A red filter helps to enhance bluer features like festoons along the equator. Conversely a blue filter helps to enhance redder objects like the belts and the Great Red Spot. A yellow filter gives good all-round contrast.
It takes practice to record Jupiter correctly, but doing so will really hone your observational skills. A Jupiter drawing requires the correct blank: this planet is appreciably flattened due to its rapid rotation, so the standard blank is 64mm wide but only 60mm high.
Like Mars, Jupiter rotates quickly; in this case you have 10 minutes to make your sketch. First draw the main belts and large storms, recording the ones near the preceding edge first as these will vanish soonest. Spend the remaining time adding in the finer details.
Supermoon
Jupiter's most famous and persistent storm is the Great Red Spot, a vast hurricane situated in Jupiter's South Tropical Zone. Visible to a 5-inch scope, the Great Red Spot drifts in longitude at varying speeds; this drift rate can be measured.
When the storm is visible, watch as it moves towards the central meridian. When you think its centre is on the meridian, record the time. Use freeware software WinJUPOS to convert the time into longitude and repeat this whenever you observe the Great Red Spot. You can plot the resulting longitudes against time and look at how quickly the spot is moving in Jupiter's atmosphere.
Saturn
It is often said that majestic Saturn is a 'quieter' Jupiter. The belts and zones of Saturn's atmosphere are less well defined, but the storms that this planet can produce are even more ferocious.
Watching and charting storm activity is one of the main tasks for visual observers of Saturn. Storms are seasonal, occurring every 30 years, and usually take the form of a large white oval on Saturn's equator. The next outbreak is due near 2020.
Recently Saturn has produced other storms: quite unexpectedly in late 2010 a large storm erupted in the planet's northern hemisphere, lasting into 2011. This powerful storm churned up the North Tropical Zone, reminding us of the need for a constant vigil if we're to catch the next outbreak.
To really view Saturn, you'll need to use a power of 160x or more; 250x is a good all-round magnification. Drawing Saturn requires five accurately placed ellipses — so don't try to do it free-hand, use a carefully produced blank.
Saturn is also a quick spinner, so spend about eight minutes drawing in the main features on the disc and the rings, and use the final four minutes to finish the fine details such as the fainter belts and shadows. Filters work well for Saturn: yellow enhances the contrast between belts and zones, while light blue helps to emphasise redder features. Also watch out for a bi-coloured aspect of Saturn's rings: occasionally Saturn's outermost ring, the A-Ring, appears brighter in a blue filter than in a red one. Although rare, this phenomenon has been reported by visual observers and is worth keeping an eye out for.
Keeping a Log Book
Keeping a log book is an essential skill for any visual observer. It will keep your observations in a logical structure and you'll be able to look back and see how your drawing skills have developed. Your log book should be a sturdy bound notebook, and every observation should include the following information:
- The Date of Observation
- The Time, always in UT
- The Telescope and Magnification, along with the details of any filters used
- The Seeing Conditions, recorded using the Antoniadi scale, which runs in Roman numberals from I to V; I is perfect seeing and V is a very poor unfocused image
Tools of the Trade
Eyepieces
A selection of medium- and high-power eyepieces, giving a range of magnifications to suit your seeing conditions. A useful range is 160-190x for low power, 200-250x for medium power and 300x-plus for high power.
Filters
These help to enhance different features on planetary discs. Red, blue and yellow filters are invaluable.
Pencils
Some planetary features are more subtle than others, so you'll need a range of pencils from HB to 6B to capture as many as possible.
Red Light
White light destroys night vision, so always use a red light to draw.
WINJUPOS
This essential free software displays the features present on Jupiter or Saturn's disc at any date and time, and gives you the planetary longitudes for both gas giants so you can record the location of details. It is especially helpful as these planets have three systems of longitude due to their different bands of rotation.
About The Writer
Dr. Paul Abel is an astronomer based at the University of Leicester. You can listen to him on the BBC Sky at Night Magazine Virtual Planetarium each month.
Copyright � Immediate Media. All rights reserved. No part of this article may be reproduced or transmitted in any form or by any means, electronic or mechanical without permission from the publisher.


Why Buy From Orion
- 30 Day Money Back Guarantee
- Safe & Secure Shopping
- Next Day Shipping
- Easy Returns
- Sale Price Guarantee
- Free Technical Support

- 800-447-1001
- Telescope.com
- © 2002- Orion Telescopes & Binoculars All rights reserved
- DMCA/Copyright
- Terms and Conditions
- Privacy & Security
![]()


About Orion Telescopes & Binoculars
Since 1975 Orion Telescopes & Binoculars has been offering telescopes for sale direct to customers. Now an employee-owned company, we pride ourselves on an unswerving commitment to best quality products, value and unmatched customer care. Our 100% satisfaction guarantee says it all.
Orion offers telescopes for every level: Beginner, Intermediate, Advanced, and Expert. From our entry level beginner telescopes for amateur astronomers to our Dobsonian telescopes to our most advanced Cassegrain telescopes and accessories, you can find the best telescope for you. Because we sell direct, we can offer you tremendous value at a great price. Not sure how to choose a telescope? Orion's Telescope Buyer's Guide is a great place to start.
Orion binoculars are known for quality optics at a great price. We offer binoculars for every viewing interest, including astronomical binoculars, compact binoculars, waterproof binoculars, birding binoculars, and sport and hunting binoculars.
Orion's telescope and astrophotography accessories will enhance your telescope enjoyment without breaking the bank. Expand your viewing experience with accessories ranging from moon filters to power-boosting Barlow lenses to advanced computerized telescope mounts. Capture breathtaking photos with our affordable astrophotography cameras. And when you're stargazing, Orion's telescope cases and covers, observing gear, red LED flashlights, astronomy books and star charts will make your observing sessions more convenient, comfortable and meaningful.
At Orion, we are committed to sharing our knowledge and passion for astronomy and astrophotography with the amateur astronomy community. Visit the Orion Community Center for in-depth information on telescopes, binoculars, and astrophotography. You can find astrophotography "how to" tips and share your best astronomy pictures here. Submit astronomy articles, events, & reviews, and even become a featured Orion customer!
sales, new products, and astronomy.