


{ width: 160, height: 160, defaultImage: '', layers: 'Artimg-BBC_LunarObserving_07_16' }


![]() Orion is proud to partner with BBC Sky at Night Magazine, the UK's biggest selling astronomy periodical, to bring you this article as part of an ongoing series to provide valuable content to our customers. Check back each month for exciting articles from renowned amateur astronomers, practical observing tutorials, and much more!
Orion is proud to partner with BBC Sky at Night Magazine, the UK's biggest selling astronomy periodical, to bring you this article as part of an ongoing series to provide valuable content to our customers. Check back each month for exciting articles from renowned amateur astronomers, practical observing tutorials, and much more!
Explore the seas and craters that texture the lunar surface with our beginners' observing guide.
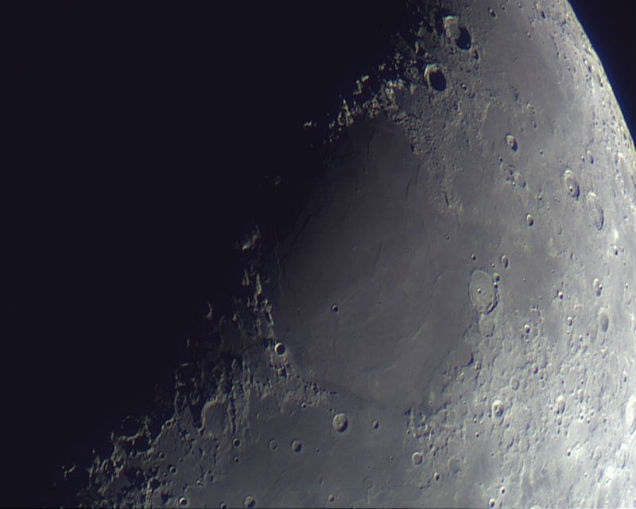
Sea of Serenity by Craig Heaton
The Moon is an ideal object to begin your observing odyssey because it is big, bright and covered with amazing detail. But the thing that surprises most novice observers is the variation it holds. Though the same hemisphere faces Earth at all times, what you can see on the Moon changes from one night to the next.
You may be forgiven for thinking that full Moon is the best time to examine our close companion — not so. While this is a good time to see the long, bright rays of ejecta surrounding prominent craters such as Tycho, the high altitude of the Sun in the lunar sky means no shadows are cast, resulting in a washed-out view of the Moon.
In general, the best time to view a given lunar feature is when the terminator, the demarcating line that separates lunar day and night, is nearby. This is the region where the Sun is either rising or setting, where crater rims and mountain peaks stand out in stark relief, casting inky black shadows across the lunar surface that exaggerate their presence. Those further from the terminator show hardly any shadows and are harder to make out.
At day zero of the lunar cycle — new Moon — the whole of the dark lunar hemisphere points towards Earth. Over the next 15 days the terminator slowly creeps across the lunar surface from east to west until the disc is fully illuminated at full Moon. Then the tables are reversed as the encroaching darkened hemisphere heads west with each passing day, until the diminishing crescent becomes lost in the pre-dawn twilight.
Peering Beyond the Limb
The nature of the Moon's orbit generates another effect that is a boon to lunar observers, a rocking and rolling motion that we call libration. The Moon's orbit is elliptical, and as a result its distance from Earth does not remain constant. When closest it speeds up slightly; when more distant it slows down. This small variation is enough to cause the Moon to 'nod' back and forth on its axis, giving us an occasional chance to see a little more around its eastern and western edges.
The orbit is also slightly inclined, and this causes it to sometimes appear above the Earth's orbital plane and sometimes below. This gives us an opportunity to peek over the top, and under the bottom, of the Moon over time. Taken together, this libration allows us to see a total of 59 percent of the Moon's globe, revealing tantalising features normally hidden from view.
With the naked eye it's easy to see the progression of lunar phases, full disc effects such as earthshine and the major lunar seas. Binoculars increase the detail you'll see: as well as dark seas, you'll now be able to spot individual craters and large mountain ranges, especially when they are close to the terminator. The smallest craters you'll be able to pick out will depend on how still you can hold your binoculars, but a pair of 7x50s should comfortably reveal features down to about 50km across.
A telescopic view of the Moon is amazing and one that never gets old. At low magnifications, the amount of detail visible is breath-taking, especially close to the terminator where relief shadows really help to emphasise the detail. Upping magnification by using shorter focal length eyepieces will get you in closer and give you opportunity to 'roam' around the lunar landscape.
Trifles and Troubles
The view you have of the Moon through a telescope will differ from what you see with the naked eye or binoculars depending on its optical arrangement. Through a refractor or compound instrument, the Moon will appear flipped west to east, while through a reflector the image will be inverted.
If you look at the Moon with a telescope you may also notice the surface appears to gently wobble or sometimes even shimmer. This effect is caused by air moving through the atmosphere of our planet, and the greater the turbulence the worse the views.
Such 'seeing' conditions can vary from minute to minute and night to night. The best views will always be had when the seeing is steady and these undulations are less intense; poor seeing, on the other hand, results in loss of detail and fuzzy lunar features.
For centuries, telescopic observers have also reported seeing short-lived changes in brightness on the surface of Moon, events that are collectively referred to as transient lunar phenomena, or TLPs. They have been described as luminous spots that suddenly appear and vanish, localised patches of colour and temporary blurring or misting of the Moon's fine surface detail. However, despite several high-profile reports — including those from Sir William Herschel in 1787 and French astronomer Audoiun Dollfus in 1992 — their existence remains debated to this day.
The problem is that TLPs, being transient by nature, are hard to independently verify and impossible to reproduce. Most are spotted by lone observers, or are only witnessed from a single location on Earth, casting doubt on whether they truly occurred at all. Some believe that TLPs are little more than the result of poor observing conditions or equipment issues. Assuming they do occur, the most popular theory to explain them is residual outgassing from below the lunar crust.
What does seem clear is that TLPs, whether real or imagined, are more prone to occur on some areas of the lunar surface than others, with more than one-third of official reports coming from the region around the Aristarchus plateau.
The Many Guises of the Moon
Even to the naked eye, our satellite is a beguiling subject.
Earthshine
The Moon is not solely lit by sunlight. When it is in a slender crescent phase in the evening or dawn twilight, it's sometimes possible to see its dark portion gently glowing due to sunlight reflected off the oceans and clouds of planet Earth. This effect is known as earthshine. Our planet actually reflects more light onto the lunar surface than the Moon gives us when it is full.Lunar Halos
On frosty nights, often when the Moon is or near full, you may be able to spot a faint ring of light caused by ice crystals refracting the moonlight in the upper atmosphere. Since the ice crystals are normally all hexagonal, the ring is almost always the same size; it has a diameter of 22�. Sometimes it is also possible to detect a second ring, 44� in diameter.Red Moon
There are two reasons the lunar disc may take on a ruddy hue. The first is if it is low in the sky, so light reflected from it passes through more of our atmosphere. Blue and violet light is scattered more easily, so we see a redder Moon. The other is during a total lunar eclipse: longer sunlight wavelengths are refracted by the Earth's atmosphere onto the eclipsed Moon.Supermoon
A supermoon is a full Moon that coincides with the closest point to Earth in its orbit, causing the lunar disc to appear larger by as much as 14 per cent. The word is rooted in astrology but, given the correct astronomical term is a 'perigee-syzygy Moon', you can see how it caught on. A supermoon also occurs with a new Moon at perigee — but you aren't able to see this one.
The Big Myth — The Moon illusion
Look for the Moon when it is low to the horizon and you may get the impression that it is unnaturally large — this is the phenomenon known as the Moon illusion, and it appears to be more pronounced around full Moon when the maximum area of its disc is illuminated. In reality, the Moon has more or less the same apparent diameter of around 0.5�, whether it is looming over the horizon or riding high in the sky.
One explanation for the illusion arises from our perception of the shape of the celestial sphere above us; instead of a hemisphere, we perceive the sky to be a flattened dome. Consequently the lower the Moon is in the sky, the farther away and larger it is perceived to be. When the Moon is high in the sky we conversely perceive it to be closer to us and therefore smaller in apparent size.
Few people seem to be immune to the Moon illusion, even though the viewer may be fully aware that for any given evening there is actually no appreciable difference in the Moon's apparent diameter, regardless of its height above the horizon.
The Rarest Moon
No doubt you've heard the expression 'once in a blue Moon' — meaning something that is exceptionally rare. But what exactly is a blue Moon, and does our neighbour ever adopt an azure appearance?
When astronomers use the term, they are most likely referring to one of two lunar events — neither of which cause the Moon to turn blue.
Traditionally, a blue Moon is considered to be the third full Moon in a season that has four. Normally, there are only three. The second and more modern interpretation is that it is the second full Moon that occurs in a calendar month, which can happen as a lunar cycle only takes 29.5 days to complete.
Why the discrepancy in definitions? It appears to be the result of a publication mistake that appeared in 1946 that confused the traditional meaning, which dates back to 19th-century editions of the Maine Farmers' Almanac.
And yet there is circumstance that can cause the Moon to truly appear bluish, as it did in the wake of the Krakatoa eruption in 1883, and it is exceptionally rare. The secret is that the atmosphere needs to be flooded with dust particles of a specific size — slightly smaller than the wavelength of red light — and that size alone. These particles scatter red light, causing the Moon to take on a slight cerulean cast.
Copyright � Immediate Media. All rights reserved. No part of this article may be reproduced or transmitted in any form or by any means, electronic or mechanical without permission from the publisher.
{ width: 160, height: 160, defaultImage: '', layers: 'Artimg-BBC_MagicOfSaturn_07_16' }

![]() Orion is proud to partner with BBC Sky at Night Magazine, the UK's biggest selling astronomy periodical, to bring you this article as part of an ongoing series to provide valuable content to our customers. Check back each month for exciting articles from renowned amateur astronomers, practical observing tutorials, and much more!
Orion is proud to partner with BBC Sky at Night Magazine, the UK's biggest selling astronomy periodical, to bring you this article as part of an ongoing series to provide valuable content to our customers. Check back each month for exciting articles from renowned amateur astronomers, practical observing tutorials, and much more!
To many, the Ringed Planet is the first 'wow' object they glimpsed through a telescope. Paul Money explains how you can see it for the first time.
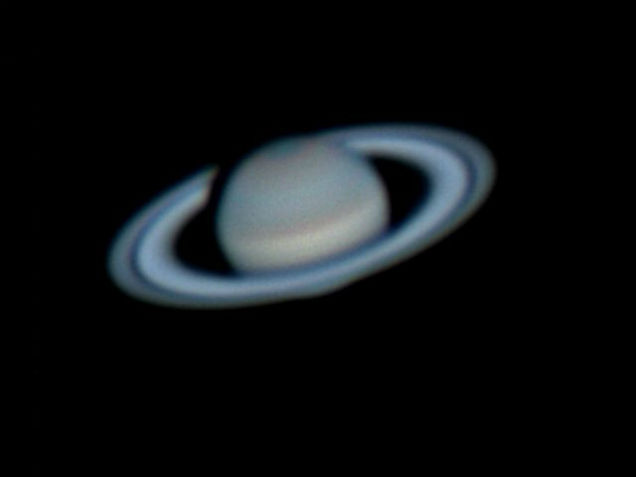
Saturn by Mark Bell
If there is one planet in our Solar System that captures hearts, inspires minds and invokes joy when seen through a telescope it surely has to be the ringed wonder that is Saturn. Even through a modest instrument such as a 2.5-inch spotting scope it is possible to see that the planet is more than a roundish globe. No other planet comes close to capturing the wonder and imagination of young or old when they see Saturn through a telescope for the first time.
Reactions to the view can be interesting. While running a public astronomy event with Saturn as the 'star', a nine-year-old boy took one look through a 10-inch telescope and, for one cheeky moment, exclaimed it had to be a picture stuck to the end of the tube! A tap on the tube as he took another look put him right: the view shimmered and he stepped back amazed, exclaiming, "Wow it really does have rings!"
It is this joy of discovery when someone takes their first look at the beguiling planet which is so inspiring and moving. Saturn, along with the craters on the Moon, is consistently voted as the favourite things to see through a telescope on outreach evenings.
It is a common mistake to think that you need a large telescope with lots of sophisticated equipment to get the best view of Saturn. The truth is you don't: even a pair of 10x50 binoculars will show that the planet is slightly extended either side of the disc and reveal Saturn's largest moon, Titan, when it is not too close to the planet. Using a 5- to 8-inch reflector or 3- to 5-inch refractor will show more detail. A scope with a long focal ratio of around f/9 to f/12 helps too, as this will make the disc and rings appear larger in the eyepiece.
Stark and Golden
Through such instruments the planet can take on a golden hue, in stark contrast to the gleaming white rings, which are currently angled towards Earth. Within the rings you should look for the Cassini Division, the black gap that separates the outer A ring from the brighter B ring. You might even see the inner C ring at times, if the air currents in our atmosphere are steady to provide good seeing. These certainly aren't the only rings Saturn possesses, but they are the easiest to pick out.
The planet itself may also show a dusky northern belt and a polar haze. Through a telescope you'll also be able to bag a few more of Saturn's moons, most likely Rhea, Tethys, Dione and Iapetus. Larger telescopes reveal more subtle detail on the planet, finer detail in the rings and three more moons: Mimas, Enceladus and Hyperion.
If you are showing the view to youngsters, make sure they can reach the eyepiece; perhaps keep a stool or sturdy chair handy for them. Not everyone finds it easy to keep one eye closed as they look through the eyepiece either, so an eye patch can be a useful aid. Some children (and even adults) can struggle looking through an eyepiece. If that's the case, try getting them to look through an empty toilet roll tube; it's surprising how effective this can be in getting them ready for the view through a telescope.
With Saturn best placed during the summer months, now is the time to plan a barbecue, get your friends and neighbors round, let the kids stay up a little later than usual and take a look at the second largest planet in our Solar System. With the added bonus of the spectacular ring system, it is sure to impress.
Getting the Best View — How to Make the Most of Observing the Ringed Planet
A good clear southern horizon is a must for spotting Saturn. Use binoculars first to home in on the planet, then a modest telescope such as a 5-inch reflector or a 3-inch refractor to gain a closer look. When using a telescope, make sure everyone can reach the eyepiece. With reflectors in particular, you can usually rotate the tube to bring the eyepiece to a better position, or have a stool or chair handy. Don't use too high a magnification: it's better to ensure the view remains sharp, even if that means keeping the magnification lower than you'd like.
Top 10 Saturn Facts
As well as being a beauty, the ringed wonder is also a fascinating world.
- Saturn has 62 confirmed moons.
- The planet is tilted on its axis by 26.7� and therefore has seasons. Each lasts just over seven years because Saturn takes 29.45 years to orbit the Sun.
- Saturn is a gas giant planet; it is mainly made up of hydrogen and helium. It's thought that a rocky core exists at its centre.
- On average, Saturn is 9.5 times farther from the Sun than Earth is.
- Each day on Saturn is only 10.55 hours long. This means that there are 24,470 Saturnian days in one Saturnian year — that's a lot of sunrises and sunsets!
- Saturn is slightly flattened: its equatorial diameter is 120,536km while its polar diameter is 108,728km. You could fit 9.5 Earths across its disc.
- The ring system out to the A ring is 273,550km wide, but only 1km thick.
- Saturn is a windy planet, with gusts measured by Voyager at 1,800km/h.
- Titan, Saturn's largest moon, has a nitrogen atmosphere and liquid lakes of methane on its surface.
- Roughly every 30 years, a great white storm appears in Saturn's northern hemisphere.
About the Writer
Paul Money is the BBC Sky at Night magazine reviews editor and an expert on running astronomy outreach events.
Copyright � Immediate Media. All rights reserved. No part of this article may be reproduced or transmitted in any form or by any means, electronic or mechanical without permission from the publisher.
{ width: 160, height: 160, defaultImage: '', layers: 'Artimg-BBC_ConstantCompanion_07_16' }

![]() Orion is proud to partner with BBC Sky at Night Magazine, the UK's biggest selling astronomy periodical, to bring you this article as part of an ongoing series to provide valuable content to our customers. Check back each month for exciting articles from renowned amateur astronomers, practical observing tutorials, and much more!
Orion is proud to partner with BBC Sky at Night Magazine, the UK's biggest selling astronomy periodical, to bring you this article as part of an ongoing series to provide valuable content to our customers. Check back each month for exciting articles from renowned amateur astronomers, practical observing tutorials, and much more!
A familiar sight in our skies from ancient times, the Moon is threaded through humanity's history.
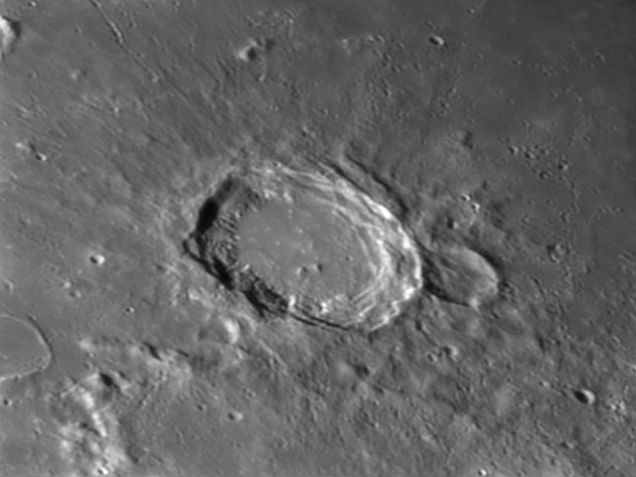
Bulliadus Crater by Mark Bell
The source of our ocean tides, subtle chronobiological cycles and the only other world that humankind has so far set foot upon, the Moon seems a familiar and tangible place. A quarter of Earth's diameter and just a quarter of a million miles away, it's 100 times closer than Venus. Given its proximity, brightness and large apparent size, it's easy to see why the Moon has enchanted humankind for centuries.
Before the emergence of widespread street lighting, the Moon was the primary source of light for nocturnal activities. Its sheer size and regular cycle of phases made it an obvious timepiece to our ancient ancestors, forming the basis of some early calendars, and in various cultures the Moon either had deities associated with it or was considered to actually be one. In the following centuries, when astrology and astronomy were one and the same, it continued to bear a supernatural significance, marking when certain activities and plans would go well — and when they were doomed to fail.
Pre-telescopic observers noticed an unchanging pattern of darker patches that would later become known as maria, or 'seas', because they were assumed to be vast bodies of water. They act as a Rorschach test for different cultures — the face of the 'Man in the Moon' observed in Western tradition, the 'Rabbit' pounding rice of East Asian folklore, or the 'Lady Reading a Book' from the southern hemisphere, to give just three examples.
Until the middle ages, the Moon was believed to be a smooth sphere, neatly slotting into the Aristotelian view of the 'perfect heavens'. It wasn't until after 1609, when Galileo turned his telescope to the Moon, that this perception was undone.
Galileo was not the first to examine the Moon through a telescope — that accolade falls to Englishman Thomas Harriot, whose sketches predate Galileo's by several months — but he was the first to publish. In his Sidereus Nuncius, Galileo revealed a world pockmarked with craters and mountains. He had seen that the terminator, the line that divides lunar day and night, was often jagged, correctly inferring that this irregularity must result from shadows cast by topographical features.
About a dozen lunar landforms can be distinguished with a keen eye. A typical pair of binoculars, if suitably steadied, will transform your view of the Moon into a scarred, airless world, and most likely will give you a better view than Galileo had in the 1600s. Through even the smallest modern scope innumerable impact craters appear, often fringed by long rays of ejecta. Alongside them sit grand basins of solidified lava, soaring mountain peaks, curious fissures and escarpments — it's a whole new world to explore.
Locked on Earth
You don't need a telescope to reveal that night after night we always see the same lunar features staring back at us. This is because the Moon has a synchronous rotation with respect to Earth, meaning that spins once on its axis in the same 27.3 days (the sidereal month) it takes to complete an orbit of our planet.
This is no coincidence. Earth's gravitational pull on the Moon has caused a bulge in the body of the Moon itself, similar to the tides in Earth's oceans. This bulge unbalanced the Moon's gravitational force, slowing its rotation until the bulge aligned with the Earth. Despite its appearance in the sky, our Moon is nowhere near round; it is closer to a lemon shape.
A consequence of this 'tidal locking' is that for much of human history the Moon held a closely guarded secret: no one knew what the far side was like. This didn't change until 1959, when the Soviet Luna 3 probe became the first to pass an image of the hitherto unseen side.
In a memorable episode of The Sky at Night broadcast on 26 October 1959, Patrick Moore announced the success of the Soviet mission, revealing the first shadowy photographs of the Moon's far side live on air. Luna 3's imagery was crude by today's standards, but it revealed that the 'dark side' was strikingly different in a number of ways.
While 35 per cent of the Moon's Earth-facing hemisphere is covered with mare lava, very little molten material made it to the surface on the far side, so maria account for just one per cent. It's thought this is because the far side's crust is thicker — it may be up to twice as thick as that of the near side — possibly due to the slow accretion of a companion satellite after an impact. This theory seems to be supported by the discovery of the far side's 3.9 billion-year-old South Pole — Aitken Basin, over 2,400km wide and around 13km deep. To date, our best views of the Moon come from NASA's Lunar Reconnaissance Orbiter, now in its sixth year of operations and, at the time of its launch, the first US mission to the Moon in 10 years.
The Sun Always Shines
It's equally obvious that the illumination of the Moon's Earth-facing hemisphere changes over the course of the month — a word, incidentally, that we get from 'Moon'. Although the Sun is always shining on a full half of the Moon, the proportion of the lit side we are able to see depends on where the Moon is in its orbit around Earth, giving rise to the phases we see.
Imagine you are looking down on the Earth, Moon and Sun from above. When the three line up with the Moon in the middle, the Moon's lit half points away from us on Earth, producing a new Moon. Slowly emerging from its new phase into the evening sky, the lunar crescent thickens from one day to the next. The term 'waxing' is used to indicate this thickening phase. The waxing crescent leads to the Moon appearing as an illuminated semicircle roughly a week after new.
This is somewhat confusingly called 'first quarter', referring to the Moon's position in its 29.5-day orbit rather than proportion of its disc is illuminated from our vantage point on Earth. The bulging phases after first quarter are known as waxing gibbous. These increase in size until roughly two weeks after new, the Moon is on the opposite side of its orbit from the Sun and appears fully lit as a full Moon. The point of new and full Moon, when our planet, satellite and star are aligned, is technically known as a 'syzygy'.
After full Moon the phases reverse, and the illuminated part of the Moon begins to shrink or wane. After passing through the waning gibbous phases, the Moon reaches the three-quarter point of its orbit, giving rise to the 'last quarter' phase. The Moon takes the appearance of a semicircle once again, although it's the opposite half that is illuminated than that at first quarter. After this, it takes approximately a week for the Moon to go through its waning crescent phases, visible in the early morning sky, before it once again becomes new again. It takes 29.5 days for the Moon to return to complete this cycle of phases or 'lunation', slightly longer than it does to complete an Earth orbit. This is known as a synodic month.
Ellipse and Eclipse
The Moon's elliptical orbit is inclined to Earth's by an average of 5�. This means that on most of the occasions that a full Moon occurs, it actually passes above or below the shadow Earth casts into space. But in the instances that the full Moon passes into Earth's shadow we see a different phenomena: a lunar eclipse.
Because the Sun is much bigger than Earth, it splits our planet's shadow into two parts: the darkest, called the umbra, and a lighter outer ring, called the penumbra. The intensity of a lunar eclipse depends on how much of the Moon passes into Earth's shadow, and which part of the shadow it passes through.
In a total lunar eclipse, the entire Moon passes through the penumbra and into the umbra, gradually darkening until it is completely covered, a point known as totality. During totality no sunlight shines directly on the Moon, but some is refracted onto it via Earth's atmosphere. As our atmosphere filters out blue light, the Moon often gains a strange orange-brown colour.
As the Moon goes into eclipse and dims, the sky gets darker too. You may not have realised how bright a full Moon can be. It lights up the sky around it with a blue haze, out of which only the brighter stars are visible. During a total lunar eclipse, the darker Moon means that the fainter stars can come out and we end up with the eerie sight of a deep-red Moon surrounded by twinkling stars.
There are two other types of lunar eclipse: partial, where only a portion of the Moon passes through Earth's dark umbral shadow, and penumbral, where part of the Moon only passes through the lighter, outer shadow. Partial eclipses can be quite noticeable, but penumbral eclipses often only cause a slight dimming.
When the same thing happens at new Moon the opposite occurs, and we may see a partial or total solar eclipse. By staggering coincidence, right now the Moon is both 400 times smaller than the Sun and 400 times closer, meaning that they appear to be the same size in the sky. The fact the Moon only just covers the Sun during a total solar eclipse allows us to glimpse our star's ghostly outer atmosphere, the corona.
A Changing Relationship
Life on Earth owes a lot to our rocky companion. Without it, our planet's axis would tilt wildly between 0� and 85�, albeit over a period of a million years, sending our hemispheres veering between chaotic ice ages and searing hellscapes. It would have been a death sentence for evolving life.
But our relationship with the Moon is becoming increasingly distant. When it formed, the Moon was only 22,500km from our planet. Today, it's nearly 10 times farther away and getting more distant by 3.8cm a year — around the same rate as your fingernails grow. As a result, Earth's spin speed is slowing down and our days are getting longer.
Eventually, there will come a point when the length of the day and the month will be the same, and the Moon will cease to cross our skies. There will be no new or full Moon, only a small static disc in the night sky visible from one side of the planet, a situation we see today in the Pluto-Charon system. By the time that happens, humans will hopefully be looking out at other moons from distant planets.
The Major Classes of Lunar Features
Valleys
There are 14 official valleys on the Moon, the longest around 600km. Most are named after nearby craters. One of the most familiar is the 180km-long Vallis Alpes (pictured), which cuts across the northern Montes Alpes and almost connects the Mare Imbrium and the Mare Frigoris.Seas
These vast dark plains of solidified magma are notable for both their dark appearance and the fact that they are largely absent from the Moon's far side. One of the most distinct is the 560km-wide Mare Crisium (pictured) which is just visible to the naked eye.Craters
The ubiquitous lunar feature, varying in size from microscopic pits to sprawling depressions up to 350km in diameter — anything larger is a basin. Some were formed through volcanism but the majority, like Tycho (pictured) are the result of ancient impacts.Basins
The oldest and largest impact craters on the Moon, exceeding 350km in diameter. All lunar maria are found within them. The South Pole-Aitken Basin on the Moon's far side holds the record for being the largest, at around 2,400km; the biggest on the near side is the Imbrium Basin, shown here, which stretches across 1,160km of the lunar surface.Mountains
The Moon's peaks are named in two ways: 'Montes' for mountain ranges and 'Mons' for singular peaks and massifs. The most spectacular of the 18 named lunar ranges is the gently curved, 600km-long Montes Apenninus (pictured), which form the southeastern edge of the Imbrium Basin. Mons Huygens, the Moon's tallest mountain at 5.4km, soars skyward here.
The Big Myth — The Dark Side of the Moon
The phrase 'dark side of the Moon' may evoke fond memories of Pink Floyd's 40-year-old prog-rock album to the baby boomer generation, but in an astronomical context it's often used to refer (erroneously) to the Moon's far side. The phrase is something of a misnomer, since the lunar far side goes through the same cycle of illumination as the phases of the Moon seen on the Earth-facing hemisphere. Technically, the far side is the 'dark side' at the instant of full Moon. The only places on the Moon's surface permanently bathed in shadow are a few deep craters at the north and south poles.
Where Did the Moon Come From?
Most scientists now believe that the Moon was formed around 4.5 billion years ago when an object the size of Mars (and since named Theia) collided with the early Earth, giving it a glancing blow. The impact spewed debris into Earth's orbit, which coalesced to form the Moon at just the right distance to be an independent body; any closer and Earth's gravity would have pulled the material back.
This theory was born from the chemical analysis of lunar samples returned by the Apollo missions, which showed a remarkable similarity between Earth's composition — hinting at a common heritage. But there is a problem: the compositions look too similar. If this collision occurred, the Moon should have more of Theia's material and should therefore be more different from Earth.
The Apollo samples were obtained from a very small area - could this explain the similarities? It would seem not, because we do have other lunar material. The Russian Luna programme returned 0.33kg of Moon samples and we also have a number of lunar meteorites. Analysis of this material brings up a similar problem, it is just too similar to the composition of Earth.
So where does this leave the collision theory? It still has a lot of support, but what would be a great help is having more lunar samples from known but more varied locations.
What's Our Moon Made Of?
Our natural satellite has a small core composed predominantly of iron, a distinct mantle, and a crust of varying thickness comprised of anorthosites and basalt.
Moon Facts
- Age: 4.5 billion years
- Diameter: 3,475km
- Mass: 0.0123 Earths
- Average distance: 384,400km
- Average orbital velocity: 3,679km/h
- Orbital period: 27.3 Earth days
- Lunar cycle: 29.5 Earth days
- Surface gravity: One-sixth that of Earth
Copyright � Immediate Media. All rights reserved. No part of this article may be reproduced or transmitted in any form or by any means, electronic or mechanical without permission from the publisher.
{ width: 160, height: 160, defaultImage: '', layers: 'Artimg-032015-Eclipse_square' }

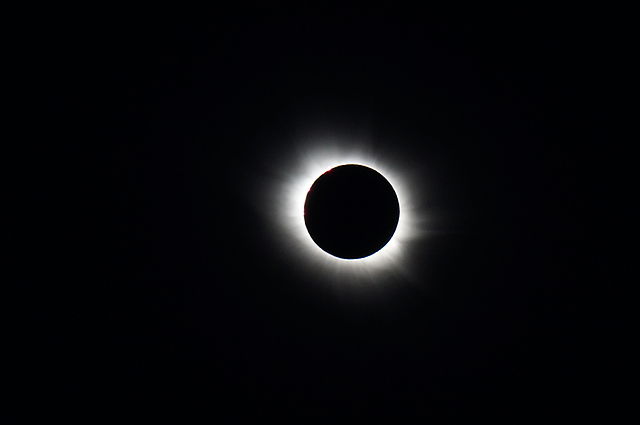
Photo courtesy of Damien Deltenre (Own work) [CC BY-SA 3.0], via Wikimedia Commons
When it comes to total solar eclipses, nothing can be more confusing than eye safety — because you need it for the partial phases but not for the total phase. Despite global efforts to build awareness as to when you should and shouldn't wear eye protection, the concept still isn't universally clear. So some people opt to use eye protection throughout totality for fear of damaging or losing their eyesight. But that defeats the purpose, because you cannot see totality using eye protection.
So let's wipe the slate clean and look at a total solar eclipse in a different way. Think this: Sun (bad); Moon (good). Every total solar eclipse has two parts: the partial phases, when part of the Sun is visible (bad); and totality, when the Moon is fully visible and the Sun is not (good)!
If you watch only the total phase a solar eclipse, you don't have to worry about eye safety because you are looking at the Moon — so you do not need eye protection. Just as you don't fear looking at the Moon at night, you shouldn't fear looking at the Moon during totality — because, literally, what you don't see (the Sun, which the Moon is blocking) can't hurt you.
Eye safety is only for those who wish to watch the partial phases of the eclipse, which last for roughly 90 minutes before and after totality.
Warning: Looking directly at the Sun without proper protection may result in retinal burns or thermal injury, which could cause or lead to blindness. Never look directly through binoculars or a telescope unless they are properly covered with specifically designed filters — filters that cover the front end of the binoculars or telescope and let only about one part in 100,000 through, reflecting the rest. If in doubt about the filter, don't use it!
Eclipse Phases and Eye Safety
We've all learned not to touch a stove when it is on, because it is hot and we may burn ourselves. Well, imagine the Sun as a stove. Anytime the Sun is visible, the stove is on, and we need eye protection. During totality, however, we cannot see the Sun, so the stove is off (and cold). Let's look at each of these examples more closely and how they pertain to a solar eclipse.
Eclipse Begins: Stove On (eye protection required). An eclipse begins at first contact — the instant the Moon first "touches" the Sun. To see this event, which appears as a tiny black notch in the Sun's western limb, you will need eye protection, such as safe eclipse viewing glasses or solar filters on your binoculars or telescope. First contact is followed by the partial phases — as the Moon's silhouette moves across the face of the Sun, it blocks more and more (but not all) of its illuminated disk. As parts of the Sun remain visible during the partial phases (bad), we need proper eye protection to view them. Even if the Moon covers 99 percent of the Sun, the remaining 1 percent of sunlight is enough to do retinal harm.
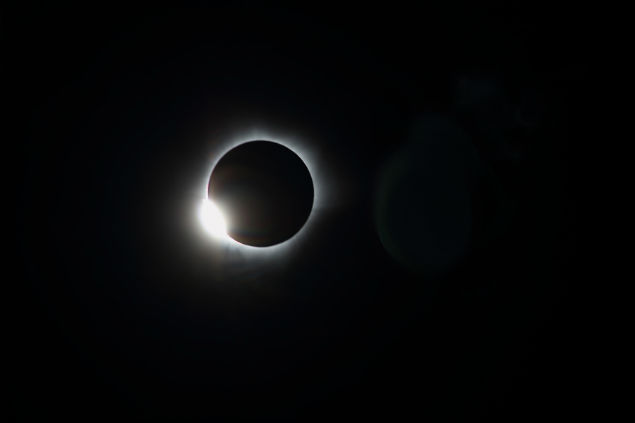
Totality: Stove Off (remove eye protection). About 15 seconds before totality, an anemic solar crescent splits like quicksilver into beads of sunlight. Second by second, these beads "dry up" ... until one last bead of sunlight forms on the eastern limb of the Moon; this last event, called the Diamond Ring, signals the start of second contact ? the instant the Moon fully covers the Sun and the beginning of totality (good). At this point it is completely safe to remove your eclipse viewing glasses and see the Moon as a dark silhouette crowned by a white and gossamer glow called the corona. The corona is about as bright as the full Moon, so it too is a lovely sight to watch throughout the duration of totality.
Eclipse Wanes: Stove On Again (eye protection required). Third contact marks the end of totality. A second Diamond Ring swelling into view on the western limb of the Sun announces the return of the Sun (bad), so we must immediately put our safe viewing glasses or instrument solar filters back on and keep them on for the remainder of the eclipse, which ends at fourth contact, when the last bit of the Moon slips off the Sun's disk.
What is proper eye protection?
Inexpensive "eclipse glasses" or "solar glasses" featuring solar polymer film and cardboard frames can be found from a variety of stores and online sources. It is important to only use glasses from reputable sources, featuring solar film that has been rigorously tested for safety. Another common filter for safe naked-eye solar viewing is a shade number 14 welder's glass, which is available for a few dollars from welder supply shops; a 10-centimeter-square (4-inch square) glass will cover both eyes. Do not use sunglasses, smoked glass, CDs, DVDs, CD-ROMs, film negatives, or polarizing filters to look at the Sun — they are not safe for this purpose! Again, if in doubt about a filter's safety ... do not use it!
CAUTION: Never look at the Sun, either directly or through a telescope or binocular, without a professionally made protective solar filter installed that completely covers the front of the instrument, or permanent eye damage could result. When using a truss tube telescope to view the Sun, both a properly fitting solar filter and light shroud are required.
 |
Stephen James O'Meara is an award-winning visual observer, whose writings, lectures, and numerous books on amateur astronomy have inspired observers across the globe to see the sky in new and wonderful ways. A contributing editor for Astronomy magazine, Stephen is an avid "eclipse chaser", having witnessed a dozen total solar eclipses dating back to 1959 (when he was 3 years old). |
{ width: 160, height: 160, defaultImage: '', layers: 'Artimg-BBC-SolarEclipses_06_16' }

Orion is proud to partner with BBC Sky at Night Magazine, the UK's biggest selling astronomy periodical, to bring you this article as part of an ongoing series to provide valuable content to our customers. Check back each month for exciting articles from renowned amateur astronomers, practical observing tutorials, and much more!
Warning: Do not look directly at the Sun with the naked eye or any unfiltered optical instruments
The ancient Chinese thought solar eclipses were the Sun being eaten by a dragon. Today we know exactly what causes them - and where to get the best views
Annular Solar Eclipse by Ken S.
One of the most breathtaking astronomical events you can witness is a total eclipse of the Sun, also known as a total solar eclipse. Not only is it an experience you'll never forget, but it also shows the Solar System in motion through the fortunate alignment of three astronomical bodies.
The first object is our planet, Earth, which slowly orbits the second object, the Sun. The third object in the equation is the Moon. We get an eclipse when the Sun, Moon and Earth are temporarily aligned.
On Earth we're really rather lucky that the Moon is just the right size and orbits at just the right distance to make total solar eclipses possible. You may wonder how they happen at all since the Sun is so much bigger than the Moon. Well, due to one of the most amazing coincidences in nature, even though the Moon is 400 times smaller than the Sun, the Sun is around 400 times further away. As a result, the two objects can appear to be the same size.
However, we don't get a total solar eclipse every time the Moon moves between Earth and the Sun. The lunar orbit is tilted, so that it sometimes passes above or below the Sun. And because the Moon's orbit isn't circular but elliptical, like an oval, when it is furthest from us and an eclipse occurs the Moon is too small to cover the Sun completely. We then see an 'annular eclipse', in which a thin ring of sunlight can be seen circling the Moon.
Sun Blocked
When we witness a total solar eclipse it means that we are in the shadow of the Moon and, as the Sun is the bigger object, it makes the shadow of the Moon cone-shaped.
This shadow cone starts out as big as the diameter of the Moon at 3,476km (2,160 miles), but by the time it reaches Earth the shadow is much smaller — the biggest it can get is about 300km (190 miles) in diameter. If you're lucky enough to be within the zone of the shadow, you'll see darkness descend as the shadow sweeps across the planet.
During an eclipse the Moon will cover the Sun entirely for seven minutes 31 seconds at most, but you'll probably see a 'totality' lasting somewhere between two and four minutes. If you're not within the 300km circle of the shadow cone, however, you'll only see a partial eclipse because the Moon covers up less of the Sun as you move further away from the track of totality.
Do, however, be careful! Due to the intense light from the Sun, a total eclipse is dangerous to look at. The only time when it's safe to look directly at the eclipse is during the few minutes of totality when the Moon completely covers the Sun. For the rest of the event you must protect your eyes from the Sun's glare. Take appropriate care and you can fully enjoy this marvel of celestial mechanics.
How To See An Eclipse
Three ways to see it ...
Pinhole
A safe way of viewing an eclipse is with two pieces of card. Make a small hole in one and hold the other so that the Sun is projected onto it. You can then watch as events unfold.Eclipse Glasses
You can now buy safe eclipse viewers that you wear just like sunglasses. They cut out all harmful ultraviolet and infrared rays and 99.9 per cent of the Sun's visible light.Casting Shadows
See total coverage of the Sun in the umbra
During a total solar eclipse, if you're in the 'umbra' you'll see the entire Sun being slowly covered by the Moon and get the full glory of totality. There's also an area around the umbra called the 'penumbra', where the shadow isn't quite so dark. On the ground this forms a large circular zone where you see more and more of the Sun the further you get from the umbra until you don't see an eclipse at all. So whenever people in one location see a total eclipse, those in a large surrounding area will see a partial eclipse. There are a maximum of five solar eclipses in any given year.
Copyright © Immediate Media. All rights reserved. No part of this article may be reproduced or transmitted in any form or by any means, electronic or mechanical without permission from the publisher.
{ width: 160, height: 160, defaultImage: '', layers: 'Artimg-BBC-ObservingTheSun_06_16' }

Orion is proud to partner with BBC Sky at Night Magazine, the UK's biggest selling astronomy periodical, to bring you this article as part of an ongoing series to provide valuable content to our customers. Check back each month for exciting articles from renowned amateur astronomers, practical observing tutorials, and much more!
Warning: Do not look directly at the Sun with the naked eye or any unfiltered optical instruments
When the short summer nights and long sunny days come around, there's no need to fret about what to see — the daytime has its own highlight.
Sun with Spots by Orion Staff
Stars are fascinating things: at the simplest level they make the patterns of the constellations. Some brighter examples give hints of color, like red Betelgeuse in Orion. The trouble is, every night-time example is so incredibly far away. Fortunately, the Sun is one star that's right on our doorstep and it's available for everyone to look at, understand and, depending on how you're looking at it, gasp in amazement.
The Sun, our source of natural light and warmth, and the star that made life possible on our planet, is just next door in astronomical terms. On average, it's only 150 million kilometers away.
However, the Sun's close proximity makes it brighter and hotter than any other star in the sky. Never look at the Sun using just your eyes, unfiltered binoculars or telescopes — you risk permanent damage to your eyesight. There are a number of options to view the Sun safely.
If you have a refracting telescope, try the projection method. Line the telescope up with the Sun (remembering not to look at the Sun through the telescope) and then hold up a piece of card close to the eyepiece so that an image of the Sun falls onto it.
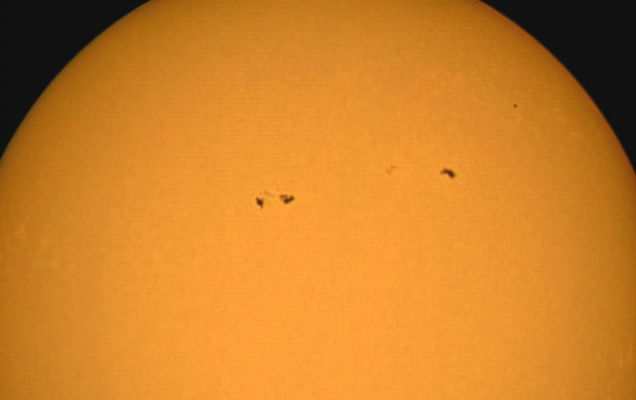
When projecting the Sun, you'll be able to see that its disc appears slightly darker around the edges than it is in the middle, an effect known as limb-darkening. You'll also be able to see sunspots — providing there are any around. Project the Sun over a few days and you might see the sunspots move and change shape because the Sun rotates quite slowly.
Filtering Option
If you want to move on from projecting, you can buy filters that fit over the big, front lens of your telescope. These objective lens filters allow you to look directly through the telescope at the Sun. Because it's quite risky to point your scope at the Sun, these filters must fit properly and must not be damaged in any way. Before you go out to observe the Sun, be sure to seek expert advice from a reputable astronomy shop.
Solar filters block out what you don't want to reach your eye: the Sun's infrared heat, its ultraviolet radiation and 99.9 per cent of its light. What you get is a greatly dimmed, safe image of the Sun. You'll be able to see sunspots and those dark solar edges through the scope and, depending on what kind of filter you buy, the Sun will be displayed in a different color. The cheaper 'white-light' filters are made of black polymer film (aluminum plastic sheet), which gives the Sun a blue tinge, while more expensive glass white-light filters give a more natural orange-yellow look to the Sun's disc.
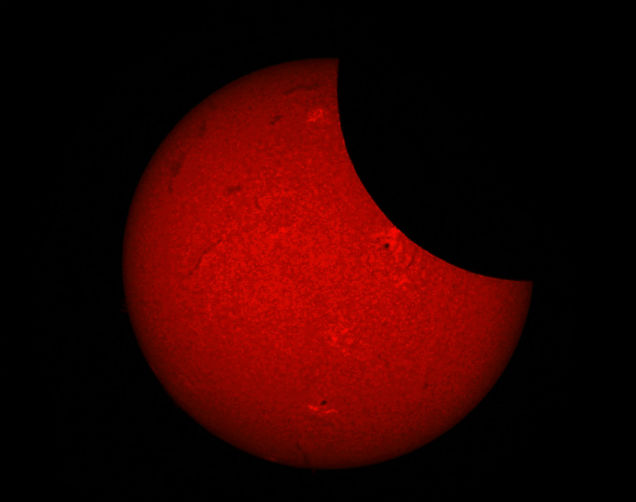
Then there are the costly hydrogen-alpha (H-alpha) and calcium-K (CaK) filters and dedicated telescopes. These filter all the light and heat coming from the Sun except in wavelengths of hydrogen-alpha or calcium.
At the H-alpha wavelengths, you'll get orange views of the features in part of the Sun's atmosphere called the chromosphere, where dramatic solar flares and outbursts called prominences take place.
Looking through a CaK filter allows you to see magnetic storms that occur lower in the chromosphere, all in a fetching purple. So although these are two expensive options, they certainly produce the 'wow' factor when looking at the Sun.
Solar observing is the one time that astronomy poses a real risk of physical injury. Here's how to do it safely ...
Solar Projection
All you need is a piece of white card, onto which you project the image of the Sun from your scope or binoculars. You could also fix another piece around the front end of the scope to create a shadow around the projection. Good for eclipses and sunspots.Cardboard Sun Projector
These kits are simply a small telescope and mirror that projects an image of the Sun onto a white screen on the inside of the box. It will show much the same views as the solar projection setup — great if you don't have a scope.Solar Filters
These glass or film coverings fit completely over the light gathering front end of the scope, stopping all heat and virtually all light from the Sun entering the scope. Good for viewing sunspots and granulation.Personal Solar Telescope
The Personal Solar Telescope (PST) is made to reveal one specific wavelength of light and can show much more than your naked eye will see with film or glass filters. Good for prominences, active regions, filaments and faculae.
The Corona
The amazing sight of the Sun's outer atmosphere, the corona, only becomes visible to us on Earth at totality — the height of a total solar eclipse. Of course, the corona is always there, it is simply that its delicate pearly-white structure is usually drowned out by the brightness of the Sun and our daytime sky. Views of the corona can also change quite dramatically depending on how active the Sun is; its shape is influenced by the vast solar magnetic fields. During totality, it is the corona that defines the eclipse for many people, and it is only during this darkest part of a solar eclipse that you don't need special equipment or eye protection to marvel at it.
Sights on the Sun
You'll need a filter to view the sun safely and see the incredible activity on our nearest star. Here's what to look out for:
Sunspots
These features usually appear in pairs and are caused by magnetism, which draws away energy. Their resulting lower temperature makes these regions appear dark.Limb Darkening
The photosphere is translucent, so when you look at its center you're peering deep into the hotter, brighter part. This is why it appears lighter than it does at the edges.Photosphere
The light from the Sun is given off here. Its temperature is around 6,000�C and it is home to sunspots.Prominences
These are concentrations of gas, associated with sunspots, that move up from the chromosphere. In just an hour, active prominences can shoot to heights of 750,000km.Filaments
A filament is the same as a prominence, except that whereas prominences are seen outside the Sun's disc, filaments are seen against the disc — which makes them a little harder to pick out. Best seen with a PST.Faculae
Latin for little torches, these bright patches of the photosphere are found where sunspots have been or are going to appear.Flares
Flares are the most explosive features on the Sun and are associated with sunspots. They are believed to be caused by sudden changes in the Sun's magnetic field. They are best seen with a PST.
Copyright � Immediate Media. All rights reserved. No part of this article may be reproduced or transmitted in any form or by any means, electronic or mechanical without permission from the publisher.
{ width: 160, height: 160, defaultImage: '', layers: 'Artimg-BBC-GuideToSun_06_16' }

Orion is proud to partner with BBC Sky at Night Magazine, the UK's biggest selling astronomy periodical, to bring you this article as part of an ongoing series to provide valuable content to our customers. Check back each month for exciting articles from renowned amateur astronomers, practical observing tutorials, and much more!
Warning: Do not look directly at the Sun with the naked eye or any unfiltered optical instruments
It's possible to see the amazingly dynamic nature of our nearest star in white light and hydrogen alpha; Pete Lawrence tells us how

Solar Close Up by Mark Bell
Active Regions
Sunspot groups, or active regions, take on a whole new appearance in hydrogen alpha. Dark sunspots become harder to see, partially hidden under the surrounding chromospheric blanket. Around them, dark fibrils follow the intense magnetic fields associated with these regions. Large, bright areas called plage appear throughout and around sunspot groups.
Spicules
The edge of the Sun's disc seems to have a thin skin running around it. This is a cross-section of the chromosphere. Under good seeing you can make out that it's made up of tiny jets known as spicules. Together, they make the edge of the Sun appear 'furry'.
Prominences and Filaments
Giant clouds of magnetically influenced hydrogen plasma can often be seen hanging off the edge of the Sun through a hydrogen-alpha filter. Known as prominences, these can change appearance day-to-day or, in extreme circumstances, real time. When seen against the chromosphere away from the limb, they appear dark and are known as filaments.
Dynamic Brightening
Active regions may also show dynamic bright regions. Tiny star-like points of light called Ellerman Bombs may come and go, each releasing the same energy as several million atomic bombs. Larger ribbons of light called flares are associated with magnetic reconnection events, which may throw out huge clouds of charged particles known as coronal mass ejections.
Dark Mottling
A hydrogen-alpha filter shows the Sun's inner layer of atmosphere, known as the chromosphere, which sits on top of the photosphere. This is covered in a coarse, magnetically influenced light and dark pattern collectively known as dark mottling. The pattern is visible across the entire disc and makes the Sun resemble a giant orange.
Sunspots
Sunspots appear dark against the photosphere, often occurring in groups known as active regions. A typical sunspot shows a dark inner core called the umbra, and a lighter surrounding region called the penumbra. Sunspots appear dark because they are cooler than the surrounding photosphere.
Faculae
The limb-darkened edge of the Sun's disc provides excellent contrast for viewing faculae. These are magnetically affected regions where the Sun's 'surface' becomes more transparent, allowing you to see into the deeper, hotter areas below.
Limb Darkening
When the Sun's disc is viewed through a white light filter, the centre appears brighter than the edge. This is called limb darkening and occurs because at the centre of the disc you can see deeper into hotter, brighter layers.
Granulation
The Sun's visible surface, or photosphere, is covered in a fine pattern called solar granulation. This can be tricky to see and image as it's easily hidden by poor seeing. Granulation represents the tops of huge rising convective cells reaching the photosphere.
Ways to Observe the Sun: A Quick Guide to Observing
From DIY to precision engineering, you can view the Sun in safety.
Projection
Solar projection is suitable for small refractors. The idea is to point the scope at the Sun and place a screen, typically a piece of white card, behind the telescope's eyepiece. This method can show solar granulation, dark sunspots and bright faculae.
White Light Solar Filter
An inexpensive sheet of white light solar safety material can easily be fashioned into a filter for use with any type or size of amateur telescope. It allows you to view and image granulation, sunspot groups and faculae.
PST
An entry level hydrogen-alpha scope such as the Coronado PST is able to show prominences, dark mottles, filaments and many of the bright phenomena associated with active regions such as plage and flares.
H-Alpha Scopes and Filters
For finer detail, larger aperture, narrower bandwidth hydrogen-alpha scopes are available, typically for several thousand to tens of thousands of pounds. Solar hydrogen-alpha filter kits in a similar price range can also be used to convert night-time telescopes.
Copyright � Immediate Media. All rights reserved. No part of this article may be reproduced or transmitted in any form or by any means, electronic or mechanical without permission from the publisher.
{ width: 160, height: 160, defaultImage: '', layers: 'Artimg-BBC-JewelsOfSummer_06_16' }

![]() Orion is proud to partner with BBC Sky at Night Magazine, the UK's biggest selling astronomy periodical, to bring you this article as part of an ongoing series to provide valuable content to our customers. Check back each month for exciting articles from renowned amateur astronomers, practical observing tutorials, and much more!
Orion is proud to partner with BBC Sky at Night Magazine, the UK's biggest selling astronomy periodical, to bring you this article as part of an ongoing series to provide valuable content to our customers. Check back each month for exciting articles from renowned amateur astronomers, practical observing tutorials, and much more!
Will Gater takes us on an observing tour across the sparkling summer night skies.
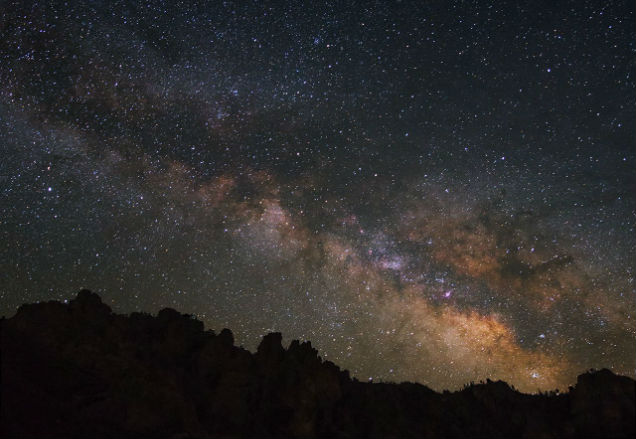
Milky Way over Pinnacles by Steve Peters
Summer's balmy nights are short but they pack in some glorious celestial sights. There are many deep-sky objects nestled in the rich star fields of the Milky Way and these will be our destinations on this seasonal star hop. The best time to take this tour is in the last week of June, when the Moon is out of the way. You can choose whether to spread the 15 objects here over a few nights, or observe them all in one. If you feel like doing them in a single session, to make maximum use of the darkness during June's short nights we've chosen a route that takes you through the 15 in the order that they reach their highest point in the sky.
1. M3
Let's kick off our observing session over in the western sky just after midnight. Hopefully the Moon isn't around and there are hours of clear skies ahead. Mag. +0.2 Arcturus (Alpha Bo�tis) is blazing away and it's the signpost we need to find our first object, globular cluster M3 in Canes Venatici. Once you've found Arcturus, imagine a line between it and mag. +2.9 Cor Caroli (Alpha Canum Venaticorum). The cluster is just less than halfway along this line.
2. M13
We've got a bit of a trek to our next object, the spectacular globular cluster M13 in Hercules. Thankfully we can get there with a few simple star hops. Probably the easiest method, from M3, is to use mag. +3.6 Rho and mag. +3.5 Delta Bo�tis as pointers. Scan along a line from Rho Bo�tis through Delta Bo�tis for just over 27� and you'll come across M13. The cluster is easily visible in binoculars from dark skies and through a small scope it appears as a fuzzy ball of faint light; larger aperture scopes will fare better at resolving the cluster's myriad stars.
3. M92
Once you've enjoyed M13 it's time to move to another globular cluster, M92, which is about 9.5� away. It's not as impressive as M13 in binoculars, but it's fairly easy to locate nevertheless. Just sweep along a line between M13 and mag. +3.8 Iota Herculis. You can also find the cluster with a telescope through a series of simple star hops: head northeast from mag. +3.1 Pi Herculis to mag. +4.6 69 Herculis and then onto mag. +6.0 HIP 84656, mag. +7.4 HIP 84559 and finally mag. +6.8 HIP 84118, which is just over 1.5� from the cluster.
4. Epsilon Lyrae
Having admired three fine globular clusters we're going to switch to a completely different type of object, the wonderful multiple star system of Epsilon Lyrae. From M92, head eastwards towards brilliant mag. 0.0 Vega (Alpha Lyrae). From Vega it is only a short hop to Epsilon Lyrae, which makes a triangle along with Vega and mag. +4.3 Zeta Lyrae. Epsilon Lyrae is most definitely a telescopic object. With a medium to high power eyepiece and a good-sized scope you should have little trouble seeing the two pairs of stars in the system.
5. The Ring Nebula
While in Lyra, there's one object that we really must visit and that's the charming Ring Nebula, M57. This is what's known as a planetary nebula, formed when a star like our Sun ejected its outer layers towards the end of its life. It appears as a little grey ring through the eyepiece. To find it we don't have to go far, though you will need a telescope and a medium-power eyepiece to see it well, as its angular diameter is rather small. You'll find M57 about 70 arcminutes along a line between mag. +3.3 Sulafat (Gamma Lyrae) and mag. +3.5 Sheliak (Beta Lyrae).
6. M22
It's time to head south from Lyra and into Sagittarius, and the beautiful Milky Way star fields in and around it. At the end of the month, the Milky Way will be low in the south at about 01:00 BST (00:00 UT). Our first object here is magnificent globular M22. To find it, first locate the famous Teapot asterism. The handle of the teapot is the key to finding M22. Imagine a line from mag. +3.3 Tau Sagittarii towards mag. +2.1 Nunki (Sigma Sagittarii). If you extend this line for about 5� beyond Nunki you'll reach the cluster.
7. The Lagoon Nebula
Next on our tour of this part of the sky is the wonderful Lagoon Nebula, M8. There are several ways you can go about tracking it down. Under dark skies it's visible to the naked eye, so if you're using binoculars you should be able to pick it out fairly easily about 6� above the 'spout' of the Teapot asterism. If you're using a telescope you'll find the glowing nebula and its sparkling star cluster by slewing roughly 7� to the west of M22. If you get stuck, remember that the nebula forms a rough isosceles triangle with mag. +2.8 Kaus Borealis (Lambda Sagittarii) and mag. +3.8 Mu Sagittarii.
8. M23
Heading away from the Teapot asterism, we're now traversing some of the dark dust lanes that criss-cross this region of the Milky Way. We're going in the direction of an exquisite open cluster, made of some 150 stars, catalogued as M23. If you're using binoculars, scan a line from Mu Sagittarii to mag. +3.5 Xi Serpentis. You'll find M23 just less than halfway along. With a small telescope you can star hop from the Lagoon Nebula to the glittering M23 by using four stars as waypoints: mag. +5.8 HIP 88298, mag. +6.3 HIP 88760, mag. +6.8 HIP 88362 and mag. +7.5 HIP 88297.
9. M25
From M23 we're going to cut right back across the band of the Milky Way to another lovely open cluster, M25, which is also in the constellation of Sagittarius. As you scan east across the sky with binoculars, take a moment to admire the stunning, densely packed star fields located roughly halfway between M23 and M25. Finding M25 with a small telescope is also fairly easy: simply point your finderscope at the 5th-magnitude star HIP 90806 and you'll find the glittering stars of M25 sitting around 45 arcminutes to the south of it.
10. The Eagle Nebula
Our final object on this leg of the tour is located a little higher up in the sky. It's the Eagle Nebula, M16. To get there we need to jump across the border from Sagittarius into the neighboring constellation of Serpens. Start by tracking roughly north from M25 to mag. +4.7 Gamma (g) Scuti. Once there, move west and up a little using mag. +6.7 HIP 90281 to guide you toward the nebula. With a small telescope you should have no problem seeing the cluster of stars in M16 and maybe a hint of the nebulosity itself.
11. The Wild Duck Cluster
We're now entering the third and final leg of our tour, which we begin in the constellation of Scutum, the Shield. This beautiful region of the summer night sky is home to edge of the Scutum Star Cloud and can be seen easily in binoculars. For a truly breathtaking view, use a telescope with a low-power eyepiece so you can really appreciate the open cluster and its starry environs.
12. The Coathanger
To get to our next object we're going to meander our way up the band of the Milky Way. The Coathanger, also known as Brocchi's Cluster, is a lovely grouping of stars that, you guessed it, looks like a coathanger — albeit an upside down one. To reach it from M11, use binoculars to work your way along the rich star fields in Aquila until you get to mag. +0.8 Altair (Alpha (a) Aquilae). Using Altair and the nearby mag. +2.7 Tarazed (Gamma (g) Aquilae) as pointers, head slightly northwest for about 12.5�. Dark skies and a good pair of binoculars are all you need to enjoy this gem.
13. The Dumbbell Nebula
Next up is the fascinating Dumbbell Nebula, M27, which sits in the constellation of Vulpecula. We don't have far to go, but we will need a change of equipment, as a small scope is the best instrument for observing this planetary nebula. There are ways you can star hop to M27, but an easy one is to simply point your scope's finder at the 3rd-magnitude Gamma Sagittae and track north for just over 3�. In a small scope M27 looks like a smudge of light, but in 6-to 8-inch instruments its dumbbell shape becomes much more obvious.
14. Albireo
If you've reached this point having observed all the objects so far in one night, we salute you! Your reward will come in the form of one of the most beautiful double stars in the whole night sky, Albireo (Beta Cygni). Albireo is 3rd-magnitude, meaning it is easily visible to the naked eye. It sits at the head of Cygnus, the Swan, which is marked out by a large 'cross' of bright stars with mag. +1.3 Deneb at one end and Albireo at the other. Through a telescope, at high magnification, the two stars sparkle gold and blue — a wonderful sight on a warm summer evening.
15. M39
We're now at the end of our journey and chances are, if you've been observing all night, the sky is now starting to lighten. We'll end our tour across the summer sky by looking at a lovely, if often overlooked, open cluster: M39. To find it with binoculars follow the body of Cygnus all the way from Albireo to bright Deneb, passing mag. +2.2 Sadr (Gamma Cygni) as you go. From Deneb, imagine a line running all the way to mag. +3.8 Alpha Lacertae in the head of Lacerta, the Lizard. M39 is situated almost exactly at the midpoint of this line.
Summer Astrophotography: Objects to Photograph in This Season's Night Skies
The nights may be short at this time of year but that doesn't mean there aren't plenty of imaging opportunities. Noctilucent clouds are extremely photogenic; a DSLR or compact camera on a photographic tripod should capture them well. Using a wide-angle lens and an exposure of between two and 10 seconds should be perfectly sufficient to reveal most displays.
The summer Milky Way in the constellations of Sagittarius, Scutum, Scorpius and Ophiuchus is also a fine photographic target in June. If you're just starting out in deep-sky astrophotography this region offers many bright and beautiful objects to cut your teeth on; the Lagoon Nebula, M8, is a good example, though you will need a clear southern horizon and excellent transparency for the best images of it.
For more experienced imagers, fainter objects such as the Cocoon Nebula (IC 5146) in Cygnus and the Iris Nebula (NGC 7023) in Cepheus provide a satisfying challenge. If you use narrowband filters in your deepsky imaging setup, old favorites such as the Eastern Veil Nebula (NGC 6992), the Witch's Broom Nebula (NGC 6960) and the Crescent Nebula (NGC 6888) — which are all in Cygnus — are also well placed this month.
Noctilucent clouds
Keep a close eye out for these high-altitude electric blue displays.
The twilight skies of the summer months are occasionally adorned with beautiful, glowing wisps of light known as noctilucent clouds. These polar mesospheric clouds, to give them their scientific name, reside high up in our atmosphere at an altitude of around 80-85km. They are clouds of minute ice crystals and it is their great height that causes them to shine — 'noctilucent' simply means 'night shining'.
While ordinary clouds, much lower down in our atmosphere, appear silhouetted against the glow of twilight, the high altitude of noctilucent clouds means they are still illuminated by the Sun, and so scatter the sunlight down towards us on the ground. It's thought that the tiny ice crystals may form on microscopic pieces of meteoritic dust, deposited into our atmosphere by the countless meteors that zip through this region.
Noctilucent cloud displays are usually seen in the UK during late May, June, July and early August. Unfortunately, predicting when a good display will be visible is not easy, so your best bet is to be vigilant and look out for them during the hours after sunset or before sunrise throughout the summer. From the UK, it's the northern horizon that you need to monitor closely for any possible noctilucent cloud activity. Some displays can be very weak and may only show up on camera, while others are bright and easily visible to the naked eye as bluish-white ribbons of light, perhaps containing striking ripple or tendril-like structures.
They are a wonderfully dynamic phenomenon and appear to change minute by minute — some displays look like flowing waves of light crashing over the horizon. Binoculars, or a fixed camera taking still images every five to 10 seconds, will help you pick out any changes in shape and structure, but be very careful not to accidentally observe the rising Sun.
About The Writer
Will Gater is an astronomy writer and journalist. He also appears on TV and radio to talk about space. Find him on Twitter: @willgater
Copyright � Immediate Media. All rights reserved. No part of this article may be reproduced or transmitted in any form or by any means, electronic or mechanical without permission from the publisher.
{ width: 160, height: 160, defaultImage: '', layers: 'Artimg-Totality-Culture-Fear_square' }


Total solar eclipses belong to a rich and diverse cultural heritage steeped in myth and superstition. Even today, the sight can stimulate primitive receptors in our bodies to react when we see daylight suddenly turn dark and behold the preternatural glow of the solar corona surrounding the "black hole" of the New Moon.
Little wonder many cultures across the globe imagined the event as a beast (dragon, frog, wolf, snake, giant, ghoul ... you name it) devouring the Sun, and made noises (like banging drums) to scare the offender away. In time the beast gave way to superstitious beliefs, and we can still see age-old rituals re-enacted. For example, during the October 1995 totality over northern India, 1 million people bathed in the sacred waters in Kurukshetra, believing that doing so would bestow blessings of peace unto them and other wandering and unhappy souls. That may sound funny, but it's no different from the age-old tradition (superstition) of voting along party lines; we just put our faith in a different kind of promise in the belief that life will suddenly get better.
During the 2016 totality over Indonesia, I met locals who were told (as children) that if they looked at the Sun directly, ghosts might steal them away when the sky turned dark; so it was best for them to stay indoors with the curtains closed. When older they learned to watch the partial phases of totality indirectly — reflected in a dark bowl of water. This behavior, I thought, is culturally no different from parents employing the idea of Santa Claus to instill fear in children who might otherwise behave badly — until they know better.
The world over, superstitions abound when it comes to pregnant women and total solar eclipses. The women are cautioned to stay indoors with the curtain closed or their unborn child might be born deformed, or blind, or ... well, does it really matter what they're told? The root superstition stems from the fear that the mother-to-be may do herself harm if she looks at the Sun (which is true, if she does so without proper eye protection), and therefore will not be able to care for her unborn child.
On the opposite end of the scale is the belief in totality's healing power. For instance, during the July 2009 total solar eclipse over Pakistan, some parents with disabled children buried them up to the neck in sand, hoping the event would help to heal them. It's no different, really, than bathing in sacred waters; it's another cultural belief that helps one's soul in a time of despair. Drastic? Yes. But who's to judge?
Some Native Americans will not look skyward during an eclipse largely out of respect. When a total solar eclipse occurs, it steals daylight from the sky causing an imbalance in what's known as the "cosmic order." Looking sunward at this time is regarded as taboo. The Sun is sacred and should not be watched for long; by staying inside and not looking skyward during an eclipse, one respects the Sun, allowing it to undergo a rebirth ... in private. Perhaps just as one shouldn't watch a couple consummate a marriage, one shouldn't interfere with the Sun as it undergoes its sacred and intimate union with the Moon.
On the other side of the coin, there's a fear component to this tradition. Watching a solar eclipse can adversely affect the mind, tilt life out of balance, and invite evil into one's life. In essence, one is left to weigh a minute or two of totality against a potential lifetime of turmoil and chaos. It's like the dieter's creed: a moment on the lips, a lifetime on the hips ... You decide!
Fears and superstitions will undoubtedly still lurk in the Moon's shadow when totality occurs over parts of the United States on August 21, 2017 — especially with the uninformed. Most of us, however, will have, by then, read articles and blogs, had casual conversations with experienced or prospective eclipse watchers, and learned proper safety measures (for eye protection) which, if followed, will provide a completely harmless, enjoyable eclipse experience.
As for the various traditions that continue to linger, what are they but "good lies" spoken by the uninformed with an aim to either protect those they love from forces unknown or to help them in times of need. "Unknown" is the key word. With education, we can help people disperse the mists of mystery and learn how to appreciate one of the world's most visually rewarding natural spectacles — totality.
CAUTION: Never look at the Sun, either directly or through a telescope or binocular, without a professionally made protective solar filter installed that completely covers the front of the instrument, or permanent eye damage could result. When using a truss tube telescope to view the Sun, both a properly fitting solar filter and light shroud are required.
|
Stephen James O'Meara is an award-winning visual observer, whose writings, lectures, and numerous books on amateur astronomy have inspired observers across the globe to see the sky in new and wonderful ways. A contributing editor for Astronomy magazine, Stephen is an avid "eclipse chaser", having witnessed a dozen total solar eclipses dating back to 1959 (when he was 3 years old). |
{ width: 160, height: 160, defaultImage: '', layers: 'Artimg-Unforgettable-Chase_square' }

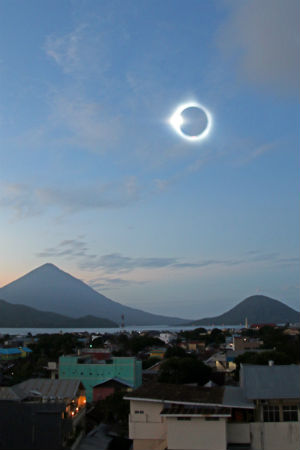
Over the past thirty years, I've made several successful eclipse chases — last-minute dashes to escape clouds threatening to obliterate the spectacle of the Moon obliterating the Sun — but none were as hectic and heart thumping as the one during the March 9, 2016, total solar eclipse.
 My partner Deborah Carter and I began planning for that event a year in advance. The March 9th path of totality swept across parts of Indonesia and the Pacific Ocean. Weather studies led us to select Ternate, a small volcanic cone jutting from the sea in northern Indonesia, as the prime viewing location. We arrived four days before totality, and, despite an atmospheric "monkey wrench" (El Ni�o), we enjoyed cloudless bliss until the day before totality.
That morning we awoke at dawn to partly cloudy skies. The once brisk trade winds had stopped, and the air felt muggy and hot. By late afternoon, storm clouds had gathered, only to unleash torrents of rain that lasted until midnight. Figuring the worst was over, we went to bed feeling cautiously optimistic — only 8 1/2 hours to go before the partial phases of the eclipse were to begin, and the rains had stopped.
When eclipse morning dawned clear, we cheered and rushed to the hotel's roof to set up our cameras, filters, and tripods. Two new friends from Java (Adrian and Heni Smith) joined us to watch first contact under a cloudless sky. About 20 minutes into the event, however, I saw a dark gray mass building on the eastern horizon. The mass turned into broken cloud, which began creeping toward the Sun at an uncomfortable rate. About 10 minutes later I saw the first cloud fragment brush past the Sun.
Deborah noticed my concern and asked what I thought.
I asked our new friends if they had a car.
They did.
I suggested we leave.
Deborah asked when.
"Now!" I replied.
We had everything packed in a flash and took an elevator to the ground level. Adrian got the car, we stuffed it with gear, crammed ourselves in, and made a mad dash toward blue sky.
But first we had to negotiate a maze of one-way streets jammed with motorbikes, cars, and crisscrossing pedestrians. Precious minutes passed before we got onto the main road. A nail-biting five-mile sprint took us to the southern edge of the island, where clouds still covered the Sun — just barely — we were literally right on the edge.
Fifteen minutes to totality.
But we had nowhere else to go ... except to the water. We saw a beach beyond the cliff, and Deborah had sighted an access road to it nearby. We made a five-point turn, zipped down the road, slipped into the alley, and bounced into a little seaside village.
Still not good enough; clouds continued to hide the Sun.
Ten minutes to totality.
Aha! There were boats and people up ahead. Heni swiftly negotiated with happy locals as we waded out to a narrow wooden fishing boat with pontoons.
Six minutes to totality.
After removing a canopy, we got on the boat, and the owners started to paddle.
My heart sank.
Deborah asked if the boat had a motor.
It did, but the tide was out, so they had to push beyond the reef.
Three minutes to totality.
 Seconds felt like hours. I pleaded that they start the motor. They agreed.
After a few tugs on the cord, the one-cylinder engine coughed to life, and we chugged southward at a possum's pace.
Kluck ... kluck... kluck....
We were traveling at about the same speed as the advancing cloud edge, which just covered the Sun. Another vital minute passed without gain.
Then I noticed a hole forming in the clouds. Gesturing, I stood up and shouted, "Head west!" After hurtful moments of confusion, the crew finally understood and set off on the new course.
Seconds before totality, we saw the Sun break free of cloud. We began whooping as the diamond ring formed, the Sun winked out, and the gossamer petals of the Sun's corona blossomed into view. After that, emotion overwhelmed thought. I'm not sure if sanity ever returned.
Thanks to our combined efforts, we watched totality for nearly three minutes through a magnificent hole in the clouds.
The lesson: if you truly want to maximize your chances of seeing this rare event, don't rely on the luck of the devil; if clouds threaten, chase blue skies as if the devil were chasing you!
|
Stephen James O'Meara is an award-winning visual observer, whose writings, lectures, and numerous books on amateur astronomy have inspired observers across the globe to see the sky in new and wonderful ways. A contributing editor for Astronomy magazine, Stephen is an avid "eclipse chaser", having witnessed a dozen total solar eclipses dating back to 1959 (when he was 3 years old). |
{ width: 160, height: 160, defaultImage: '', layers: 'Artimg-WhatsInTheSky_2016_square' }

Mark your calendars and plan star parties with your family, friends, and fellow astronomy enthusiasts to catch these noteworthy 2016 celestial events. Here are just a few of the exciting sights to look forward to in the New Year!
January:
Comet Catalina (C/2013 US10) moves northward in January, brushing past the Big Dipper about mid-month. The comet is expected to be a bit fainter than naked-eye visibility for most observers, binoculars might show a fussy "star" while a medium to large telescope should show the comet's core and faint wisps of tail.
Bundle up in warm clothes and keep your eyes peeled at night in early January to catch the Quadrantids meteor shower. Some meteors associated with the Quadrantids are expected to be visible from January 1st until the 6th, but the peak of activity will occur on the evening of January 3rd into the very early morning of the 4th, with up to 40 meteors expected per hour. Look for "shooting stars" radiating from the constellation Bo�tes.
It's worth rising an hour or two before the Sun on January 8th and 9th, to see a close pairing of planets Venus and Saturn in the pre-dawn sky.
February:
The second month of 2016 offers great views of the winter Milky Way, especially the evenings around February 8th, when the New Moon promises dark skies. Scan the "cloudy" Milky Way with big binoculars or a wide-field telescope to explore dozens of interesting star clusters and wispy nebulas.
Speaking of star clusters, use a telescope and look east of constellation Canis Major's brightest star Sirius to see two beautiful star clusters, M46 and M47 in the constellation Puppis. For more star cluster observations in February, look in the constellation Auriga and go after sparkling clusters M36, M37 & M38, or M35 in the constellation Gemini.
From late January through late February, get outside about an hour before dawn to see five planets line-up above the eastern horizon. For the first time in over a decade, planets Mercury, Venus, Saturn, Mars and Jupiter will all be visible at once before the Sun rises. While you may need binoculars to spot Mercury, which will be very close to the horizon, this planetary line-up is not to be missed.
March:
Get ready for great views of giant Jupiter this month as the gas giant planet will be at opposition on the evening of March 8th - the point in its orbit when it appears opposite the Sun from Earth. This will be the best night of the year to view Jupiter and its four brightest moons Io, Europa, Ganymede and Callisto.
Some of the best galaxies to see are spread across the night skies of March from Ursa Major to Virgo. Take advantage of the New Moon on March 9th and set sail for these island universes with a big telescope!
Grab a pair of 50mm or larger binoculars in March for great views of the Pleiades cluster (M45), the Beehive cluster (M44), and the must-see Double Cluster in Perseus. These sparkling sky gems are perfect fare for big astronomy binoculars and telescopes too.
April:
Don't miss the Lyrids meteor shower which peaks on the evening of April 22nd into the morning of April 23rd. Scan the skies near the constellation Lyra after midnight on the 22nd for your best chance to see meteors. Unfortunately, the Full Moon of April 22nd will outshine fainter meteors, but there will still be a chance to see "shooting stars" after midnight and into the early morning hours of April 23rd.
With the Virgo Galaxy Cluster and the Big Dipper and Coma Berenices well-positioned in the sky, April evenings are truly a gift for galaxy hounds. Check out a few of our favorite galaxies: M101, M51, and M106 near the Big Dipper asterism in Ursa Major; M86, M87, M84 and M104 in the Virgo Galaxy Cluster; and don't miss NGC 4565, M64, M99, and M100 in the constellation Coma Berenices.
A grouping of bright beacons Saturn, Mars, Antares and the Moon will adorn the night sky on April 25th and 26th.
May:
Grab a comfortable blanket or lounge chair and catch the Eta Aquarids meteor shower which peaks on the evening of May 4th into the early morning hours of May 5th. The New Moon of May 6th means conditions will be ideal to watch "shooting stars" created by debris from Halley's Comet. Look for meteors to radiate outwards from the constellation Aquarius.
On May 9th, planet Mercury will transit the Sun. This will be the first Mercury transit since 2006, and observers using solar filter-equipped telescopes will be able to enjoy the view as Mercury passes between the Earth and the Sun, appearing as a tiny black dot moving slowly across (transiting) the Sun's luminous disc over a 7.5-hour period. From locations in the western U.S., the transit will begin before sunrise, while the entire transit will be visible from the Midwest, southern U.S. and the east coast. CAUTION: Never look at the Sun, either directly or through a telescope or binocular, without a professionally made protective solar filter installed that completely covers the front of the instrument, or permanent eye damage could result.
May skies present great viewing opportunities for many globular star clusters, including M3 in the constellation Bo�tes, the Great Cluster M13 in the keystone asterism of Hercules, M5 in Serpens, and M92 in the northern section of Hercules.
The best time of the year to observe Earth's next-door neighbor planet Mars is the night of May 22nd, when it reaches opposition. The Red Planet rises at sunset and shines brightly with reflected sunlight all night. Look for Mars within the constellation Scorpius.
June:
Summer stargazing season kicks off in June with great opportunities to see a host of globular and open star clusters, emission nebulas, and more. Grab a pair of big binoculars or a wide-field telescope and scan the summer Milky Way for great views.
Gas giant planet Saturn will be at opposition on June 2nd, arguably the best night of the year to observe and capture astrophotos of Saturn and its majestic rings. Saturn will be visible all night long in the constellation Ophiuchus, and it will be brighter than any other night of the year. Saturn's brighter moons such as Titan and Enceladus make great targets for 6" and larger telescopes.
Catch a close pairing of the Moon and gigantic Jupiter on June 11th. At their closest approach, Jupiter will appear to pass within 1�25' of the Moon, making a nice target for binoculars and telescopes.
July:
With constellation Hercules almost directly overhead and Scorpius to the south, there's plenty to explore in July skies as summer continues. Check out globular star clusters M13 and M92 in Hercules, and explore Scorpius to find numerous deep-sky objects including open clusters M6 and M7, and globular clusters M4 and M80.
On July 9th, the Moon and Jupiter will make a very close approach to one another in the evening sky, appearing to pass as close as 0�48' from each other.
July winds down with the Delta Aquarids meteor shower. For the best chance to see meteors, get outside after midnight on July 28th and look towards the constellation Aquarius.
August:
Use 50mm or larger binoculars and/or a telescope with a low-power eyepiece to explore the summer Milky Way in August for nice views of various star clusters, galaxies, and cloudy nebulas.
Check out the skies after midnight on August 12th and in the early morning hours of August 13th to see meteors from the Perseids shower radiating from the constellation Perseus. This year, the waxing gibbous Moon will set a bit after midnight, leaving skies nice and dark to see lots of "shooting stars" streak across the sky.
On August 27th, look above the western horizon just after sunset to see an extremely close pairing of bright planets Venus and Jupiter. The two planets will appear to pass within a scant 0�3.6' of one another, presenting a wonderful target for binoculars and telescopes.
September:
The fall stargazing season begins with wonderfully placed spiral galaxies M31 (Andromeda Galaxy), M33 (Triangulum Galaxy), and M74 in Pisces. Use a big telescope to see these glittering island universes.
Three popular globular star clusters line up almost directly north-south in September skies. From a dark sky site, check out views M15 in Pegasus, M2 in Aquarius, and M30 in Capricornus.
October:
In early October, catch your last glimpse of the year of the galactic center in the constellation Sagittarius, low in the southwestern sky, where you can track down four great emission nebulas - M8, the Lagoon; M20, the Trifid; M17 the Omega; and M16, the Eagle or "Star Queen" nebulas.
Two great planetary nebulas are still well-placed in October skies - M57, the Ring Nebula; and M27, the Dumbbell Nebula.
Sit back and relax in your favorite backyard chair to watch the Orionid meteor shower, which peaks on the night of October 20th into the morning of October 22nd. Unfortunately, the bright Moon will outshine fainter meteors, but brighter "shooting stars" will be visible. The Orionids shower is notoriously irregular, so keep an eye out for meteors on any night from October 20th through the 24th.
November:
Bundle up for bright winter skies! See our namesake constellation Orion arch its way across the sky in November along with lots of bright star clusters to explore with big astronomy binoculars and telescopes.
Get outside after midnight on November 17-18 to see the Leonids meteor shower peak as meteors appear to radiate from the constellation Leo.
High in the northern skies of November, between the constellations Perseus and Cassiopeia, use a pair of big binoculars or a wide-field telescope to seek out the sparkling Double Cluster in Perseus -- two open star clusters NGC 884 and NGC 869 side by side.
December:
Don't miss the Geminids meteor shower which peaks after midnight on December 13-14. This year, the Full Moon of December 14th will outshine fainter Geminids meteors, but there's still a good chance to see "shooting stars" the evening of December 13th into the early morning hours of the 14th. Look for meteors to emanate from the constellation Gemini and the surrounding area.
The New Moon of December 28th will provide dark skies and great conditions to observe deep-sky gems with big binoculars or a telescope. Check out open cluster M42 (Pleiades), the Andromeda Galaxy (M31), and the many gems within our namesake constellation Orion, including M42 the Orion Nebula and the elusive Horsehead Nebula located near Alnitak - the easternmost star of Orion's easily recognizable belt.
{ width: 160, height: 160, defaultImage: '', layers: 'Artimg-WhatsInTheSky_2015_square' }

Mark your calendars and plan star parties with your family, friends, and fellow astronomy enthusiasts to catch these noteworthy 2015 celestial events. Here are just a few of the exciting sights to look forward to in the New Year!
January:
Bundle up and keep your eyes peeled on the evenings of January 3rd and 4th to catch the Quadrantids meteor shower. While the nearly Full Moon will unfortunately outshine many of the Quadrantids this year, there will still be opportunities to see brighter meteors streak across the night sky. Look for meteors appearing to radiate from the constellation Bo�tes.
On the night of January 23rd, train your telescope on Jupiter from 7pm PST to about half-past 11pm PST to witness a rare triple Galilean moon and shadow transit. The shadows of Galilean moons Callisto, Io and Europa will cross the face of Jupiter, followed by the moons themselves, all in one night!
February:
Get ready for great views of giant Jupiter this month as the gas giant planet will be at opposition on the evening of February 6th - the point in its orbit when it appears opposite the Sun from Earth. The second month of 2015 continues to offer good views of the winter Milky Way, especially during the evening of February 18th, when the New Moon promises dark skies.
Catch an early evening conjunction of the planets Venus and Mars on February 22, when our closest neighboring planets will appear to be just a half-degree apart in the evening sky.
March:
Some of the best galaxies to see are spread across the night skies of March from Ursa Major to Virgo. Take advantage of the New Moon on March 20th and set sail for these island universes with a big telescope! Grab a pair of 50mm or larger binoculars in March for great views of the Pleiades cluster (M45), the Beehive cluster (M44), and the must-see Double Cluster in Perseus. These sparkling sky gems are perfect fare for big astronomy binoculars and telescopes too.
April:
Skygazers get a treat this month in the form of a Total Lunar Eclipse on the evening of April 4th. You won't want to miss the show as the Full Moon gradually becomes darkened by the Earth's shadow and turn a reddish orange color. This Total Lunar Eclipse will be visible throughout most of North and South America, eastern Asia and Australia.
Don't miss the Lyrids meteor shower which peaks during April 22nd and 23rd. Scan the skies near the constellation Lyra after midnight on the 22nd for your best chance to see meteors.
May:
Grab a comfortable blanket or lounge chair and catch the Eta Aquarids meteor shower which peaks on the evening of May 5th and the early morning of May 6th. Meteors will appear to radiate from the constellation Aquarius.
May skies present great viewing opportunities for many globular star clusters, including M3 in the constellation Bo�tes, the Great Cluster M13 in the keystone asertism of Hercules, M5 in Serpens, M92 in the northern section of Hercules.
The best time of the year to observe Saturn and its spectacular rings is the night of May 22nd, when the gas giant planet reaches opposition. 2015 will be a great year to observe and photograph Saturn because its rings will be at nearly maximum tilt from our vantage point.
June:
Summer stargazing season kicks off in June with great opportunities to see a host of globular and open star clusters, emission nebulas, and more. Grab a pair of big binoculars or a wide-field telescope and scan the summer Milky Way for great views.
Around 10pm in mid-June, two face-on spiral galaxies M51 and M101 will both be well-paced in the night sky for observation and astrophotography. While you can see these galaxies from a dark sky site with a humble 60mm refractor, bigger telescopes will reveal much more detail. Use a 10" or larger reflector to see the spiral arms of M51.
July:
With constellation Hercules almost directly overhead and Scorpius to the south, there's plenty to explore in July skies as summer continues.
On the night of July 1st, get outside in the early evening to catch a close conjunction between bright planet Venus and giant Jupiter. The two planets will appear just 24 arcminutes away from one another in a very pretty pairing. July winds down with the Delta Aquarids meteor shower. For the best chance to see meteors, get outside the night of July 28th and look towards the constellation Aquarius.
August:
Get outside during the evening of August 6th to see a close conjunction between the planets Mercury and Jupiter, which will appear just 35 arcminutes away from one another.
Use 50mm or larger binoculars and/or a telescope with a low-power eyepiece to explore the summer Milky Way in August for nice views of various star clusters, galaxies, and cloudy nebulas.
Check out the skies after dark on August 12th and in the early morning hours of August 13th to see meteors from the Perseids shower radiating from the constellation Perseus. This year, the thin crescent Moon during the Perseids will allow summer stargazers to see plenty of beautiful meteors streak across the night sky.
September:
The fall stargazing season begins with wonderfully placed spiral galaxies M31 (Andromeda Galaxy), M33 (Triangulum Galaxy), and M74 in Pisces. Use a big telescope to see these glittering island universes.
Three popular globular star clusters line up almost directly north-south in September skies. From a dark sky site, check out views M15 in Pegasus, M2 in Aquarius, and M30 in Capricornus.
The end of September treats us to a Total Lunar Eclipse on the evening of the 28th. Get outside to see the Moon become a deep red color as it becomes darkened by Earth's shadow. This Total Lunar Eclipse will be visible from most of North and South America, Europe, western Asia and Africa.
October:
Sit back and relax in your favorite backyard chair to watch the Orionid meteor shower, which peaks on the night of October 21st into the morning of October 22nd. The Orionids shower is notoriously irregular, so keep an eye out for meteors on any night from October 20th through the 24th also.
Set your alarm to get up early on October 28th, to catch a glimpse of a rare triple-conjunction between the planets Venus, Mars and Jupiter before sunrise. These three planets will form a 1-degree triangle in the pre-dawn skies of the 28th.
November:
Bundle up for bright winter skies! See our namesake constellation Orion arch its way across the sky in November along with lots of bright star clusters to explore with big astronomy binoculars and telescopes.
Get outside on the evenings of November 17th and 18th to see the Leonids meteor shower as meteors appear to radiate from the constellation Leo.
High in the northern skies of November, between the constellations Perseus and Cassiopeia, use a pair of big binoculars or a wide-field telescope to seek out the sparkling Double Cluster in Perseus - two open star clusters NGC 884 and NGC 889 side by side.
December:
Don't miss the Geminids meteor shower which peaks during December 13th and 14th. Even though the peak is on the 13th and 14th, this popular shower will likely produce worthwhile meteors from the 6th through the 19th. Look for meteors to emanate from the constellation Gemini and the surrounding area.
The New Moon of December 11th will improve your chances of seeing the Geminids shower, as well provide optimal conditions to go after deep space telescope fare including the open cluster Pleiades (M42), the Andromeda Galaxy (M31), and the many gems within our namesake constellation Orion, including M42 the Orion Nebula and the elusive Horsehead Nebula located near Alnitak - the easternmost star of Orion's easily recognizable belt.
Some of Our Favorite Customer Astrophotos:

Bright planet Venus and a sliver-thin Crescent Moon make a pretty pair in the sky in this beautiful pic from Orion customer Aaron Collier.

Orion customer Frank Boegert captured this exquisite photo of ringed planet Saturn that clearly shows the Cassini Division and atmospheric cloud details.

Dedicated astrophotographer and longtime Orion customer Doug Hubbell sent us this dynamic photo of the Sun in Hydrogen-Alpha light captured using a Coronado PST.

This impressive astrophoto of NGC 253, the "Silver Coin" or "Sculptor's Galaxy", was captured by Orion customer Barry Brook from the dark skies of Adelaide Australia.

This impressive astrophoto of NGC 253, the "Silver Coin" or "Sculptor's Galaxy", was captured by Orion customer Barry Brook from the dark skies of Adelaide Australia.

Orion customer David Rankin sent us this great shot of M20 which displays the Trifid Nebula's beautiful coloring and delicate structure in wonderful detail.
{ width: 160, height: 160, defaultImage: '', layers: 'Artimg-og1' }

One of the nicest aspects of winter observing is the early sunsets and long nights. You can be outside and enjoy an hour or so of astronomy, and still be in early enough that mid-week viewing is an easy habit to acquire. All we need are clear skies. When you have them, get out and enjoy!
I find nothing more pleasing than an easy star hop from one great target to another. Take your binoculars or telescope out this week for a short but fun hop to four big and bright open clusters full of variety, as well as some interesting challenges. These are clusters that will become staples of your winter observing routine.

Gemini and Auriga
Find Gemini and Auriga rising above the eastern horizon in the early evening. M35 (discovered by Philippe Loys de Ch�seaux) is the lone Messier object in Gemini. The trio of M36, M37 and M38 form a nearly straight line, equally spaced in Auriga. Charles Messier discovered them while searching for comets from his observatory in Paris, France. He discovered 16 comets, but is more famous for objects he cataloged as "not" comets, so he wouldn't mistake them in his search. The list of non-comets became famous at the Messier Catalogue, 110 objects that represent the brightest and arguably most interesting deep sky targets in the northern skies.

M35 with NGC 2158 at lower left. Image courtesy Andr� Hartmann.
Let's begin with M35 in Gemini. It is very easy to locate off of one of the Twin's feet. Train your binocular or telescope finder on Eta Geminorum - the last star in the chain that begins with Castor. You should see the big open cluster as a bright fuzzy patch of light to the star's north-northwest. At magnitude 5.1, it is quite bright, so much so that there are reports of observing it without optical aid, meaning, naked-eye. Try this from a dark sky. In small binoculars, such as a 7x35, it appears as a 25' fuzzy patch with hints of resolution in periods of excellent seeing. In an 8" telescope it is best viewed at low power, so the cluster does not entirely fill the field of view. One description has it as somewhat donut shaped, with fewer stars in the center. The cluster is about the size of the Full Moon, has at least 120 stars of magnitude 13 or brighter, and is at a distance of 2800 light years. Do you see a dim unresolved glow 15 arcminutes to the big cluster's southwest? That's another open cluster, NGC 2158, 10 times older and five times more distant! NGC 2158 is a nice treat coupled with M35!
Use the finder chart at the start of this article to hop up from M35 toward Auriga, between its two closest stars, but stay on the M35 side. Your finder or binocular should show what most observers consider to be the prettiest open cluster, M37.

M37. Image courtesy Ole Nielsen.
M37 was discovered before 1654 by Italian astronomer Giovanni Battista Hodierna. The brightest of the three Messiers in Auriga, it is a very evenly distributed open cluster, with hundreds of stars of similar magnitude. The cluster has over 150 stars brighter than magnitude 12.5. It lies 4500 light years from us, and, with an overall magnitude of 6.2, it has been seen naked-eye. One observer has seen it in 8x21 binoculars from skies limited to magnitude 3. That's quite an accomplishment, but you should use larger binoculars or a telescope to enjoy the cluster at its best. Here is a nice description by Michael Geldorp using an 8" f/6:
"Magnificent cluster. Large and very rich cluster. The stars in M37 seem to form streams flowing outward from the center and there appears to be a relatively starless area near the center. Unbelievable sight at 98X with the cluster more than filling the field of view. There is a yellowish/orange bright star near the middle of M37."
Move just across the constellation line now, to M36, and you'll see a dramatic difference in appearance compared to M37.

M36 courtesy NOAO.
M36 will appear smaller, and sparse by comparison. It too was discovered by Hodiema. It shines at magnitude 6.3 and is 4,100 light years from us. Its size, though, is half that of M37. The difference will be very apparent. It has been reported as a threshold object naked-eye. Try for it that way from your darkest skies. In 7x35 binoculars, observer Lew Gramer reports: "This open cluster under these skies showed as a mere 15' irregular fuzzy patch NE of a pretty grouping of seven mag 5-8 stars, all lined up along a 2-degree path roughly North/South." Michael Geldorp in his 8" f/6 reports: "Nice bright cluster with streams of stars that give it the appearance of a crab to me. Less impressive than M 37, this cluster has fewer stars but more relatively bright ones. Located in a rich part of the sky."
The last of our clusters is M38, which is reminiscent of M35 in that it has a smaller open cluster paired in the field of view.
 and NGC 1907. Courtesy Sloan Digital Sky Survey")
M38 (above) and NGC 1907. Courtesy Sloan Digital Sky Survey
M38 is listed at magnitude 7.4, so the few "visual" observations (naked-eye) I've found are beyond the reach of most normal humans, but there are reports. In fact, one report says all four of these Messiers are visible at the same time, in one view, from a very dark (magnitude 6.7) location. I'll have to try it. What I do find reliable and interesting is the excellent observation by Michael Geldorp (again): "Large and rich cluster best seen at 49X. Not as many bright stars as M36 but richer in fainter stars. There is a conspicuous Y shaped asterism in the central part of M38. 98X showed more stars but the grandness of the cluster is lost with high powers. Striking contrast with nearby NGC 1907, reminiscent of the M35-NGC 2158 pair. 60-70 stars seen at 98X."
The cluster was also first observed prior to 1654 by the Italian Hodierna. Its 4,200 light years away and is nearly as large as M37 at 24 arcminutes. Unlike NGC 2158 near M35 thought, NGC 1907 is the same distance from us as M38.
All four Messier open clusters are around 4,200 light years distant. To give you an idea of what these clusters' distances mean, if we were to view the sun from within M38, it would appear as a magnitude 15.3 star. Go search for one in your telescope. Here's another fun fact, and chuckle — none of these four Messiers was actually discovered by Charles Messier!
I hope you've enjoyed this "hop". There are lots more, clusters, bits and pieces of nebulae strewn through our nearby home locale, and strings and chains of galaxies to explore.
Till next time under the stars,
Mark Wagner
{ width: 160, height: 160, defaultImage: '', layers: 'Artimg-CatsEyeNebula' }

Halloween is a great time to share astronomy. It's an appropriate time to do it as well. With families coming out in the early evening to trick-or-treat, you can greet them with your telescope (and short ladder), a few fun targets to show, and a Jack O'Latern of treats to hand out. You can even tell them a bit about the astronomy tie-in.
 Gibbous Moon
.
The best object to show on Halloween 2014 is the Moon. With an 8.4-da- old waxing gibbous phase, its light will dominate the sky to the south. But it is also a very easy object for first-time viewers to appreciate through a telescope. Bright and intuitively easy to relate to, what you see in a low power view are its dark seas and big craters. These will be seen both through the telescope and looking up at the moon with the unaided eye.
 Low Power Telescope View
.
The Moon will be high in the south as darkness deepens. Here you can see what the Moon will appear like in a low power view. Most obvious will be three huge mares, or seas; the dark areas on the upper half of the moon.
 Half The Moon Is Sea
.
The largest sea is Mare Tranquillitatis, close to the lunar equator. Above and attached to it is Mare Serenitatis, appearing more circular. Toward the limb of the moon, above the eastern edge of the big mare, is Mare Crisium, the Sea of Crisis. It is very round, very dark, and distinct. All three are lava-filled basins. You can also get some nice views of half of Mare Imbrium high up next to Mare Serenitatis, along the shadow line, or terminator.
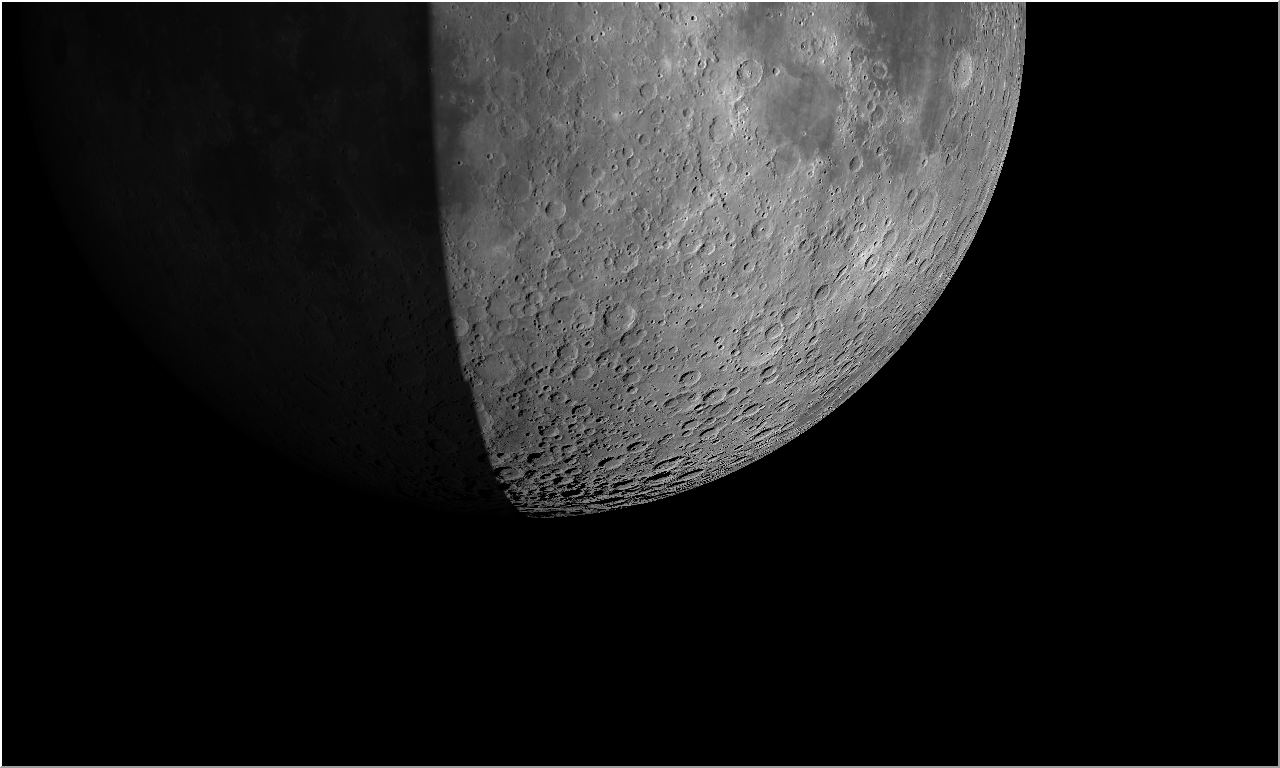 Half The Moon Is Crater
.
In contrast to the northern half, the southern visible portion tonight is pock-marked with craters. Scan around with your telescope, particularly near the south pole along the terminator for high contrast views of shadow and light inside the larger craters.
I mentioned Halloween has an astronomical history. So here's the story you can tell:
The celebration of Halloween dates our distant ancestry, and across cultures. Its astronomical tie-in has to do with recurring annual dates. Most of us know the four major time demarcations each year; vernal equinox where (northern hemisphere) day becomes longer than night, summer solstice; the most daylight of the year, autumnal equinox when night becomes longer than day, and winter solstice with longest night of the year. Between each of these is a half-way mark, called a "cross-quarter day."
Halloween historically fell on a cross-quarter day, the actual day being Nov. 7. It was the Scots and Irish celebrating it as "Samhain", between years 1,000 and 1,200, when the Pleiades star cluster would transit overhead at midnight. Samhain was a celebration of the deceased, the ghosts. At Samhain, the ghosts would leave for the season, going to their rest. Over many years this celebration became All Hallow's Eve, or Halloween, A cross-quarter day with a ghostly theme, halfway between the autumnal equinox and winter solstice. In Central American culture, friends and relatives are remembered in D�a de Los Muertos, or Day Of The Dead. It is the same celebration!
Other astronomical objects have a Halloween theme as well. They tend to be almost nebulae, as clouds of gas and dust, and we make shapes in their dark and light tones.
 The Soul Nebula
.
Two difficult ones visually are the Soul Nebula and Witch's Head. The soul is ghostly in shape.
 Witch Head Nebula
.
The Witch's Head really looks like its namesake!
There are two ghosts in the night sky! Can you name them? One is named because in early telescopes little detail could be seen, and these type of mysterious objects (planetary nebulae) looked like round planets. One of the ghosts appeared like the planet Jupiter. It is a spring object, so not visible this time of year. The other ghost is little, looks like a small "smoke circle" when viewed in amateur telescopes, and is setting in the evening with the constellation Ophiuchus. Can you name these planetary nebulae ghosts?
What would Halloween be without creepy spiders? The Red Spider Nebula and Tarantula Nebula are perfect for this night! The red spider may be viewed in amateur telescopes, but not much detail can be discerned. In comparison, The Tarantula is a treasure trove of complex nebulae for observer in the southern hemisphere.
 Cat's Eye Nebula
.
Ghosts, spiders, witches, what more could there be? The Snake Nebula is a dark nebula, part of a gigantic complex of dust toward the center of our home Milky Way Galaxy. It is a treat to see it in telescopes from a dark sky. The Owl Nebula fits our Halloween theme, as a creature of the night, and so does Cat's Eye Nebula in Draco, a fine sight in amateur telescopes.
The Medusa Nebula is large and dim, currently visible in Gemini in the morning sky. This is a large and dim planetary nebula, and very challenging to observe. But knowing what happens to humans seeing the Medusa, perhaps its better to just enjoy knowing its there.
With so many scary Halloween themed creatures in the sky we should feel fortunate to have the moon tonight, as some easy and even friendly "eye candy" to show visitors.
Get your telescope out in the early evening and share some treats. You might even consider handing out Milky Way and Mars bars.
Happy Halloween!
Mark Wagner
All maps are courtesy Virtual Moon Atlas. Photos are courtesy of NASA.
{ width: 160, height: 160, defaultImage: '', layers: 'Artimg-WhatsInTheSky_09-14_square' }

September nights hold lots of wonderful treats for amateur astronomers to see with binoculars and telescopes. See some of our top September stargazing suggestions below:
- The Northern Milky Way - Early in the month, around 9 PM, the "Summer Triangle" of three bright stars (Vega, Deneb and Altair) is nearly overhead. In the northernmost portion of the Summer Triangle, you'll see the brightest portion of the northern Milky Way. Point a telescope there and you'll discover that the fuzzy outlines of the Milky Way will resolve into fields of glittering stars.
- Planetary Nebulas in the Summer Triangle - Get a star chart and see how many of these you can find in September: the famous Ring Nebula (M57) in the constellation Lyra; the Dumbbell Nebula (M27) in Vulpecula; and the "Blinking Planetary," NGC 6826 in Cygnus. Not far outside the western boundary of the Summer Triangle is a small, but intensely colorful planetary nebula, NGC 6572. All these can be seen in a 6" or larger telescope. An Oxygen-III filter will help.
- Neighbor Galaxy - In early September, lurking low in the northeast sky is another galaxy, separate from our Milky Way - the Great Andromeda Galaxy (M31). From a very dark, moonless sky, M31 is visible with the unaided eye as a slightly fuzzy spot. A pair of 7x50, 9x63 or larger binoculars will give you a much better view and telescopes will reveal some of the subtle dust lanes in the neighboring galaxy.
- Saturn Comes Close to the Moon - On September 28th, grab a pair of powerful astronomy binoculars or a telescope to see ringed planet Saturn come within 43 arcminutes of the waxing crescent Moon. This pretty pairing of two popular solar system objects is sure to make a spectacular sight.
- More Extra-Galactic Treats - If you haven't tracked down "The Whirlpool Galaxy," M51, just off the handle of the easily recognizable Big Dipper asterism, do it now while you still can! It will be too low for most to get a good view after September and you'll need to wait until late winter or next spring to catch a good view of this truly picturesque galaxy.
- A Brilliant Open Star Cluster - Off the western end of the constellation Cassiopeia is the beautiful Open Star Cluster M52. You can find it with 50mm or larger binoculars from a dark sky site, but the view is definitely better in a telescope. With a larger scope, say 8" or larger, and with the aid of an Orion UltraBlock or Oxygen-III eyepiece filter, you may even be able to catch views of faint emission nebulas near M52.
- Two More Brilliant Star Clusters - If you liked sparkling M52, you'll love the popular favorite "Double Cluster in Perseus." Lying between constellations Cassiopeia and Perseus is a bright, fuzzy spot in the Milky Way, and a binocular or telescope will reveal two, bright open star clusters close to one another. In early September the "Double Cluster" appears low in northeastern skies around 9 PM, but it becomes a real showpiece later in the evening as it climbs higher in the sky.
- The Globular Star Clusters of September - Almost in a row, off the western side of the constellation Pegasus are three globular star clusters that line up almost north-south. These sparkling clusters are, starting with the most northern globular, M15 in Pegasus; M2 in Aquarius and M30 in Capricorn. From a dark sky site you can easily find all of them in binoculars!
- The Challenging Veil - A challenge object for September is the Veil Nebula, a supernova remnant, in Cygnus which is almost overhead as soon as it gets dark. With a star chart, aim your telescope at the naked eye star 52 Cygni. One branch of the Veil crosses over this star and to the east are brighter segments of this roughly circular nebula. While the Veil can be seen in big binoculars by expert observers under very dark skies, you will likely need at least a 5" telescope and an Orion Oxygen-III eyepiece filter if you are near city lights.
All objects described above can easily be seen with the suggested equipment from a dark sky site, a viewing location some distance away from city lights where light pollution and when bright moonlight does not overpower the stars. All objects have been verified by actual observations by Orion Telescopes & Binoculars Staff at Fremont Peak State Park, and/or Deep Sky Ranch, 60 miles and 90 miles respectively from San Jose International Airport, San Jose, CA.
{ width: 160, height: 160, defaultImage: '', layers: 'Artimg-WhatsInTheSky_07-14_square' }

Summer stargazing fun continues in July! Warm July nights are ideal opportunities to spend time outside with family and friends, exploring the heavens with your telescope or astronomy binoculars.
Here are some of our top suggestions for July stargazing:
- The Moon and the Red Planet - On July 6th, grab a telescope or pair of 50mm or larger astronomy binoculars to see the Moon positioned close to Mars in the sky.
- The Moon and the Ringed Planet - Just a couple days later on July 8th, you can enjoy a close pairing in the sky between the Moon and Saturn called a conjunction.
- The Summer Milky Way - At mid-month, around 10pm PT, the glorious Summer Milky Way shines down as a band of light that stretches from the Southern horizon to nearly overhead. You don't need binoculars or a telescope to see our home galaxy, but it is best observed from a site with inky-black dark skies. The Summer Milky Way will arch across the sky as the night progresses.
- Spectacular Saturn - Still well-positioned in July skies, ringed Saturn continues to be a wonderful summer planetary target. Look for it in south to southwestern July skies around 10pm. Use an eyepiece that will yield at least 40x in your telescope to see Saturn's beautiful rings, then use a Barlow lens or higher-power eyepiece to go in for closer views. Larger telescopes and clear, dark skies will help you see a thin gap between Saturn's largest rings, which is called the Cassini Division.
- Sparkling Open Star Clusters - In the constellation Scorpius, catch M6, the "Butterfly Cluster" and M7 in 50mm or larger binoculars. Point a telescope at these two open star clusters to try to see the subtle dust clouds nearby.
- Flaming Gas Clouds - Scan the Summer Milky Way with 50mm or larger binoculars or a telescope to reveal some of the best emission nebulas of July. Use an Orion Oxygen-III Nebula Eyepiece Filter for the most stunning views. In Sagittarius, track down M8, the "Lagoon Nebula"; M20, the "Trifid Nebula"; and M17, the "Swan Nebula." In the constellation Serpens Cauda, see the delicate "Star Queen Nebula, M16. Use big astronomy binoculars to frame both M16 and M17 in the same field-of-view, or use a really large telescope to coax out the faint violet glow of M16.
- Dying Stars and Glowing Balls of Gas - Look to the constellation Lyra with a telescope to catch one of the best Planetary Nebulas in the sky - M57, the famous "Ring Nebula"!
- Late July Meteors - Discovered in 1825 by the German astronomer Friedrich Georg Wilhelm von Struve, NGC 6572 is bright enough to be seen in a 60mm refractor telescope; but it is very, very small! At only 8 arc seconds in size, it takes a lot of magnification to distinguish this from a star. The easiest way to find it is to look in the target area for a green star. NGC 6572 is one of the most intensely colored objects in the night sky. Some say this is green, some say it is blue; what do you think?
- July Challenge Object - Hercules Galaxy Cluster: About half a billion light years from Earth in the constellation Hercules, not far from the star Beta Hercules in the southwest corner of the "keystone" asterism, lays the "Hercules Galaxy Cluster." This association is a group of 200-300 distant galaxies, the brightest of which is NGC 6050 at about 10th magnitude and can be seen with an 8" reflector under very dark skies with good seeing conditions. A larger aperture, 14"-18" telescope will begin to show about a half-dozen or more galaxies in one field-of-view. How many can you see in your telescope?

M20 Trifid Nebula, Doug Hubbell
All objects described above can easily be seen with the suggested equipment from a dark sky site, a viewing location some distance away from city lights where light pollution and when bright moonlight does not overpower the stars. All objects have been verified by actual observations by Orion Telescopes & Binoculars Staff at Fremont Peak State Park, and/or Deep Sky Ranch, 60 miles and 90 miles respectively from San Jose International Airport, San Jose, CA.
{ width: 160, height: 160, defaultImage: '', layers: 'Artimg-WhatsInTheSky_06-14_square' }

Get outside for summer stargazing fun in June! With weather warming up, June is a great time to enjoy relaxing evenings under starry skies with your telescope or astronomy binoculars.
Here are a few of Orion's top picks for June stargazing:
- The Moon & Mars Red planet Mars will appear to creep within about two degrees (about 4 lunar diameters) of the Moon on the night of June 7th. This conjunction will be visible from moonrise to moonset, so get outside and enjoy the view!
- Ringed Saturn Throughout all of June, the ringed planet will be an attractive target for stargazers. Use an eyepiece that will yield at least 40x in your telescope to catch views of Saturn's beautiful rings and brighter orbiting moons. Larger telescopes and clear, dark skies will help you see a thin gap between Saturn's rings, which is called the Cassini Division.
- Swirling Spirals - Around 10pm in mid-June, two glorious, face-on spiral galaxies M51 and M101 will both be in a great position for viewing and imaging. While you can see these great galaxies with a humble 60mm refractor, bigger telescopes will reveal finer details. Use a 10" or larger reflector under dark skies to see the delicate spiral arms of M51.
- Gems of the Summer Triangle - By 10pm in mid-northern latitudes, the Summer Triangle, comprising beacon stars Vega (in Lyra), Deneb (in Cygnus), and Altair (in Aquila), will be fully visible above the horizon. Several celestial gems lie within its confines, including the Ring Nebula (M57), the Dumbbell Nebula (M27), open star cluster M29, and the visually challenging Crescent Nebula (NGC 6888). To catch a glimpse of the elusive Crescent, you'll almost certainly need an Orion Oxygen-III Filter in a larger telescope.
- Pretty Pair - On June 24th during daylight hours, the thin crescent Moon passes within 1 degree of our neighboring planet Venus. One degree is about the width of your pinky held at arm's length. Knowing this proximity makes it easier to spot Venus in the daytime sky. Can you see it?
- Summer is Globular Season! - Globular star clusters are densely packed balls of stars that are concentrated towards the center of the Milky Way. June skies offer some of the finest globular cluster viewing opportunities. You can catch globular clusters in 50mm or larger binoculars, but a 6" or larger telescope at moderate to high power offers the best chances to resolve individual stars. In the constellation Hercules, look for M92 and the "Great Cluster" M13. In Scorpio, look for M4 and M80. The constellation Ophiuchus is home to six globulars - M10, M12, M14, M107, M9, and M19. Can you spot them all?
- The Virgo Cluster - A treasure trove of galaxies can be explored if you point your 6" or larger telescope towards the Virgo Galaxy Cluster. Aim your telescope at galaxy M87 in the constellation Virgo and start scanning the surrounding night sky. How many galaxies can you see?
- Summer Sky Challenge - Discovered in 1825 by the German astronomer Friedrich Georg Wilhelm von Struve, NGC 6572 is bright enough to be seen in a 60mm refractor telescope; but it is very, very small! At only 8 arc seconds in size, it takes a lot of magnification to distinguish this from a star. The easiest way to find it is to look in the target area for a green star. NGC 6572 is one of the most intensely colored objects in the night sky. Some say this is green, some say it is blue; what do you think?
All objects described above can easily be seen with the suggested equipment from a dark sky site, a viewing location some distance away from city lights where light pollution and when bright moonlight does not overpower the stars. All objects have been verified by actual observations by Orion Telescopes & Binoculars Staff at Fremont Peak State Park, and/or Deep Sky Ranch, 60 miles and 90 miles respectively from San Jose International Airport, San Jose, CA.
{ width: 160, height: 160, defaultImage: '', layers: 'Artimg-Moon_Day_2014_06_16' }

In a previous Telescope.com article, I gave a list of essential items needed to do urban/sidewalk astronomy. The list is good for any astronomy observing outreach, but best suited for light-polluted urban settings using a "public hands-on" approach.
So now you're ready to head out to the restaurant or pub patio, the coffee shop veranda, or just out on the sidewalk. What do you look at? City and business lighting may make it tough to see many stars in the sky. But really, all you need are two or three good things to view, and often there can be even more. Here's a list of the best objects to view from city locations:

First Quarter Moon through an XT8 Dobsonian, at Orion's last star party. Credit: Maria Grusauskas
1. The MOON: This is an easy, obvious target if it's the right phase-anything from about three days after New Moon to sometime around Last Quarter. While the Moon is hated by those hunting deep sky objects at a dark site, it's the object everyone wants to see in an urban setting. Binoculars are good for panoramas, especially if there are nearby trees and thin scattered clouds you can put in the FOV. The most modest scope can show amazing detail on the surface. It just blows people away, especially the craters-I'm always amazed they're so amazed by that. In larger phases, an adjustable polarizing filter can be a good thing to cut down the glare. I prefer using a wide-field eyepiece rather than tight-in magnification, so folks can track and follow easier when they run the scope-which I always encourage.
2. SATURN: The next-most-impressive object to the Moon. With a little scale on it, people will accuse you of pasting a picture in the scope. This is a good time to show them (if you're using a reflector) that there's just a mirror at the bottom and a small mirror at the top, bouncing light right into their eye-no tricks! They'll be especially impressed by any moons visible, and Titan, at least, almost always is. Like all objects, have a "cheat sheet" in hand or in your head with some basic facts, like size, distance, and number of moons. Depending on your scope, maybe a little more magnification is in order, but not TOO much: you want to make sure it's easy to track.
3. JUPITER: The "other" impressive target. Cloud bands and the Galilean moons are always visible unless conditions are terrible. People love watching the moons move around through the evening, and they're amazed that they can be spotted even with binoculars. This is a great object to show through both the binos and your scope. Thick haze can ruin it, though, so wait it out or pack it in! If at a tavern, and you're a bit of a gambler, an entertaining "wager" can be to see if your patron can name any or all of the Galilean moons. Don't believe they never can-I've lost this bet before, requiring all four. Pay up if you lose! As always, know which moon is which: this is very easy to do with any number of apps, tweets and sites which will keep you informed. Jupiter's Great Red Spot is not often visible from urban settings, even if face-on. But it's good to know when it is anyway, because someone will ask. And who knows, maybe you will be able to see it.
4. The SUN: There is no more-impressive object than our closest star. Obviously exclusively a daytime target, this requires a white-light solar filter or a hydrogen-alpha scope. It's a stand-alone target for daytime outreach, other than the Moon or Venus, which can sometimes be seen depending on their location in the sky. The H-alpha scope is by far the best way to go, as most people have never seen this view at all unless it's in a photo in a magazine or online. All you need is a clear day, the time and inclination to do it! This is THE target for daytime festivals and public events. It's also the one where I tend to do the aiming, rather than allowing the patron to do so, since it's tougher than aiming a Dob, and the H-alpha scope tends to be a little more fragile and pricey.
5. ORION'S SWORD/ORION NEBULA: For a light-polluted place, Orion's entire Sword through astronomical binoculars is the better of this pair of targets. While the Sword is probably visible naked-eye, the amount of stars, and the small view of the Orion Nebula in the middle, is a very easy and impressive sight from all but very bright places. If it's a bit darker, the Orion Nebula through a scope can be very good as well, but often it's not; it'll never look like that OIII filter view from your dark site. But I've had a viewer be able to see the four main Trapezium stars from a tavern patio; not bad!
6. PLEIADES: This is a real crowd-pleaser through binoculars, and of course too large to fit into any but a rich-field scope. People can see it in the sky, although they may have to shield their eyes from nearby lights. And the view in binoculars is simply stunning. It's a challenge to see how many stars they can see naked-eye (I can usually only manage five myself) versus the binocular view (generally over thirty if they take their time). And the various names of this object are of great interest to most: many have heard of the Seven Sisters if they haven't heard of the Pleiades, but most have NOT heard its name "Subaru", and are pleased to finally learn why those cars have those stars in the logo.
7. ALBERIO: A good object, easy to find at the right time of year, and wonderful for showing color to those who wish to see some. Many are disappointed by the lack of color in images, having imagined the view through a scope is like a picture in a magazine. This is great for showing color due to its blue and yellowish components. And it allows some conversation about the Milky Way, (which probably is not visible from the city), and the "Northern Cross", Cygnus.
8. BEEHIVE CLUSTER: Much like the Pleiades, this is an extremely pleasing binocular object. Often viewers will want the scope aimed at these clusters as well, and that's fine-they can steer around and see more detail, but they'll get a very visceral lesson in object size. That can lead to a great conversation on best viewing methods: naked-eye for meteors and aurora, binos for very large objects, scopes for objects from low-magnitude (large clusters, many nebulae) to high-mag (planets, planetary nebulae).
9. MARS (SOMETIMES): People always want to look at Mars, and sometimes it does look good; when it's close enough to Earth and your scope can give it enough scale. A lot of the time though, it's not very impressive. But when it is, and you can get enough magnification to make it worthwhile, folks can be extremely impressed to see a lighter polar cap and surface mottling. And it's always better than Neptune or Uranus, and someone cracking wise will always ask to see the latter.
10. HYADES: More huge star-cluster fodder for binoculars. Easy to spot via Aldebaran in proximity to Orion and the Pleiades, your viewers can be very impressed by the number of stars and the amount of sky it covers. I'm going to throw in the northern Perseus star fields as well, when they're visible, and also scanning many areas of the summer Milky Way.

Credit: Barstronomy
BONUS OBJECTS: The International Space Station and Iridium Flares. www.heavens-above.com is a great place to find out when and where, although it's not the only site doing this. And even though the ISS is just a bright white light slowly crossing the sky on a good day, people LOVE to see it. However, it's generally too hard for people to track successfully, although it shows structure in large binoculars and a scope. You can let them try if you wish. The brighter Iridium flares are impressive due to their predictability and the fact that they happen frequently, about two to four times per night; people are pleased to find out they can learn easily when and where they'll be visible. Then, they can impress the neighbors by saying "the aliens are going to signal me from this part of the sky at such-and-such a time tonight." New respect in the hood!
BELIEVE IT OR NOT, PROBABLY NOT: The next objects are usually NOT very much to look at from an urban setting in a scope 8" or less. You might think they'd be, but in my experience I've mostly given up on them. For a darker site, certainly; light-polluted urban site, not really, but they are worth a try. Your mileage may vary, depending on your scope and the exact conditions from your viewing stage.
M13, Lagoon Nebula, Swan Nebula, Andromeda Galaxy, M81/82, Leo Triplet, Comets, unless they're quite bright, say 5th magnitude at least.
If you've got an obvious object I missed in this list, please let us know in the comments. Hey, I'm not a scientist-I just play one on bar patios! Until next time, eyes to the skies!
CAUTION: Never look at the Sun, either directly or through a telescope or binocular, without a professionally made protective solar filter installed that completely covers the front of the instrument, or permanent eye damage could result. When using a truss tube telescope to view the Sun, both a properly fitting solar filter and light shroud are required.
{ width: 160, height: 160, defaultImage: '', layers: 'Artimg-MilkyWay_ap1418' }

Now that summer is arriving to the northern hemisphere, we are about to enter the best time of year to see and photograph the most beautiful part of our own Milky Way Galaxy. Not only are there millions of stars and some amazing dust lanes in the band of the Milky Way, there are also a host of Messier and NGC objects as well.
What equipment will I need?
- A camera with a large sensor, such as a DSLR or Micro Four Thirds camera. The sensor on most point-and-shoot cameras just isn't big enough to capture enough light at night to make photographing the Milky Way a worthwhile endeavor.
- A wide angle lens with a large aperture. The summer Milky Way encompasses a lot of the night sky, so you will want to shoot with a very wide field of view. I suggest at least 24mm or wider, with an aperture of at least f/2.8. You can still get decent results with smaller aperture lenses, but the goal is to try and get as much light into the camera as possible without too long of an exposure.
- A remote shutter release, or an in-camera timer option. Pressing the shutter with your finger causes camera shake, which can result in blurry images when shooting long exposures. See if there is an available remote shutter control for your camera. If not, most cameras have some kind of timer option. That way you can press the shutter button normally with your finger, but the camera will wait for a period of time before it actually opens the shutter. This allows the camera to stop shaking before taking the photo. A remote shutter release is the preferred option because it will also allow you to take exposures for several minutes in length if you are able to use a tracking device for even longer exposures. You will use the bulb setting on your camera and the remote to open and close the shutter.
- A good sturdy tripod. You don't want the wind to blow your tripod over with your nice camera on it. You also don't want a light breeze to shake your camera during a long exposure and cause blurry images. I would recommend a tripod with a weight rating of at least 5 pounds. Orion sells three tripods that meet this requirement.
- A couple of reliable memory cards with at least 16 gigabytes of storage each. You're probably going to be shooting a lot of images as you will likely have to experiment a good bit initially with your camera settings. I also recommend that you shoot with your camera in RAW mode so that you can have more control over processing them. Shooting in RAW mode comes at a price, however. The individual images will be much larger than if you were shooting in JPG mode.
- A fully charged camera battery and at least one fully charged backup battery. Or, you can use a field battery and adapter, like Orion's Dynamo battery and DSLR adapter (compatible with Canon cameras). It is an awful feeling to be out shooting something really beautiful and having your camera die because of battery power. Get charged up ahead of time!
Now that you have your materials list down, here are some other details you'll want to consider before you set out to shoot the Milky Way:
- You will of course want to find a location with dark skies. Light pollution is your enemy (and that includes the Moon). If you can't see any part of the Milky Way with your naked eye, then photographing it will be quite difficult. Get away from the city lights! Hopefully there is a national or state park with reasonably dark skies within a manageable driving distance.
- Keep an eye on the weather. You will want to consult the Clear Sky Chart website for this.
- Learn the phases of the Moon. The Moon is beautiful, but it interferes with our trying to shoot the Milky Way. Try to plan your shooting as close to the New Moon as possible so it won't interfere.
- Know what time the Milky Way will rise so you can maximize your shooting time. A good piece of free software that can help is Stellarium. This program shows you what will be in the sky at any time you'd like to know about.
- You will have to use both manual focus and manual exposure settings with your lens and camera. Automatic focusing and exposure will simply not give good results for shooting at night.
- For manual focusing, set your lens to infinity focus mode if available. If not, try to focus on the brightest star or planet in the sky. Vega is a really bright star that is right next to the Milky Way. It might take you several test shots to get the focus exactly correct, so be patient and if your camera has a zoom feature which allows you to view your images that can be very helpful for focusing.
Getting Started with Camera Settings
- Use the largest aperture your lens will allow.
- Start with your ISO at 3200.
- Set your exposure time to 20 seconds.
- Review your image in the camera. If it's too bright, then lower the ISO and/or exposure time. If you don't see much detail, try raising them a bit.
- You might find that setting the ISO too high will result in noise (or graininess) in your photos. Some cameras handle high ISO better than others; so take lots of test shots. Some noise can be reduced in post-processing.
- Be careful of star trailing. Because the Earth is rotating, the stars appear to move across the night sky. This will affect your exposure times. The wider your lens is, the longer you can shoot without star trails. This article from David Kingham talks about the "Rule of 500" and how to avoid star trails.
Other Suggestions for Shooting the Milky Way:
- Consider shooting with something interesting in the foreground. Trees, mountains, a lake, or any scenery you choose can add some real visual interest to your photos.
- Once you've gotten comfortable with shooting exposures of no more than 30 seconds, consider purchasing a tracking device that will allow you to take exposures that are several minutes long. The Orion StarBlast AutoTracker Altazimuth Mount will allow you to attach your camera so you can take much longer exposures. This will allow you to take photos with better detail and also reduce your ISO so you will have less noise in your photos.
- Combine several images for a panorama or mosaic. You can use a program like the free Microsoft Image Composite Editor to combine multiple images into one larger one.
- Use an intervalometer to create a time-lapse or extended star trails image. An intervalometer allows you to program your camera to take a series of exposures without your having to do anything. If you have a Canon camera, a free piece of software called Magic Lantern can do this for you without having to purchase a separate piece of hardware.
- Learn from others. There are astrophotography groups on places like Flickr and Google+. Most people will provide assistance and suggestions if you ask nicely.

Image Credit: Stephen Rahn
{ width: 160, height: 160, defaultImage: '', layers: 'Artimg-WhatsInTheSky_05-14_square' }

Get outside with your telescope on clear May evenings to see celestial treats in the sky! With weather warming up and skies clearing up, there's no shortage of celestial delicacies to view. Here are a few of Orion's top suggestions for May observing:
- Eta Aquarid Meteor Shower - Get outside on the night of May 5th, or well before dawn on May 6th to catch the peak of the Eta Aquarids meteor shower. You don't need a telescope to enjoy this meteor shower, which should deliver about one meteor per minute (60 per hour). Look for meteors appearing to radiate out of the water jug portion of the constellation Aquarius.
- Four Big Planetary Nebulas - Use a 6" or larger telescope and an O-III or UltraBlock filter to catch four relatively large planetary nebulas in May skies. See the "Ghost of Jupiter," NGC 3242 in Hydra; M97, "the Owl Nebula" in the Big Dipper; NGC 4361 in Corvus, and the famous "Ring Nebula", M57 in Lyra just a few degrees from bright star Vega.
- Four Glittering Globulars - Four picture-perfect examples of globular star clusters will be visible in May skies. Check out M3 in the constellation Bo�tes. M13, the "Great Cluster in Hercules" will be visible near the zenith. M5 can be found in Serpens, and M92 in the northern section of Hercules. Big telescopes will provide the best views, but even 50mm binoculars will show you these dense balls of stars from a dark sky site.
- Four Face-On Spirals - Use large telescopes to see the classic pinwheel shapes of galaxies M51 and M101 in the Big Dipper asterism, and M99 and M100 in the Virgo galaxy cluster. There are also dozens of additional galaxies to explore in the Virgo cluster with a big-aperture telescope.
- May's Challenge Object - May skies present perhaps the best opportunities to grab a view of Omega Centauri - the brightest globular star cluster in the sky! While it's big and bright, even visible as a "fuzzy" star in binoculars, the challenge Omega Centauri presents is its low position in southern skies, which can make it unobservable from higher northern latitudes.
All objects described above can easily be seen with the suggested equipment from a dark sky site, a viewing location some distance away from city lights where light pollution and when bright moonlight does not overpower the stars. All objects have been verified by actual observations by Orion Telescopes & Binoculars Staff at Fremont Peak State Park, and/or Deep Sky Ranch, 60 miles and 90 miles respectively from San Jose International Airport, San Jose, CA.


Why Buy From Orion
- 30 Day Money Back Guarantee
- Safe & Secure Shopping
- Next Day Shipping
- Easy Returns
- Sale Price Guarantee
- Free Technical Support

- 800-447-1001
- Telescope.com
- © 2002- Orion Telescopes & Binoculars All rights reserved
- DMCA/Copyright
- Terms and Conditions
- Privacy & Security
![]()


About Orion Telescopes & Binoculars
Since 1975 Orion Telescopes & Binoculars has been offering telescopes for sale direct to customers. Now an employee-owned company, we pride ourselves on an unswerving commitment to best quality products, value and unmatched customer care. Our 100% satisfaction guarantee says it all.
Orion offers telescopes for every level: Beginner, Intermediate, Advanced, and Expert. From our entry level beginner telescopes for amateur astronomers to our Dobsonian telescopes to our most advanced Cassegrain telescopes and accessories, you can find the best telescope for you. Because we sell direct, we can offer you tremendous value at a great price. Not sure how to choose a telescope? Orion's Telescope Buyer's Guide is a great place to start.
Orion binoculars are known for quality optics at a great price. We offer binoculars for every viewing interest, including astronomical binoculars, compact binoculars, waterproof binoculars, birding binoculars, and sport and hunting binoculars.
Orion's telescope and astrophotography accessories will enhance your telescope enjoyment without breaking the bank. Expand your viewing experience with accessories ranging from moon filters to power-boosting Barlow lenses to advanced computerized telescope mounts. Capture breathtaking photos with our affordable astrophotography cameras. And when you're stargazing, Orion's telescope cases and covers, observing gear, red LED flashlights, astronomy books and star charts will make your observing sessions more convenient, comfortable and meaningful.
At Orion, we are committed to sharing our knowledge and passion for astronomy and astrophotography with the amateur astronomy community. Visit the Orion Community Center for in-depth information on telescopes, binoculars, and astrophotography. You can find astrophotography "how to" tips and share your best astronomy pictures here. Submit astronomy articles, events, & reviews, and even become a featured Orion customer!
sales, new products, and astronomy.