


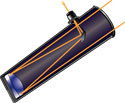
{ width: 160, height: 160, defaultImage: '', layers: 'Artimg-CT80_OptTube' }


High Praise for the CT80 80mm Compact Refractor Telescope Optical Tube
Review by Roger Ivester
 I've been wanting a small economical refractor for visual observing only. A telescope that could be used for those quick observing sessions when time is limited, and also for terrestrial viewing. A telescope which could easily be taken on trips, but take up very little space.
A Surprise!
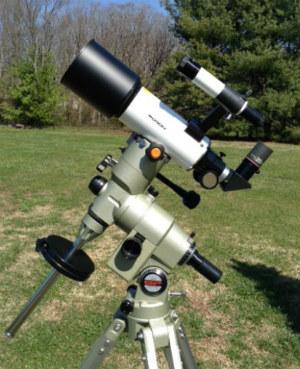
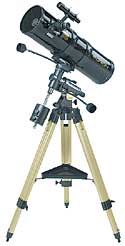
My son surprised me with an Orion model CT80 f/5 refractor as a gift.
This telescope is sold as an optical tube assembly, without accessories from Orion Telescopes and Binoculars. However, no problem. I have extra finders, an equatorial mount, plenty of eyepieces and a tripod for terrestrial viewing.
I was not wanting an expensive 70-80 mm apochromat, but an achromat that was light and easy to take outside and bring back in.
The dovetail mount fits perfectly to my vintage Orion/Vixen GP mount. I purchased a three pound counterweight about ten years ago, apparently just waiting for this scope. It balances the telescope perfectly.
A much smaller and lighter duty equatorial mount would be sufficient for the CT80, but the GP makes for a rock steady mount for sure. A good quality tripod could also suffice for either astro or terrestrial viewing.
When taking the scope outside, I carried both the telescope and mount with ease. With the tripod legs folded together, I was able to hold everything with one arm, while opening and closing the door. Everything was working perfect so far, but how would this little refractor perform on the night sky?
First Light
My first target was the beautiful double star, Castor, in Gemini. I started with 33x, but this was not enough magnification. With the employ of a 2.8x Barlow, giving a magnification of 93x, I was amazed. Castor was cleanly separated, with beautiful airy disc rings surrounding both components.
My next object was the Trapezium in Orion. The four primary components were crisp and clean even at 33x. When increasing the magnification to 93x, it was a beautiful sight indeed.
The Orion Nebula appeared very bright with excellent contrast. I was actually surprised at this view, which would only be possible with a telescope having excellent anti-reflective coatings.
What about galaxies?
M81 and M82, located in Ursa Major, have always been two of my favorite galaxies. They were very easy to locate, both fitting nicely within the large 1.8° field of view at a 33x magnification. Beautiful! This took me back forty years, when I first observed this galaxy pair with a 4.25-inch Edmund Equatorial reflector.
I'd been outside for almost an hour, which was my time allowance for this night.
Never would I take out my 10-inch equatorially mounted reflector, or my 102 mm refractor or 6-inch reflector, both also with EQ mounts for ~45 minutes. This telescope had already proved its value and convenience as being light and compact, and also providing excellent views of brighter deep-sky objects.
The scope passed all tests with flying colors. I'm very impressed with my new telescope.
Final Thought
A very portable and versatile telescope for an excellent price.
— Roger Ivester
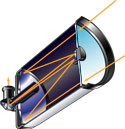
{ width: 160, height: 160, defaultImage: '', layers: 'Artimg-BBC_HowToThermally' }

![]() Orion is proud to partner with BBC Sky at Night Magazine, the UK's biggest selling astronomy periodical, to bring you this article as part of an ongoing series to provide valuable content to our customers. Check back each month for exciting articles from renowned amateur astronomers, practical observing tutorials, and much more!
Orion is proud to partner with BBC Sky at Night Magazine, the UK's biggest selling astronomy periodical, to bring you this article as part of an ongoing series to provide valuable content to our customers. Check back each month for exciting articles from renowned amateur astronomers, practical observing tutorials, and much more!
Martin Lewis shows you how to combat the irritating effects of tube currents
XT8s Scanning for Planets at Sunset by Scott A.
Thermal dynamics can have a big influence on the views you get through your telescope, blurring planetary detail, distorting star images and degrading contrast in detailed objects such as globular clusters. If you want the best performance - whether you're imaging or observing visually - it's worth getting to grips with these issues so you can minimise their impact.
Inside a cooling telescope, the warmer (less dense) air rises from hotter parts of the instrument as they lose heat by convection. These 'tube currents' are trapped inside the body of the telescope and, because the warmer air has a different refractive power than the cooler air, they introduce differing delays to light passing through it. This upsets the ability of your telescope's optics to bring the light into a sharp focus.
The longer the optical path inside your telescope and the more unequal the air temperatures, the greater the problems the tube currents cause. For a scope with a 1m focal length, even a 0.1�C temperature difference over its length is enough to degrade images.
Larger telescopes are more affected than smaller ones due to their longer light path, but also because they have a smaller ratio of area to mass, meaning they take longer to cool down. Reflectors also tend to suffer more than refractors because light has to make one passage of the tube before being collected by the mirror and bent inwards away from the tube walls, where the worst convection currents often lurk.
To eliminate the problematic convection currents you just need to allow every part of your telescope to cool to the ambient temperature. Thermal effects subside when the optics and other parts inside your telescope have a less than 1�C difference to the ambient temperature. When that temperature differential is less than 0.5�C, the tube currents diminish and the layer of warmer unstable air that's otherwise stuck to the front of the mirror or primary lens almost completely melts away — allowing maximum optical performance.
Unfortunately, getting the scope to cool down sufficiently isn't always easy. If it's been stored indoors, then taking it out into the cold night air and expecting it to perform at its best straight away is misguided. It's much better to store it outside before you begin observing and allow it to cool down properly.
A small or medium telescope might cool down fully in 30 minutes, but a large one can take hours to acclimatise. Because air temperatures continue to fall through the night, the scope may remain a few degrees above ambient. Big telescopes also have big mirrors, and the large mass and the poor conductivity of glass mean they don't give up their heat readily. Fans blowing gently on the back of the mirror can help here.
Insulate against the cold
Even if the scope has lost all of its heat to the air, you can still get convection issues of a different kind. Parts of the telescope that face the cold night sky, particularly the top face of the telescope's tube, can drop several degrees below ambient temperature, inducing convection currents of cold air that cascade down inside the tube. Unlike normal tube currents, which tend to die down with time, such 'inverse' tube current processes can plague you all night. The good news is you can combat these effects by wrapping parts of your scope in a poorly radiating material, such as shiny aluminium, or by adding a layer of insulation.
The best way to check for any residual thermal issues before starting your observations is to perform a star test where you rack an eyepiece well inside focus. This allows you to clearly see any thermal currents in the tube silhouetted against the bright expanded disc of the defocused star.
By following the steps below in the Step-by-Step Guide, you will see how badly thermal issues affect your telescope and will hopefully be able to reduce their severity to give you sharper views of the night sky.
Tools and Materials
Fans and batteries
For Newtonian mirror cooling choose a low-vibration ball-bearing or Hydro Wave-bearing electric computer fan. Power the fan from an external power supply or an on-board battery pack.
Radiator foil
The aluminum-coated insulation material sold to fit behind radiators or line lofts can also be used on the outside of a telescope tube.
Space blanket
A space blanket is an alternative to radiator foil and can be bought from camping and outdoor shops. Ideally, use both products.
Tools
Scissors and insulating tape will be needed to cut and hold the radiator foil or space blanket in place
Step-by-Step Guide
Ways to keep your scope at the right temperature
Step 1
You can speed up the cooling of a Newtonian mirror by fitting an electric fan to the rear cell so that it blows onto the rear face of the mirror. If possible, mount the fan on soft rubber washers or string it between elastic bands to isolate its vibrations.
Step 2
A low-tech alternative to installing an internal fan on your telescope is to place a desk fan nearby so that it blows on the mirror end. This will help to get the scope closer to the ambient temperature so you can start your observing session.
Step 3
Allow plenty of time for the scope to acclimatise to the outside temperature before you use it. To help speed things up, store your telescope in an unheated place, such as a shed or garage, when not in use. If it's stored in a warm place, it'll need longer to cool.
Step 4
Fit the scope with a layer of aluminium-coated radiator insulation to reduce inverse tube currents caused by the cold night air, especially during still and transparent nights. This will ensure the exposed parts of the tube stay closer to ambient temperature.
Step 5
Another method of reducing inverse tube currents is to wrap a space blanket around the body of your telescope. Like the more permanent insulated foil, this reduces the radiative chilling of the telescope by the cold night air.
Step 6
Rack the eyepiece far inside focus to expand the image of a bright star to one-third of the field diameter. Tube currents will be seen as swirling patterns of bright and dark, trapped within the circular disc. Experiment using your hand at the front end to see the currents.
Copyright � Immediate Media. All rights reserved. No part of this article may be reproduced or transmitted in any form or by any means, electronic or mechanical without permission from the publisher.
{ width: 160, height: 160, defaultImage: '', layers: 'Artimg-Go_Scope_II' }

There comes a time in every amateur astronomer's life when you just need a little telescope. I'm not talking about small optics. There are a whole host of small aperture telescopes which possess very fine features and are worth every last cent (which is usually comparable to a telescope five times its size). No, I'm talking about a small telescope that you aren't afraid to leave in the trunk of your car, or let your grandkids play with... a telescope worthy of a stellar view and equally at home spotting wildlife. A telescope you could take along on a camping trip, or allow up in a tree house! For me, the tried and true choice is the Orion 70mm GoScope.

Orion's GoScope II 70mm Refracter Travel Telescope fits into the backpack it comes with.
This little gem of a refractor telescope isn't a toy. It's a 70mm achromatic optical instrument that just happens to be affordable. It weighs in at less than four pounds fully assembled, and comes with a field tripod, two 1.25" Kellner eyepieces (25mm and 10mm), 45� correct-image diagonal, and a 5x24 optical finder scope.
Even more handy is the Orion GoScope II 70mm Refractor Travel Telescope, which fits everything neatly in its own little custom designed backpack, so you're not carting around a bunch of loose parts. Having everything contained means you're 100% more likely to have a telescope with you at all times in your car's trunk, or tucked behind your pick-up truck's seat. And everything is there...
Imagine being out and taking a drive when you spot a herd of deer along a distant tree line. They are feeding and feeling mighty comfortable about where they are. In just brief minutes you can have the GoScope assembled and on the easy to use alt-az mount. Bingo. You can count the tines on that buck. Perhaps you're camping and you see a flash of color through the trees. Is that an elusive bluebird? Are you seeing a bear or Bigfoot? Just turn the 70mm optics its way and find out!
However, don't limit yourself to just terrestrial views. The Orion GoScope is a perfectly capable astronomical instrument as well. With slightly more aperture than an average pair of binoculars, it is going to provide very satisfactory views of the Moon, bright deep space objects and even bright comets! The optical finder scope is quite sufficient, and the included eyepieces are well thought-out... just the right focal length for more extensive views, and not so much magnification as to render them useless in certain studies.
One of the best parts about the Orion GoScope II 70mm Refractor Travel Telescope is that it's inexpensive enough that you don't fear using it. Go ahead! Let the grandkids take it out and play with it. While I wouldn't suggest putting it beside the pool, it is rugged enough that less experienced hands aren't going to destroy it. Children have a wonderful sense of curiosity, and why dampen their enthusiasm by continually worrying if they are going to put a fingerprint on an eyepiece that costs about as much as a small house - or wondering if they'll strip a gear on a mount that's as expensive as a motorcycle.
Although the GoScope would be a little advanced for small kids, it's perfectly within the capabilities of a pre-teen and right up the young teenager's alley. It doesn't cost any more than a video game and just think... what young Carolyn Porco or Carl Sagan might you inspire?
Today's grandma doesn't just bake cookies... she chases stars
Warning: Please note this product was not designed or intended by the manufacturer for use by a child 12 years of age or younger.
{ width: 160, height: 160, defaultImage: '', layers: 'Artimg-Scope_Buyer_Guide_square' }

The process of choosing the best telescope for your needs can be overwhelming. We put together the following resources to help you make an informed decision. ![]() We suggest starting by watching our helpful video, How to Choose a Beginning Telescope
We suggest starting by watching our helpful video, How to Choose a Beginning Telescope
The process of choosing the best telescope for your needs can be overwhelming. We put together the following resources to help you make an informed decision. We suggest starting by watching our helpful video, How to Choose a Beginning Telescope, and then reading the article below.
 See Our eCatalog just for Beginners!
People all around the world enjoy looking at the stars of the night sky. There are many different telescope designs available, but what telescope is the best choice for someone just starting out? The question of which telescope is best for a beginner is asked quite often, and the best person to answer the question is you! The telescope that's right for you will depend on your lifestyle and your astronomy goals. To help steer you in the right direction, let's review the major factors to consider.
1) Performance — What will I be able to see?
Performance is perhaps the most important factor when choosing a telescope. Knowing what you can expect to see through the telescope can help determine which instrument is right for you. The aperture, or diameter, of a telescope governs how much light the telescope can collect. A larger aperture telescope will be able to collect more light than a smaller diameter instrument, and therefore will be able to show you a larger number of night sky objects and more detail on them. Also, a telescope with a larger aperture can be pushed to a higher viewing magnification compared to a smaller diameter scope.
Telescopes measuring 60-80mm (2-3 inches) in aperture will provide nice views of the Moon, bright planets like Jupiter and Saturn, and a few of the brighter cloudy nebulas and star clusters. A telescope with an aperture of 90-130mm (3.5-5 inches) will show a substantial increase in detail on the same subjects, and allow you to see more dim objects in the sky, like galaxies, some of the more faint nebulas and star clusters. Telescopes with apertures of 150mm (6 inches) and above are capable of providing very bright and sharply detailed views of solar system objects and most deep space objects like cloudy nebulas, sparkling star clusters, and distant galaxies.
Every increase in aperture, no matter how small, will have an exponential effect on performance. A 10-inch telescope will show more than an 8-inch model, which will show more than a 6-inch, and so on. Of course, the larger the telescope's aperture: the larger the telescope. Don't forget to weigh your decision of telescope aperture with the size and portability factor.
2) Size and Portability
An old saying in amateur astronomy is "the best telescope is one that is used often." Like many sayings, it has a lot of truth to it. The size and relative portability of a telescope can have a significant effect on how often you use it. While a larger telescope will usually allow you to see more, you may not want an especially large telescope if its size will prohibit you from using it regularly. Our advice is to pay close attention to the size and weight of the telescopes you consider, and try to anticipate how much effort each one will take to set up and use. If you have any concerns about the size of a particular telescope, there is a good chance Orion has a slightly smaller model with similar characteristics and features. Although some telescope designs can be bulky, many observers find the extra effort worth it to obtain beautiful views of the heavens.
3) Optical Design — Which telescope design is best for me?
While most people think of a pirate with an eye-patch wielding a long brass tube when we hear the word "telescope", there are actually many different optical designs used to make telescopes. The three most common telescope designs are: refractors, reflectors, and Cassegrains. Each design has different attributes that may make one more enticing to you compared to another, depending on your goals. Let's briefly investigate each design and their main differentiating factors to help you make an informed decision on which one is right for you.
Refractor
Refractors are the oldest telescope design. A small refractor of 60mm to 80mm diameter, referred to as aperture, is usually what most beginners consider buying as a first telescope, thanks to their recognizable appearance and history of good performance. Refractors use a lens system to collect and bend, or refract, light into a cone shape that is focused in an eyepiece for you to view.
A refractor is an excellent choice if you'll be doing most of your stargazing from the city or suburbs, where night skies are moderately light polluted. Since they use a lens system, refractors can be equipped with accessories for daytime use taking in magnified views of terrestrial objects like birds, wildlife, and scenery. Refractors require little to no maintenance, since their optical elements are fixed in place and cannot be misaligned during normal use. Renowned for crisp, sharp images, refractors are the priciest per inch of aperture of all three most common types of telescope, but they are arguably the most user-friendly as well.
Here are some refractor telescopes we recommend for beginning astronomers:
- Orion Observer II 70mm Altazimuth Refractor Telescope Kit
- Orion Observer 80ST 80mm Equatorial Refractor Telescope Kit
- Orion BX90 EQ 90mm Equatorial Refractor Telescope
Reflector
As their name implies, reflector telescopes reflect light to a focus point by using mirror based optics. Collected light is reflected off a large dish-shaped parabolic primary mirror, and then reflected again off a smaller secondary mirror so you can focus the view in an eyepiece.
Reflectors provide a big performance punch in a very affordable package relative to other optical designs. All things considered, you will most likely get the most performance per dollar invested out of a reflector design. While affordable, reflectors do require more maintenance, which is an important consideration. Unlike refractor telescopes, the mirrors of a reflector can occasionally become misaligned if the telescope is roughly handled. Because of this, reflectors can sporadically require manual re-alignment, or collimation, of the optics. Don't let collimation intimidate you; any telescope owner can perform this task with a little practice.
Reflectors are most commonly offered in two ways: mounted to a tripod, or attached to a base. Base-mounted reflectors are known as "Dobsonian" designs, named after astronomer John Dobson who unveiled the first Dobsonian base-mounted telescope in 1978. Known as the "best bang for the buck" compared to other telescopes, a Dobsonian or tripod-equipped reflector will provide years of enjoyment for a comparably modest investment.
Here are some reflector models that would be excellent telescopes to begin a hobby of stargazing:
- Orion SkyScanner 100mm TableTop Reflector Telescope
- Orion SpaceProbe II 76mm Equatorial Reflector Telescope Kit
- Orion StarBlast II 4.5 EQ Reflector & AstroTrack Motor Drive
- Orion XT8 Classic Dobsonian Telescope & Beginner Barlow Kit
Cassegrain
Cassegrain telescopes are a relatively recent design compared to refractors and reflectors. Cassegrains are a more advanced and specialized telescope design that uses elements of both refractors and reflectors to bend and reflect collected light. This gives a Cassegrain telescope a very long focal length in a conveniently compact telescope tube.
There are numerous variations of Cassegrain telescopes available to amateurs, all based on the original design attributed to Laurent Cassegrain of France. Orion offers a selection of Maksutov-Cassegrains, which is a variation including elements of both Cassegrain and Maksutov telescope designs. The Maksutov telescope design is named after optician and astronomer Dmitrievich Maksutov of Russia. A Maksutov-Cassegrain (Mak-Cass for short) telescope excels at higher magnification study of relatively narrow-field objects, like the Moon, planets, bright nebulas and star clusters. If you anticipate spending a large amount of time viewing the Moon and planets, a Mak-Cass should be on your short-list of candidate beginner telescopes. Like refractors, Mak-Cass telescopes can be equipped with accessories to provide a correctly oriented daytime view of birds, scenery, and wildlife.
Here are some Maksutov-Cassegrain telescopes we feel are worth considering for beginners:
- Orion StarMax 90mm TableTop Maksutov-Cassegrain Telescope
- Orion Apex 102mm Maksutov-Cassegrain Telescope
- Orion StarSeeker IV 102mm GoTo Mak-Cass Telescope Kit
4) Price
Price is a very important factor, especially if you are just starting out as an astronomy enthusiast. You may not be certain you and your family will have a long-term interest in looking through a telescope, and therefore may not want to spend a lot on a first telescope. There are many reasonably priced, high-quality beginner's scopes that can reveal incredible wonders, while helping you define your particular viewing interest. Alternatively, if you feel your interest in amateur astronomy will last, investing in a more capable and more expensive telescope is worthwhile.
It doesn't matter if you have a large or small budget, Orion will have the right telescope for you and your family to start a rewarding hobby of stargazing together.
The Bottom Line
The question of what is the best beginner telescope depends on you and your goals in the hobby. We recommend you take advantage of information and resources such as our website and catalog to help you make the most appropriate selection for you and your family.
In closing, let's re-visit some of the most important factors to consider:
- Aperture — A telescope's aperture, or diameter, relates to what you'll be able to see and how much detail will be observable. Essentially: the larger the aperture, the more you'll see.
- Size and portability — The best telescope for you is the one you'll use most often. A huge, optically wonderful scope will bring little joy if it's always stuck in a closet!
- Optical design — Depending on your goals and budget, choosing one telescope optical design over another can help simplify your ultimate decision.
- Price — A modest investment in a telescope can provide years of family fun.
Be sure you don't forget the most important factor of all, to have FUN!
If you get stuck along the way, we're here to help you with any questions. Just send us an email or give us a call Toll-Free at 800-447-1001 and we'll help you find the right telescope!
{ width: 160, height: 160, defaultImage: '', layers: 'Artimg-ScopeBeginners' }

The question of which telescope is best for the beginner is asked a lot. Here are our thoughts on the best beginner telescope — it really depends on what is important to you! There are many factors, most of which can only be answered by you, to pick the best beginner telescope. Here are some general guidelines to help steer you in the right direction.
Price, portability, what you can see with your new telescope and features such as computerized and GoTo functionality are the common attributes for the beginner to consider.
Price is a very important factor, especially if you are a beginning enthusiast. You may not be sure that you or your family will stick with the hobby for the long run and want an entry-level price just to get you started. Of course, you may find that in no time at all you're ready to step-up to a larger, more feature-rich telescope. Or, your high level of interest in astronomy and desire to have a high-quality, more capable telescope right from the beginning may make the investment in a higher-priced telescope your best choice. No matter your budget - Orion will have the right telescope for you!
The design and size of the telescope has a lot to do with portability and what you can see.
Refractors are the telescope design that most beginning astronomers consider first. A refractor uses a lens that provides a clear, quality view and tends to be smaller and more portable. Refractors can be used for both astronomy and scenic viewing (with a correct-image diagonal). A small 60mm-70mm refractor is one of the most inexpensive investments you can make to get into the hobby. You will be able to see the Moon in great detail, the rings of Saturn, and a cloud belt or two around Jupiter. Smaller telescopes are very portable and inexpensive, but lack the aperture (size of optics/light-gathering capability) needed to see much outside of the solar system like faint nebulae and galaxies.
Some great refractor choices from Orion can be found in the Refractor Telescopes For Beginners category.
If you're looking for the next step up to a more capable, feature-rich refractor, you can explore these Intermediate Refractors.
Reflectors use a primary and secondary mirror to gather light from the universe to your eyes. Mirrors are more economical to manufacture and are available in larger sizes to gather more light and see beyond our solar system. Reflectors are used exclusively for astronomy and tend to be a larger, less portable telescope.
There are relatively inexpensive models that will allow you to enter the realm of deep-sky objects, as well as give excellent views of the planets. A 4.5" to 8" Dobsonian is perhaps the best "bang-for the buck" beginner choice.
With a scope like this, you can see things like the Orion nebula in nice detail, the oval structure in the Andromeda Galaxy, the Ring Nebula in Lyra, and many more deep sky objects. Best of all, these telescopes are big enough in aperture that they will probably last many years before being out-grown.
Of course you can spend more to include computerized capability found in the GoTo and IntelliScope Dobsonians.
Cassegrains make a great portable telescope using a combination of mirrors and lenses. They are very portable, can be used for scenic viewing during the daytime with a correct image diagonal, and are available in larger aperture with less weight to manage.
Here are some great, entry-level Cassegrains for Beginners.
If price isn't quite as much of issue and you want to invest more but still don't want something overwhelmingly large, consider these Intermediate Orion Cassegrains.
As you can see, there are many different types of scopes that can be a great first telescope - consider a few of the factors we've described here before you make your decision and you can't go wrong.
Or just send us an email at sales@telescope.com, contact us via live chat, or give us a call Toll-Free at 800-447-1001 and we'll help you find the right telescope!
{ width: 160, height: 160, defaultImage: '', layers: 'Artimg-Choose_Scope_square' }

Like choosing neighborhoods, automobiles, or spouses, buying a first telescope is a highly subjective undertaking. There's no "best" telescope for everyone. The one that's right for you will depend on your lifestyle and your astronomy goals. Spending a little time analyzing your motivations will help you make an intelligent choice. Let's look at the different types of telescopes, and in so doing, some of the considerations that might influence your buying decision.
Power is Not the Important Thing
The first point to emphasize is that magnifying power is NOT the most important consideration when choosing a telescope. Not even close. It is the telescope's light-gathering capability, or aperture, that determines how much you will be able to see. Overblown claims of 450x or 575x power (or more!) in ads for inexpensive telescopes are pure baloney, and a sure sign of inferior quality. The brightest, sharpest images are obtained at much lower powers, on the order of 25x to 50x.
Refractors
A small, quality achromatic refractor of 60mm to 80mm aperture makes a fine starter scope for observing the Moon and major planets. They're inexpensive ($100 to $350), portable, and maintenance-free — all desirable factors if you're just "testing the waters" of the hobby. Their small apertures aren't well suited for faint deep-sky objects, though. If nebulas and galaxies are your main interest, a Newtonian reflector or Schmidt-Cassegrain is the way to go. Moving up to a 90mm or 100mm refractor will snare more objects and provide better performance, for a higher price. Renowned for crisp, sharp images, refractors are the priciest per inch of aperture of all telescope types.
A refractor is the scope of choice if you will be doing most of your stargazing from city or suburbs, where the night skies are moderately light-polluted. Here, more aperture doesn't gain you much, since viewing is restricted mostly to the Moon and planets. In fact, a big scope would only amplify the skyglow, yielding poor washed out images.
Reflectors
Newtonian reflectors are great all-around scopes, offering generous apertures at affordable prices. They excel for both planetary and deep-sky viewing. Of course, the larger the aperture, the more you'll see. Smaller, 3" and 4.5" equatorially mounted Newtonians will provide a nice "survey" of celestial luminaries, and they're plenty portable. Six-inch and 8" Newts have enough aperture to deliver captivating images of fainter fare-clusters, galaxies, and nebulas-especially in a reasonably dark sky. The tradeoff is their bulk and weight — something you should definitely take into account before you buy. But a 6" Newtonian on a Dobsonian mount is easily manageable by one person, and makes a wonderful beginner scope. Dobsonian-mounted reflectors have lower price tags than their equatorial counterparts, starting in the mid-$300s for a 6" Dob.
Schmidt-Cassegrains
If portability is important to you, you might want to consider a "catadioptric" scope such as a Schmidt-Cassegrain or Maksutov-Cassegrain. They pack a hefty aperture into a very compact tube. An 8" Schmidt-Cassegrain provides excellent views of the Moon, planets, and deep-sky objects, and is well suited for astrophotography. But an SC is a considerable investment for a beginner — over $1000 for the most basic 8" models (and hundreds more to outfit it for astrophotography). Although compact, an 8" SC is actually quite a lot of scope to manage when you include the beefy tripod and mount. So beware!
Telescope Mounts
A quick word about mounts. Telescopes come on three basic mount types: altazimuth, Dobsonian, or equatorial. The altazimuth is the simplest and is recommended for casual stargazing and terrestrial observing. The Dobsonian mount is a boxy altaz-type mount designed for easy maneuvering of large Newtonian tubes of 6" aperture or greater. Equatorial mounts are a bit more complicated (and more expensive) than altazimuth mounts, but allow the user to follow the motion of celestial objects with a single manual hand control, or even automatically with a motor drive — a great convenience.
The Bottom Line
OK, now that you've gotten the crash course on telescopes, here's some parting advice for aspiring astronomers:
Get as much aperture as you can reasonably handle, but not more.
Big aperture is desirable, sure, but you don't want to end up with a scope that is too big or complicated to conveniently set up, haul around-and use! Also, avoid those gee-whiz, techno-toy scopes with the hefty price tags that are showing up in the big chain stores. For a first telescope, we recommend a basic refractor of 90mm aperture or smaller, or a Newtonian reflector of 6" aperture or less, unless you're really committed. After you've learned the basics of observing and developed an appreciation for the hobby, then you can move up to a bigger, fancier scope.
Just send us an email at sales@telescope.com, contact us via live chat, or give us a call Toll-Free at 800-447-1001 and we'll help you find the right telescope!
{ width: 160, height: 160, defaultImage: '', layers: 'Artimg-Choose_Scope_Astronomy_square' }

Given the bewildering array of telescopes on the market, how does an enthusiastic but inexperienced consumer choose the right one? To answer this question we will explain the differences between specific telescope types, but for that discussion to be meaningful it is important first to understand some very basic points about astronomical telescopes in general.
Aperture is the Most Important Factor
The single most important specification for any astronomical telescope is its aperture. This term refers to the diameter of the telescope's main optical element, be it a lens or a mirror. A telescope's aperture relates directly to the two vital aspects of the scope's performance: its light-gathering power (which determines how bright objects viewed in the scope will appear), and its maximum resolving power (how much fine detail it can reveal). There are other criteria to be considered in selecting a telescope, but if you learn only one thing from this article, let it be this: the larger a telescope's aperture (i.e., the fatter it is), the more you will see.
Don't Get Hung Up on Power
Unfortunately, the first question most beginners ask is not "What is this telescope's aperture?" but "What is its magnifying power?" The truth is, any telescope can be made to provide almost any magnification, depending on what eyepiece is used. The factor that limits the highest power that can be used effectively on a given scope is, you may have guessed, its aperture. As magnification is increased, and the image in the scope grows larger, the light gathered by the telescope is spread over a larger area, so the image is dimmed. There is also an absolute limit, determined by the physical properties of light, to the resolution that is possible with any given aperture. As the magnification is pushed beyond that limit the image fails to reveal any additional detail and gradually breaks down into a dim, fuzzy blob.
The maximum useful magnification for any telescope is about 50 times the aperture in inches, or two times the aperture in millimeters. This equates to about 100x to 120x with the smallest telescopes, which is enough to see such wonders as the rings of Saturn and cloud bands on Jupiter. The 2x per millimeter figure is a rule of thumb, and can vary up or down somewhat depending on the optical quality of the scope in question and the vision of the individual observer. Experienced observers usually use much less power; 0.5x to 1x per millimeter is more appropriate for most objects. Any manufacturer claiming that their 60mm scope can provide good views at 450x (7.5 times the aperture in millimeters) is trying either to pull your leg or pick your pocket!
Bigger is Better, But...
While aperture is the most important specification of any telescope, there are exceptions to the rule that "bigger is better." One is obvious: the need for portability. The largest amateur telescopes are very big indeed, and demand either housing in a permanent observatory or possession of a strong back, a truck, and a gang of muscular and motivated observing buddies! There is a line to be drawn between performance and portability, and where it will be drawn varies with the individual and his or her capacity for storage and portage. Beginners are encouraged to start out with a scope of sufficient aperture to feed their interest, but of a size that they can manage easily. Avoid succumbing to "aperture fever." Those infected with this psychological malady choose the largest telescope they can afford without regard to portability. Their monster scopes soon gather dust in the garage, exiled for the crime of being too heavy and bulky, while the once enthusiastic would-be stargazers wind up frustrated or in traction.
The Sky IS the Limit
The second limitation on very large telescopes is less obvious, but becomes apparent after the first couple of viewing sessions: the Earth's atmosphere limits how much we can see. Stars and planets viewed through a telescope appear to shimmer or wiggle, as their light passes through the air and is distorted. This effect is known to astronomers as seeing, and becomes more noticeable and bothersome as telescope aperture increases. It especially affects observations of the Moon and planets, where high power applied to reveal fine details also magnifies the air turbulence.
The amount of distortion due to seeing varies, depending upon the behavior of air currents in the upper atmosphere, and to a lesser extent upon the altitude and topography of the observing site. But on an average night, at an average site, air turbulence will limit useful magnification to 250x or 300x, and prevent telescopes larger than about 8" or 10" aperture from achieving their full potential for high-powered viewing. Telescopes larger than 10" are most often chosen by observers who want to gather as much light as possible for viewing dim galaxies, nebulas, and star clusters. These "deep sky" objects, affectionately called "faint fuzzies," are most often viewed at much lower power than the planets, so seeing is less of a problem.
Telescope Mounts
The last important topic to cover before delving into optical designs is that of mounts. Telescopes are offered on either altitude-azimuth (or altaz) mounts, which move up-down (altitude), left-right (azimuth), or equatorial mounts, which are tilted to align with the rotational (polar) axis of the Earth.
Altaz mounts are generally lighter and simpler to use, and are preferred if the telescope is to be used both for astronomy and daytime observing (or for daytime observing only). The better ones offer slow-motion controls to aid in moving the scope by small increments, and are useful for powers up to about 150x. The Dobsonian mount is a variation on the altaz mount. It employs unconventional (for telescopes) materials like plywood and Teflon in a compact mounting that moves easily, is extremely stable, and can adequately support large telescopes at a very low cost. Though there are no mechanical slow-motions or electric drives on a Dobsonian, a well-made example glides so smoothly on the Teflon bearings that with a little practice it is quite easy to track objects manually at 200x or more!
Equatorial mounts are designed specially for astronomy, and are not recommended for terrestrial viewing. Their advantage is that they allow easier tracking of the stars across the sky. This motion can be achieved with either a single manual slow-motion control or an electric motor drive (or clock drive). The easier viewing they provide at high power makes equatorials preferred by observers who are most interested in the Moon and planets. Also, you'll need an equatorial mount if you want to do astrophotography.
Different Scopes for Different Folks
Now that we understand these basic points of telescope performance and mounting, we can discuss the three basic optical designs of telescopes: the refractor, the reflector, and the compound (or catadioptric) telescope.
 A refractor is what most nonastronomers think of when they hear the word "telescope." Its tube is most often long and skinny, mounted on a tripod, with a lens at one end and the eyepiece at the other. Refractors were the first type of telescope invented, and the finest refractors still provide the best images of any design for a given aperture. They are often chosen by observers with a dominant interest in the planets and Moon, because they can provide sharp, high-contrast views at high magnification and are less bothered by atmospheric "seeing" than the other designs. They also require less maintenance than reflectors or compound scopes, and are therefore popular with beginners. The refractor's good performance at high power and relative insensitivity to light pollution makes it a good choice for a city-based observer, as the design performs best on the objects that are most easily seen from urban or suburban locations.
These advantages do not come without a price—literally: refractors are the most expensive telescopes per inch of aperture. Big refractors can cost several thousand dollars, and still are considered too small in aperture for serious deep-sky observing. The long focal length of most refractors restricts the field of view, making it difficult to take in large extended objects like some clusters of stars. And the long tube, with the eyepiece located at the back end, requires a tall tripod, which, if poorly made, can allow the scope to shake and shimmy in the breeze, rendering high-powered observing difficult.
 The reflector uses a mirror, rather than a lens, to gather and focus light. By far the most common design is the Newtonian reflector, which places a concave (dish-shaped) primary mirror at the bottom end of the telescope tube. A small secondary mirror at the other end directs the focused light out the side of the tube and into the eyepiece. Newtonians offer the largest aperture available at given price, and when well made, they can provide sharp, contrasty views that rival all but the finest refractors. A Newtonian's low center of gravity and eyepiece location at the top of the tube allow for comfortable viewing with a more compact mounting, which can be made stable with much less bulk and cost than the tall mounting required by a refractor of similar aperture.
Big reflectors of 10" aperture and larger on Dobsonian mountings are the most popular telescopes for astronomers who seek to gather "buckets of light" for deep-sky observing. These giant scopes perform best at remote dark sky sites, away from the glare of city lights. The value and versatility of the smaller 4.5" to 8" Newtonians, mounted either equatorially or as Dobsonians, makes them a fine choice for the beginner with general interests.
Newtonian reflectors require occasional maintenance. Unlike the lenses in a refractor, the mirrors in a reflector need periodic alignment, or collimation, for best performance. While many beginners seem intimidated by collimation, it's really not difficult, and takes only a few minutes once you get the hang of it. A reflector's tube is also more open to air and humidity than that of a refractor, and if left uncovered the mirrors can accumulate dust and grime, which necessitates occasional cleaning. While these maintenance concerns are often overstated, a Newtonian may not be the right choice for someone who finds the prospect of occasional tinkering with the telescope unappealing.
 The most modern of the three common designs for amateur telescopes is the compound, or catadioptric type, which uses a combination of lenses and mirrors to gather and focus light. The greatest advantage of this design is its compactness: the lenses and mirrors "fold up" the light path inside the telescope, reducing large-aperture scopes to a manageable size. If an equatorial mounting is desired, the smaller tube can be carried on lighter and more economical mounts than that required by a Newtonian of the same size. Compound telescopes are most popular with observers who desire both generous aperture and an equatorial mounting in a transportable package.
The names Schmidt-Cassegrain and Maksutov-Cassegrain refer to specific designs of compound telescopes, which use differently shaped lenses and mirrors to achieve a similar result. The Maksutov is often cited as offering better image quality, though there is little in the way of optical theory to support this opinion. Most probably the Maksutov has developed its reputation as the superior catadioptric design because its spherical optical surfaces are easier to make to very high precision than the more complex shapes demanded by the Schmidt. As a result, if a telescope maker practices anything less than the strictest quality control, their "average" Maksutov will outperform their "average" Schmidt. In top-quality telescopes from careful manufacturers, both designs can yield excellent images.
There are a few drawbacks to all compound designs. As in any telescope that employs mirrors, occasional alignment is required for peak performance. The cost of a compound is higher than that of a Newtonian of the same aperture, though still lower than the cost of a comparably sized refractor. Most significantly for the planetary observer, the secondary mirror in a compound is much larger than that in a Newtonian, and its presence in the light path of the scope reduces contrast somewhat for high-powered viewing. In general, astronomers who desire a highly capable, easily transportable telescope find these worthwhile compromises, and have made the compound scopes very popular.
Price is a Consideration
Budget is a factor in almost every telescope purchase decision, but there are at least three major price-related pitfalls to be avoided.
1) Don't buy a flimsy, el cheapo scope at the mall with the intention of getting a taste of the sky and upgrading later. Many of those scopes are so poor-quality and frustrating that they can turn budding stargazers off of astronomy for good!
2) On the other hand, don't give up on astronomy if the scope of your dreams is financially out of reach at this moment. There are many reasonably priced, high-quality beginner's scopes that can reveal incredible wonders, while helping a novice define his or her particular observing interest.
3) Finally, if you are one of the fortunate few for whom price represents little obstacle, think twice before buying the biggest, most expensive telescope in stock. Many of the large, fully featured scopes favored by experienced observers are also the most complicated, and are too much to grasp for someone still trying to find the Big Dipper!
What About Astrophotography?
Before concluding, here's a quick word for the beginner who wants to jump right into astrophotography through their new telescope: Don't! At least, not until you have taken some time to learn the sky and become familiar with operating your scope. Photography of the heavens can be a wonderfully rewarding pastime, but is a combination of art and science with a steep learning curve that can discourage beginners who try to take on too much at once. Of course, if astrophotography is a primary interest there is nothing wrong with selecting a first scope based on its easy adaptability to camera work in the future. While most telescopes can be used for picture-taking (with varying prospects for success), the most important qualifications for a photographic instrument are a rock-solid equatorial mounting, and ease of attaching a camera so that it can be focused. For a variety of technical and economic reasons, compound telescopes of 8" aperture and larger are most popular for photography. They also make fine instruments for general observing.
The Bottom Line
Which, then, is the right telescope? That's a decision that must be made individually, but the three best pieces of advice are:
1) The best telescope for you is the one you will use most often. A huge, optically wonderful scope will bring no joy if it is consigned to the closet!
2) All else being equal, a larger-aperture (diameter) telescope will reveal more in the night sky than a smaller one ("I know, already!" you may be thinking.)
3) Buy from a company that's knowledgeable about telescopes and astronomy, and who will support you even after your purchase (since you will likely have questions).
Our advice is to select a well-made telescope, of a design matched as well as possible to your primary observing interest and most frequent observing site. Make sure it's a size that can be handled easily (by your standards and no one else's) and used often, and you will enjoy a lifetime of awe and wonder under the stars!
Just send us an email at sales@telescope.com, contact us via live chat, or give us a call Toll-Free at 800-447-1001 and we'll help you find the right telescope!
{ width: 160, height: 160, defaultImage: '', layers: 'Artimg-Choose_Spotter_square' }

Many people getting into nature study for the first time wonder whether they should start by purchasing a spotting scope or a binocular. Of course the answer to this depends on many things. Two of the most important factors concern the nature of the subjects to be observed and the distance between them and the observer.
In almost every instance in which the subject is near, or in situations in which only wide field views are desired, the binocular should be the first choice. They are convenient to use, offer a wider field of view, and, because of the ability to use both eyes, may yield as much as a 40% improvement in contrast.
Handheld binoculars, however, rarely come in magnifications higher than about 15 power. Thus for subjects which must be viewed at great distances, or on which greater magnifications are required, the spotting scope is the only logical choice.
What is a Spotting Scope?
Passenger planes, jet fighters, cargo planes and crop dusters all have one thing in common; they are all types of aircraft, each with a specific role to fill, and a specific name that aptly describes that role. Similarly, "spotting scopes" are in fact telescopes that have been specifically designed for daytime terrestrial viewing.
Considerably shorter and lighter than their astronomically dedicated cousins, spotting scopes with apertures between 50mm and 127mm (2 to 5 inches) are excellent for increasing our pleasure in any number of hobbies and research projects. They can also allow us to safely view (or photograph) targets that might otherwise place us in harms way. Suppose, for example, you wanted to observe hornets circling about their nest. A spotting scope set at 20-power would allow you to stand 50 feet from the nest and yet enjoy a view as if you were only 2 1/2 feet away-virtually close enough to touch it!
Kinds of Spotting Scopes
Spotting scopes come in a variety of configurations, typically: Schmidt-Cassegrains and Maksutov-Cassegrains, in which mirrors are used to fold the light back on itself making the instrument more portable and convenient to use, and the more common refracting type. In these instruments, light is gathered and brought to a focus by an "objective" lens.
When subjects are at great distances, or when high resolution-the ability to see fine detail-is required, spotting scopes with relatively large apertures are often employed. In order to make these instruments as portable as possible a "compound" system-such as the Schmidt or Maksutov described above-become the only practical option.
The majority of naturalists, however, find their needs met by using refracting spotting scopes of moderate aperture-typically 50mm to 102mm (2 to 4 inches)-and they are by far the most popular.
The Basic (Fixed Eyepiece) Spotting Scope
These spotting scopes represent the best value when thinking in terms of aperture vs. cost. This is because of the simplicity of their design and construction. They consist of an objective lens, a prism to offset the line of sight to a more convenient 45-degree angle and an eyepiece. Magnification is increased or decreased by using interchangeable eyepieces of various "powers." It is this changing of eyepieces that leads many naturalists to choose the more popular and sophisticated zooming spotting scope.
The Advanced (Zoom) Spotting Scope
For individuals whose requirements are restricted to a limited number of targets at similar distances, or who will be making observations from their house or backyard, the spotting scope described above will perform admirably.
Bird watchers and other naturalists, however, are incessantly on the go and lean toward telescopes that can provide a variety of magnifications without having to locate and fumble about with a collection of eyepieces. For most of them, the "zoom" spotting scope is the instrument of choice. In general, they cost more than fixed-eyepiece scopes of equal aperture and quality, but make up for it in the convenience they offer.
Performance
Once you have decided which type of telescope will best suit your needs, and considerations concerning styling, weight and cost have been addressed, it is time to turn your attention to performance. The most important things to think about when considering a telescope's performance involve: Aperture, Magnification and Anti-Reflective Coatings.
Aperture
Aperture is the measurement-usually stated in millimeters-of an instrument's main lens or mirror. Every square inch of an objective lenses surface gathers as much light as 9 eyes wide open. This means that even a 60mm spotting scope is capable to gathering more light at any instant in time than 41 eyes! This explains why many people new to using optical instruments show great surprise with the ability to see things very well in low-light situations, or in shadows, that would otherwise be invisible. This is not a magical power of some high-tech marvel, just a simple optical system exploiting the laws of physics.
But how much aperture do you need? Everything we see either gives off or reflects a finite amount of light. Thus, to observe faint objects, or objects in poorly lighted areas, the greater the aperture, the brighter the image will be at a given magnification. But then we must look at the practical limits of size, weight, and cost. Those wanting to watch a group of goats a mile up the side of a mountain should consider spotting scopes with an aperture of 80mm or more, while those who demand little more than the ability to provide a good view of birds at a backyard feeder, a 40mm to 50mm instrument would perform quite well. For the needs expressed by most bird watchers and naturalists, telescopes with apertures between 60mm and 80mm will be a good compromise between portability and light grasp.
Magnification
Few things in optics are understood less than magnification. Owing to the endless stream of articles and sales brochures extolling "high powered telescopes," the unwary consumer is often left to believe that magnification is the single most important feature to consider when planning the purchase of a spotting scope. This is simply not true; one should not use more magnification than is necessary to do the particular job for which it was selected. Why? Because when you increase magnification you:
1) decrease image brightness by spreading available light over a greater area
2) decrease the field of view; making objects harder to find and keep centered
3) introduce more image degrading vibrations
4) accentuate atmospheric disturbances
For years, the most popular spotting scopes have had magnifications ranging from 15 to 60 power, topping out at about 25% of the "theoretical" magnification for a good 60mm telescope of any type. However, pushing mathematical modeling aside and sticking to the practical limitations of the instrument, an observer will be assured of having nothing but good viewing experiences. Unfortunately, many observers fall into the "bigger is better" trap, and push the limits of their spotting scopes to the point that they are left with fuzzy, jittery images.
Optical Coatings
Good anti-reflection coatings are crucial to the optimal performance of any optical instrument-especially binoculars and spotting scopes. At the beginning of the Second World War, only about 50% of the light that was captured by a 7x50 binocular's objective lens managed to get to the observer's eyes. The rest was absorbed into the glass or scattered about in the system. With the development of anti-reflection coatings light transmission was increased to 85 percent. Today, magnesium fluoride coatings can increase light transmission to about 89 percent with multi-coated lenses transmitting up to an incredible 98% per surface!
A Word About Tripods
Most naturalists mount binoculars with magnifications above about 10 power on a tripod, and since spotting scopes have magnification ranges that usually start at 15 or more, it stands to reason that all spotting scopes will perform better if mounted on a good tripod.
Tripods come with a variety of features, and prices vary accordingly. Unlike spotting scopes, however, most good models remain the same for several years. Thus, wise shoppers should select a model with the quality and features necessary to make their purchase a lasting value.
Some Points to Consider
Rigidity:
Select a tripod specific to its application and the size and weight of the load it will be expected to carry, keeping in mind that rigidity is more a product of design than weight. Birders tend to be on the go and usually want a tripod that is lightweight-just large enough to carry a light duty binocular or spotting scope. Amateur astronomers, on the other hand, tend to use their tripods in only one or two locations in the course of an evening's viewing session and tend to use heavier equipment. Placing a rickety or poorly designed tripod under a $1,000 spotting scope is tantamount to hitching an expensive sports car to a team of goats-you could save on gasoline, but, overall, you would probably notice a few frustrating shortcomings in the decision to do so.
The Legs:
Photo tripods have legs with three sections that "telescope" in two places, allowing a tripod that might stand more than 5-feet tall while in use to be collapsed to just over 2-feet for storage or travel. Locking mechanisms may be of the clamp- or screw-type. If properly made, these styles will perform equally well. However, the clamp-type provides for much faster set-up and adjustment times.
The Head:
A tripod's "head" is the part onto which the spotting scope is attached. Older, or less expensive, tripods often have heads that are adjustable through the loosening and tightening of two bolts-for up and down and side to side motion. A refinement to this is seen on heads on which these bolts are operated by long handles that can be used not only for tensioning, but aiming the instrument as well.
The best tripods have "fluid" heads-"fluid" referring to the smoothness of motion and not a liquid component-which operate on a user-adjusted clutch system that can be easily adjusted to match the tension needed to support the weight of a given instrument.
The Shoe:
Some spotting scopes attach to tripods through the use of a 1/4-20 screw which passes through a metal plate on top of the tripod head and into a mounting bracket on the bottom of the scope. While this is a very efficient way to attach the tripod, it leaves much to be desired when speed is of the essence-as it usually is.
In many of the best tripods, the metal plate (or "Shoe") mentioned above is removable and may be left attached to the scope at all times. The scope may then be placed onto the head by snapping the shoe into the top of the tripod head, and removed with a "quick-release" latch or finger lever. This not only makes it possible to have several instruments ready for use at a moment's notice (additional shoes may be purchased separately), but lessens the chances of the scope being dropped while trying to attach it to the tripod.
Final Pre-Flight Instructions
1) Consider how you intend to use your new spotting scope. If it is just to be used around the house in daylight, a 50mm or 60mm instrument might be just the ticket. If you are an avid birder in search of getting a better look at those high-nesting raptors, you will want to consider an 80mm to 127mm telescope.
2) Decide which style will best suit your needs. A fixed-eyepiece will give you the largest aperture for the dollar; a zooming telescope will be the most convenient to use.
3) If you do not already own a good tripod, you will want to purchase one with your telescopes. The higher magnifications of a spotting scope will make holding it in your hands impractical.
4) Always use your spotting scope at realistic magnifications-15 to 60 power; slightly higher in instruments with aperture greater than 80 millimeters.
5) Spotting scopes may range in price from $100 to more than $2,000. Don't be fooled into thinking that your enjoyment must be directly proportional to its cost. It is true that in most cases quality comes with price. However, optical experts agree that-once a certain level of quality has been reached-It often takes a 100% increase in cost to acquire a 10% increase in performance.
6) Have fun!
{ width: 160, height: 160, defaultImage: '', layers: 'Artimg-WhatWillYouSee' }

The Moon
Even the smallest telescope will reveal breathtaking close-ups of the Moon’s rugged, battered surface. New features are highlighted every night along the terminator, where the light and dark portions of the lunar disk meet. Craters, smooth lava plains, and jagged mountains abound, providing endless fascination.
Planets
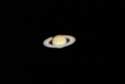
Venus, Mars, Saturn, and Jupiter make great subjects for study with a telescope. They’re very small, even at high magnification, but are bright enough to see even from light-drenched city skies. Any size telescope can show Mars’ pale red disk (and often a polar ice cap), Saturn’s pale yellow orb and picturesque rings, and Jupiter and its bright moons. In good seeing conditions you’ll see Jupiter’s colorful cloud bands and its Great Red Spot.
Star Clusters
No telescope shows stars as more than tiny but colorful pinpoints. Double stars, like the famous blue-gold pair Albireo, are a popular target. There are also numerous star clusters of different sizes and brightness ... the jewels of the sky. It’s fun to hunt them down using a star map and see how many stars you can resolve.
Nebulas
Like snowflakes, no two of these ghostly clouds of gas and dust look alike. All are faint and in a telescope will appear mostly gray or greenish in color. But their shapes and structure are revealed with patient observing. Dark-sky observing sites will let you see much more.
Galaxies
Incredibly distant and challenging faint subjects, dozens of galaxies are visible in backyard telescopes of modest size, hundreds or thousands in bigger models. In dark skies with a 6" scope, you can discern hints of structure in the brightest galaxies. The more time you spend observing them, the better trained your eye will become at seeing faint details.
Pictures vs. Viewing
Human eyes are not sensitive enough to detect colors in faint light. Long-exposure photos of nebulas and galaxies show their true colors. It’s impossible for a photo to depict the real-time, low-light image you will see. Fortunately, the eye is often better at revealing glimpses of detail on the planets than the typical photo can catch.
{ width: 160, height: 160, defaultImage: '', layers: 'Artimg-TelescopePower' }
")
Why a little is better than a lot - usually
When turned on the night sky, a telescope allows you to see millions of things that are otherwise only faintly visible to the naked eye, or not visible at all. The first telescopes seemed like magical devices to those who trained them on the heavens. Today, we don't think of telescopes as magical, but it is nevertheless important to understand how they do what they do.
A telescope renders celestial objects visible by doing two things:
1) using a large lens or mirror to gather far more light than the human eye can alone, thereby making very dim objects visible.
2) magnifying the size of the objects, thereby making the details of them easier to see.
Of those two functions, the first one - gathering more light - is by far the most important. This comes as a surprise to many people, who think that magnification, or power is the linchpin of telescope functionality. The higher the power, the better, one would think. But this isn't so.
High magnification is used primarily for planetary viewing, and then only when the air is very steady. If you ask most visual astronomers how much power they use in their telescopes, you'll find that they prefer low power (under 50x) most of the time, medium power (50x to 150x) some of the time, and high power (over 150x) relatively seldom. Why is this?
The main reason is that many objects in the sky are not really that small. When we see images of beautiful celestial objects - the Orion Nebula, the Andromeda Galaxy, the Lagoon Nebula - we assume them to be tiny, needing a lot of magnification to see. But these objects are not small at all.
Just Because It's Faint Doesn't Mean It's Small
Consider the full Moon. It's a relatively large object, its shape and even considerable detail easily visible to the naked eye. Now consider, say, the Andromeda Galaxy (M31). 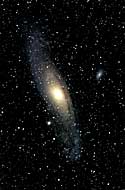 It is much dimmer than the Moon and usually requires a telescope to see, so we assume it must be smaller than the Moon. But if you could see them side by size you'd note that the Andromeda Galaxy is really much, much larger than the Moon, and in fact from one end to the other it's almost six times the width of the Moon. The only reason it doesn't dominate the night sky like the Moon does is because it is very dim, not because it's small. This is an object that does not need high magnification, but just the opposite: To see it well requires low magnification, or else you will be able to see only a small piece of it at a time, like looking at a large painting through a straw.
And so it is with many other celestial objects: The Orion Nebula is a bit larger than the Moon; the Lagoon Nebula is three times the size of the Moon, the North America Nebula is four times the size of the Moon. Even globular clusters, which are often considered small objects, are often one quarter to one half the size of the Moon's disk, objects that would be easily visible to the naked eye if only they were brighter.
It is a telescope's ability to capture light that makes these objects easier to see, not its magnifying power. And a telescope's light-gathering capability is directly related to the size of its primary lens or mirror. The bigger the size, or aperture, of the main optical element, the more light it will collect, and thus the brighter an object will appear.
Calculating Magnification
The magnification is the telescope focal length divided by the eyepiece focal length, in millimeters.
Magnification = Telescope focal length � Eyepiece focal length
For example, if you use a telescope of 1000mm focal length with a 25mm eyepiece, the magnification would be 40x (1000mm � 25 = 40). Doubling the power gives you one-fourth the image brightness and reduces the sharpness by one half.
How Much Power is Enough?
For large objects a low-power (long focal length) eyepiece may be all you want because any higher power will not allow you to see the whole object in the field of view. For smaller objects the general guideline is to use higher power only if it allows you to see more detail. If switching to a higher-power eyepiece results in a loss of visible detail, go back to lower magnification.
The theoretical limit of useful magnification for a telescope is 50 or 60 times the telescope's aperture in inches, or two times the aperture in millimeters. So, for a 60mm refractor, the maximum useful power is 120x (i.e., 120 times the magnification of the naked eye). Higher magnification is pointless, because the image seen in the eyepiece will only be dim and fuzzy.
As a practical matter, it is a rare night when the turbulence in the atmosphere (the "seeing") allows good images at more than 200x to 300x even with larger amateur telescopes, and there are many nights when even 150x is iffy. But 150x is too high a power for many faint deep-sky objects, most of which are more easily seen at magnifications of 50x to 100x. And for the largest deep-sky denizens you'll want the lowest power possible, all the way down to 15x or 20x if your scope can go that low. Those ads for inexpensive telescopes that claim 475x power (or more!) are patently fraudulent! All you would ever see at that power would be a dim, blurry smudge.
 For planets, high power is desirable. Even giant Jupiter is a small disk in the eyepiece, so for planets the lowest useful magnification is 100x or so, and the maximum is whatever the atmosphere and your telescope will allow. Jupiter, Saturn, Mars, and Venus are all bright enough that you can push the power fairly high without the image becoming too dim. But as always, increase magnification only if it reveals more detail; anything more than that is not useful and actually degrades the image.
Bear in mind, as well, that the goal of astronomy is not just to examine the smallest objects, but also to enjoy the grand sweep of the heavens. Once in a while drop in the low-power eyepiece and just sweep the sky slowly, taking in the sights at random.
The experience can indeed be magical.
{ width: 160, height: 160, defaultImage: '', layers: 'Artimg-ImgOrient' }

Every beginning astronomer has to grapple with the topsy-turvy topic of image orientation in the telescope. Depending on the type of telescope and whether or not it is used in combination with a star diagonal, the image you see may be either upside-down, backwards, rotated, or normally oriented.
For most astronomical observing, it makes little difference if an object is seen upside-down or at an otherwise odd angle (after all, there’s no "right side up" in space!). However, for terrestrial viewing you certainly don’t want to see everthing upside-down. And when stargazing, it’s hard to compare what you’re seeing to your star chart if the image is inverted or flopped. Let’s sort out the different image orientations seen through different types of telescopes, and see how diagonals figure in the equation.
Refractor and Cassegrain telescopes, when used without a diagonal (which isn’t usually the case), produce an inverted (upside-down) image. The view in Newtonian reflectors is also inverted, or rotated at an angle depending on the eyepiece angle with respect to vertical. Straight-through finder scopes also invert the field of view. If you’re using a star chart, all you have to do is turn it upside down to match the view through the eyepiece.
Refractor or Cassegrain telescopes used in combination with a standard 90 degree "star diagonal" will provide a right-side-up, but backwards (mirror-reversed), image. Using a star chart is difficult; you have to read it from the back, or do the mental gymnastics to flip the image in the eyepiece left to right to match the chart.
Fortunately, there are special "erect-image" or "correct-image" prism diagonals available that solve the problem, providing a correctly oriented view. Porro prisms (classical erecting prisms) provide correct images while allowing viewing straight through the scope. They do not work with Newtonian reflectors, however.
{ width: 160, height: 160, defaultImage: '', layers: 'Artimg-DobStory' }

The Dobsonian is a simple, low-cost telescope design popularized by San Francisco amateur astronomer John Dobson in the 1970s. It consists of a Newtonian tube assembly riding on a simple, wooden altazimuth base. A large primary mirror at the bottom of the tube collects light and concentrates it onto a small secondary mirror, which diverts the light cone out the side of the tube and into the eyepiece.
Their affordability and simplicity of operation make Dobsonians a great first telescope for entry into the hobby of amateur astronomy, especially those in the 6" to 8" aperture range. Larger Dobs, though bulkier to transport, are highly popular among experienced observers, thanks to their tremendous light-gathering prowess and, again, their affordability compared to refractors or catadioptric telescopes. Even relative to similar-aperture Newtonians on equatorial mounts, Dobsonians are delightfully economical.
A Hands-On Telescope
A Dobsonian is a telescope you can push around-literally. You point it by simply nudging the tube up or down, and left or right, with your hand. Side trunnions on the tube rotate on low-friction plastic bearings, allowing it to move up and down (altitude). The boxy base rotates horizontally (azimuth) around a center pivot. The motion on both axes is "buttery smooth," letting you guide the scope with just the lightest touch from one part of the sky to another. You don’t need to loosen and retighten clamps when targeting objects, as you must with other mounts.
Working with Gravity
The Dobsonian mount has one big advantage over other mount designs-it doesn’t try to fight gravity. The center of gravity lies directly over the center of rotation in both directions, so no matter where the telescope is pointed, weight is evenly distributed through the mount to the ground. This unique characteristic results in a dramatic reduction in vibration and oscillation, the inevitable downfall of many telescope mounts. Whereas in many telescopes the image seems to bounce around forever after the scope has been touched, this is not the case with well made Dobsonians.
{ width: 160, height: 160, defaultImage: '', layers: 'Artimg-ShortVsLong' }

Telescopes come in many different shapes and sizes. In recent years, "short tube," or "rich-field," reflectors and refractors have become popular. Their short-focal-length optics fit in stubbier tubes, making them lighter and more portable than "long-tube" scopes. (Rich-field telescopes have low f-ratios — focal length divided by aperture — typically f/5 or lower.) The physical differences are obvious, but how do short-and long-focal-length scopes differ in performance?
Field of View
The main distinguishing characteristic is the field of view. The shorter a scope’s focal length, the wider its field of view (for a given eyepiece). For many of the deep-sky treasures we so enjoy looking at — diffuse nebulas, open clusters, and big galaxies — a wide field is desirable to frame the whole object in surrounding starfield. Long focal lengths show a narrower patch of sky, which is ideal for viewing small objects like planets and lunar surface details.
Example: the Orion AstroView 120 (f.l. 1000mm, f/8.3) used with a 25mm eyepiece shows a 1.25° field of view (2.5 full Moon widths), while the AstroView 120ST (f.l. 600mm, f/5) boasts a 2.1° field (more than 4 Moon widths) with the same eyepiece. A wide viewing area also makes it easier to find objects, since you’re seeing more of the sky at once.
Image Quality Short-focal-length optics introduce certain optical aberrations. Short refractors have more visible chromatic aberration than long refractors. You’re likely to see purple or orange halos around bright planets and the lunar limb. With short reflectors, "coma" comes into play: stars appear like "commas" or "seagulls" near the edge of the eyepiece field. For most people, a little color fringing or coma is no big deal; for purists, they’re undesirable. These aberrations are less noticeable at low magnifications, which is why you shouldn’t push the power higher than about 100x in typical short-tube telescopes. Of course, high-end versions made with exotic glasses or with corrector lenses can handle higher power.
While a short-tube scope is likely to be more easily portable, choosing between a short-and long-tube telescope really boils down to this: If your main interest is in viewing or photographing the planets and Moon, go with long focal length. If deep-sky objects are what you’re after, the wide field of a short, rich-field telescope will do the job wonderfully — and more portably, to boot.
{ width: 160, height: 160, defaultImage: '', layers: 'Artimg-ApparentField' }

An eyepiece's apparent field of view is the angular diameter, expressed in degrees (�), of the circle of light that the eye sees. It is analogous to the screen of a television (not the picture seen through it). Eyepiece apparent fields range from narrow (25� - 30�) to extra-wide angle (80� or more). The true field (or real field) of view is the angle of sky seen through the eyepiece when it's attached to the telescope. The true field can be approximated using the formula:
True Field = Apparent Field � Magnification
For example, suppose you have an 8" Schmidt-Cassegrain telescope with a 2000mm focal length, and a 20mm eyepiece with a 50� apparent field. The magnification would be 2000mm � 20mm = 100x. The true field would be 50 � 100, or 0.5� - about the same apparent diameter as the full Moon.
{ width: 160, height: 160, defaultImage: '', layers: 'Artimg-ObservDoubleStars' }

You might never guess it from looking at the sky, but estimates indicate that between one-third and one-half of all stars belong to star systems called double stars or binary stars. Double stars come in many different combinations. Some consist of a faint star teamed with a bright star, while others comprise two equal-magnitude suns. Still others have three or more members, and are called multiple stars. Then, there are optical double stars, two stars that only appear closely set from our vantage point. In reality, these celestial imposters are not physically linked, and in fact are nowhere near each other in space.
For amateur astronomers, binary stars offer both charm and challenge. Many pairs display beautiful color and/or magnitude contrasts, while others are so close together that "splitting" them becomes a good visual test of one’s optics and of the night’s seeing conditions.
In a double star system, the brighter star is labeled the primary or "A" star, while the fainter member is called the companion or "B" star. If the system has other members, they are labeled alphabetically C, D, and so on. Their apparent separations are usually expressed in arc-seconds, abbreviated ". (An arc-second is a small fraction of an angular degree. There are 60 arc-minutes in one degree and 60 arc-seconds in one arc-minute.) Seven-power binoculars will resolve, or separate, double stars separated by approximately 30". A 60mm refractor can split equal-magnitude doubles separated by 2" at high power. A high-quality 6-inch telescope can resolve binaries less than 1" apart, given nearly perfect seeing conditions (i.e., a very steady atmosphere at the time of observation).
Check Out These Pretty Pairs
Some of the prettiest doubles in the sky are made up of two color-contrasting suns, where both shine like glittering jewels against a velvety backdrop. One of the most dazzling binary systems is Albireo in the summer constellation Cygnus. Here, a golden primary star radiates in sharp contrast to its fainter companion, which is blue. Another gorgeous double is Eta Cassiopeiae in the constellation Cassiopeia. It features yellow and red members separated by about 13 arc-seconds.
The table below lists some of the sky’s most interesting stellar couples. You’ll need to refer to a star atlas to find them.
| Star | Constell. | RA | Dec | Mag | Sep | |
|---|---|---|---|---|---|---|
| Spring | ||||||
| Xi Boötis | Bootes | 14 51.4 | +19 06 | 5,7 | 7" | |
| Cor Caroli (alpha) | Canes Venatici | 12 56.0 | +38 19 | 3,6 | 20" | |
| Alcor & Mizar (zeta) |
Ursa Major | 13 23.9 | +54 56 | 2,4 | 12’ | |
| Mizar (zeta) |
Ursa Major | 13 23.9 | +54 56 | 2,4 | 14" | |
| Summer | ||||||
| Albireo (beta) | Cygnus | 19 30.7 | +27 58 | 3,5 | 35" | |
| Nu Draconis | Draco | 17 32.2 | +55 11 | 5,5 | 62" | |
| Rasalgethi (alpha) | Hercules | 17 14.6 | +14 23 | 3,6 | 4" | |
| Epsilon Lyrae | Lyra | 18 44.3 | +39 40 | 5,5 | 208" | |
| Lyra | 5,6 | 2.6" | ||||
| Lyra | 5,6 | 2.3" | ||||
| Autumn | ||||||
| Algedi (alpha) | Capricornus | 20 21.0 | -14 47 | 3,6 | 3’ | |
| Almach (gamma) | Andromeda | 02 03.9 | +42 20 | 2,5 | 10" | |
| Eta Cassiopeiae | Cassiopeia | 00 47 | +57 5 | 3,7 | 13" | |
| Delta Cephei | Cepheus | 22 29.2 | +58 25 | 4,6 | 41" | |
| Polaris (alpha) | Ursa Minor | 02 31.8 | +89 16 | 2,9 | 18" | |
| Winter | ||||||
| Rigel (beta) |
Orion | 05 14.5 | -08 12 | 0,7 | 9" | |
| Pollux (beta) | Gemini | 07 34.6 | +31 53 | 2,3 | 3" | |
| Sigma Orionis | Orion | 05 38.7 | -02 36 | 4,8, 7 |
13", 43" |
|
| Theta1 Orionis | Orion | 05 35.5 | -05 23 | 7,8, 5,7 |
9", 13", 22" |
|
Notes:
"Mag" is the visual magnitudes of the A and B stars, respectively.
"Sep" is the separation of the component stars, usually expressed in arc-seconds (").
Resolution and the Dawes Limit
While all of the doubles in the listing here should be resolvable through nearly all amateur telescopes, others challenge both our eyes and our telescopes to be seen. Just how close will your telescope be able to resolve a double star? In the 19th century, a British astronomer named William Dawes experimented to find how close he could resolve a pair of 6th-magnitude stars with different apertures. This value, called Dawes’ Limit, can be estimated by dividing 4.54 by the aperture of a telescope in inches. In other words, a 6-inch telescope should be able to resolve a pair of 6th-magnitude stars separated by 0.8 arc-seconds, while an 8-inch telescope can resolve stars to 0.6 arc-seconds.
But this is not set in stone. While Dawes’ Limit is a good guide for testing a telescope’s optical quality, resolving power can be greatly affected by a number of things. Above all, seeing conditions play a tremendous role. "Seeing" is a measure of how steady the Earth’s atmosphere appears. A good way to judge seeing conditions is to check the stars. If they appear to be twinkling, which is caused by a turbulent atmosphere, then Dawes’ Limit will never be reached. Frequently, the steadiest nights appear slightly hazy, when our atmosphere is more tranquil and seeing is enhanced.
Easy on the Power
Equally important is the optical quality of a telescope’s optics as well as those of the eyepiece and the observer’s eye. Refractors are often favored for splitting tight binaries, but reflectors and catadioptric telescopes can be equally adept provided their optics are precisely collimated. The secret to success is not to overpower the telescope. Use moderate powers for the best results, as high magnification will also amplify atmospheric turbulence and optical faults.
To test Dawes’ Limit for yourself, choose a binary star that has two equally bright components, both as close to 6th magnitude as possible. A large disparity in star brightness will render the test null and void. Beside steady seeing, be sure to use a moderate-power eyepiece, wait for the telescope’s optics to cool to the ambient outdoor temperature, and move away from any buildings and other objects that may be radiating the heat of the day. Dawes’ Limit will never be reached if test conditions aren’t just so, but under the right circumstances, some observers can actually exceed it.
Observing double stars is a great project for anyone who is looking for an enjoyable and varied observing program as well as an enjoyable way of testing the acuity of both your telescope and yourself. Dozens, even hundreds of targets are waiting for you in tonight’s sky. Perhaps best of all, double stars can be studied from anywhere any clear night of the year. Unlike other, diffuse deep-sky objects that are badly hampered by light pollution, double stars look striking even from urban or suburban skies, even at Full Moon.
{ width: 160, height: 160, defaultImage: '', layers: 'Artimg-ObservVariable' }

Before the invention of the telescope, our ancestors marveled at the permanent nature of the stars at night. Planets, the Sun, and Moon moved, and comets occasionally appeared in the sky, then faded, but the stars remained constant and fixed to the celestial sphere. They were considered a source of great stability in an otherwise unstable world. At least, most were. There were exceptions.
Even in ancient times, some rogue stars were known to misbehave and were regarded with awe and fear. One such star was located in the constellation Cetus, the Whale. At times, it could be seen easily with the unaided eye, while at others, it was only dimly visible, if at all. Early skywatchers named this star Mira, which means "wonderful." Then, there was the case of the Demon star, Algol, marking the evil eye of Medusa's decapitated head in the constellation Perseus (hey, nobody said constellation mythology was pretty!). Algol winked at stargazers, varying from dim to bright over the course of about three days. What could be causing these amazing sights?
Once the telescope was turned to the heavens, astronomers began to discover more stars that changed in brightness like Algol and Mira. Today, thousands of these so-called variable stars are known and cataloged. Some fluctuate in brightness by only a few tenths of a magnitude, while others may vary by five or ten full magnitudes, or even more!
For amateur astronomers, observing variable stars can be an interesting and challenging pursuit, a different twist on typical stargazing. Before we get into the how-to of observing them, let's review the different kinds of variable stars.
Pulsating, Erupting, Eclipsing — They Vary
Variable stars like Mira are classified as pulsating variables. Known to be old, red giant stars, they actually expand and contract in diameter like a beating heart. Their rhythmic pulsations usually take weeks or months to complete a cycle.
A second class of variable stars suddenly and unpredictably change in brightness in just a few days, hours, even minutes, and so, are called eruptive variables. One example of an eruptive variable star is a nova. Here, a white dwarf star lying close to a normal star abruptly increases in brightness by five or more magnitudes, only to fade slowly back to its original, pre-eruption brightness over the course of several weeks. Another example of an eruptive variable are called R Coronae Borealis stars. These peculiar suns actually drop in brightness due to the formation of clouds of "soot" in their atmospheres.
Algol represents a third class of variable stars called eclipsing binaries. In these cases, the stars themselves do not fluctuate in brightness, but instead, are alternately covered and uncovered by unseen, orbiting companions. When a companion passes in front of or behind the system's primary star, their combined brightness fades, only to return after the eclipse ends. By measuring the period and amplitude of the fluctuations, astronomers can tell how far the two stars are apart and how long the companion takes to orbit. In the case of Algol, the orbital period is 2 days 20 hours 49 minutes, with the two stars separated in space by about 10 million kilometers (about 6 million miles).
How Bright is That Variable?
It?s fun to estimate the apparent magnitude of variable stars. This is usually done by comparing their brightness with that of neighboring stars of known (and fixed) brightness. The American Association of Variable Star Observers (AAVSO) has a collection of special finder charts for variable stars, which give the magnitudes of surrounding stars. The variable may appear to be the same brightness as one of the reference stars, which makes estimating its magnitude easy. Or, if the variable is brighter than comparison star A, but dimmer than comparison star B, then the variable?s magnitude lies somewhere in between. If star A is magnitude 8.0 and star B is 8.8, then the variable star may be about magnitude 8.4. This is called interpolation.
See the "Z": Check Out this Big Dipper Variable
Here?s a variable star that has long been a favorite among variable star observers. Z Ursae Majoris is categorized as a red, pulsating star, fluctuating between magnitudes 6.5 and 9.4 over a period of 195 days. What makes Z such a favorite is its location inside the bowl of the Big Dipper, about 2.5 degrees to the west-northwest of Megrez, the star that joins the bowl to its handle. This northerly location also means that the star stays above the horizon year-round for many observers in the Northern Hemisphere.
You don?t need fancy equipment to make accurate estimates of the brightness of variable stars — just your eye! It's really not as hard as it might sound at first. Begin by locating the star right in the center of the chart below, labeled with a "Z."
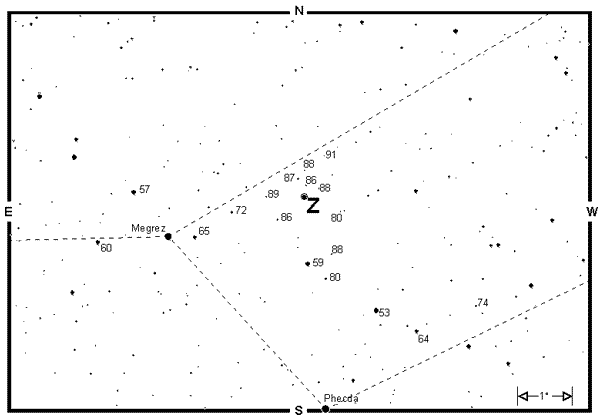
Some of the stars on the chart are numbered, while others are not. Those numbers represent the magnitudes of those stars. The decimal point has been omitted, since it would be easy to confuse it for another star. The star labeled "72" is really magnitude 7.2, while the star marked "86" shines at magnitude 8.6, and so on. These fixed-brightness "comparison stars" can be used to estimate the brightness of the variable.
If it's clear tonight, bring a print of the chart outside and find Z through your telescope or binoculars (you won?t be able to see it with your naked eyes). Begin at Megrez, then shift slowly north and west, following the trail of stars to its position (see "Star-Hopping: How and Why" for more details about locating sky objects). Be sure to use a low-power eyepiece to show the widest field of view. Unless it happens to be near its minimum brightness, Z should be bright enough to be seen through most finder scopes and binoculars.
With Z in view, take a look around at the stars in the eyepiece and compare them with the stars on the chart. Rotate the chart around so that the stars' orientation matches the eyepiece view. Remember, if you are using a star diagonal in your telescope, the view will be flipped left-to-right, like a mirror.
Begin by locating the variable star through your binoculars or telescope. Any type of telescope can be used, but be sure to select just enough magnification to see the star. Low power is usually preferred, since higher powers have very restrictive fields of view. Take a look around and find some of the comparison stars. Look for one or two that appear a little brighter than the variable, and one or two that are a little dimmer, then estimate how much brighter or dimmer the variable is from the others. For instance, you may find that Z appears a little dimmer than the "80" and "83" stars, but brighter than the "86" and "87" stars. If so, the variable must be either magnitude 8.4 or 8.5. Narrow your view now and scan back and forth between Z and the "83" and "86" stars. Try to decide if the variable is a little closer to one of the other, and mark down your estimate.
By keeping track of your estimates over the course of weeks or months, you will be able to plot a "light curve," a plot of the stars changing brightness over time. Mark the passage of time in days along the "X" axis (horizontal) and brightness along the "Y" axis (vertical). Plot the points matching the intervals of days and your magnitude estimates, then connect the dots. You?ve created a light curve just as professional astronomers do when studying variable stars!
Interested in viewing more variable stars? Here is a short sampling of the sky's most interesting ones.
| Star | Constell. | RA | Dec | Mag | Per. | Type |
|---|---|---|---|---|---|---|
| Spring | ||||||
| R Coronae Borealis | Corona Borealis | 15 48.6 | +28 09 | 5.8 to 14.8 | Irreg. | Eruptive |
| R Leonis | Leo | 09 47.5 | +11 26 | 5.8 to 10.0 | 313 | Pulsating |
| R Virginis | Virgo | 12 38.5 | +06 59 | 6.0 to 12.1 | 146 | Pulsating |
| Z Ursae Majoris | Ursa Major | 11 56.5 | +57 52 | 6.5 to 9.4 | 195 | Pulsating |
| Summer | ||||||
| Chi Cygni | Cygnus | 19 50.6 | +32 55 | 3.3 to 14.2 | 407 | Pulsating |
| RT Cygni | Cygnus | 19 43 | +48 46 | 6.0 to 13.1 | 190 | Pulsating |
| Beta Lyrae | Lyra | 18 50.1 | +33 22 | 3.4 to 4.3 | 12.94 | Eclipsing |
| R Scuti | Scutum | 18 47.5 | -05 42 | 5.0 to 7.0 | 144 | Pulsating |
| Autumn | ||||||
| R Andromedae | Andromeda | 00 24.0 | +38 35 | 5.8 to 14.9 | 409 | Pulsating |
| Delta Cephei | Cepheus | 22 29.2 | +58 25 | 3.5 to 4.4 | 5.37 | Pulsating |
| Mira | Cetus | 02 29.3 | -02 59 | 3.4 to 9.2 | 332 | Pulsating |
| Winter | ||||||
| R Leporis | Lepus | 04 59.6 | -14 48 | 5.5 to 11.7 | 432 | Pulsating |
| Algol | Perseus | 03 08.3 | +40 57 | 2.1 to 3.3 | 2.87 | Eclipsing |
Notes:
Mag is the variable's range in brightness.
Per. is short for Period, the number of days it takes the variable to complete a full period, or cycle, in brightness
Amateur observations of variable stars are especially sought by professional astronomers worldwide. If you are interested in learning more about observing variable stars, or in obtaining a set of variable star charts, contact the American Association of Variable Star Observers at 25 Birch Street, Cambridge, Massachusetts 02178, or visit their Web site at http://www.aavso.org.
{ width: 160, height: 160, defaultImage: '', layers: 'Artimg-Sketching' }

Despite the advent of photography and CCD imaging, many amateur astronomers today prefer to chronicle their observations by making eyepiece renderings. Sketching at the telescope, however, does more than create a personal observing record. It hones the observer’s perception skills.
Say you look at a star cluster for a few minutes. In that time you may note whether it is rich or sparse, contains predominately bright stars or dim or a mixture of both. Afterward, you would come away feeling as if you "saw" this cluster.
But let’s say you sketch it. Now you may notice that some of its brighter stars appear reddish; that the chains form a kind of pattern; that what you thought was a sparse cluster actually contains myriad faint members. Instead if five minutes, you may spend half an hour scrutinizing this object, after which you would come away feeling that you "observed" this cluster.
All you need to get started is a red astronomer’s flashlight, an inexpensive sketchpad, and a sharp pencil or two. Before making your sketch, circumscribe a circle—not too small—representing the field of view and note where the cardinal directions fall in the eyepiece. Don’t forget to write down the date and time of the sketch, the telescope and magnification used, and a brief description of seeing conditions.
The eye may not be able to accumulate light like a photograph, but it often can see finer detail. That faint, fuzzy thing you saw last night might not appear as faint or fuzzy once you try sketching it!
{ width: 160, height: 160, defaultImage: '', layers: 'Artimg-ObservSun' }

Amateur astronomers usually consider themselves creatures of the night, since that is when the stars come out. But one star, our most important, most impressive star, the Sun, is visible at a much more convenient hour. The Sun bathes the Earth in life-giving light and heat as we orbit a mere eight light-minutes away. By comparison, light from the nearest star beyond the Sun takes more than four years to reach Earth. Astronomers can learn much about the distant nighttime stars by studying the characteristics and behavior of our own, daytime star. For amateur astronomers, viewing the Sun with a telescope is both interesting and fun!
Rather than appearing as a point of light as all other stars do, the Sun displays a disk half a degree in diameter, large enough to reveal fine detail on its visible surface. But with the Sun being so close and its energy so intense, it must be observed cautiously to prevent it from damaging both our equipment and our eyes. The Sun should never be viewed directly without first exercising precaution (except during the short span of totality during a total solar eclipse), so it is critical to know how to look at the Sun before you try.
Safety First!
Extreme care is necessary when viewing the Sun. The intensity of its light, when focused by even the smallest lens, is strong enough to ignite paper. The retina of an unprotected eye will be instantly destroyed, causing permanent blindness! Never look directly at the Sun without a proper solar-protection filter.
Amateur astronomers usually use one of two methods to view the Sun safely. The first and simplest uses a telescope or binoculars to project the Sun's image onto a white screen. Move the screen closer or farther from the telescope to adjust both image size and brightness. Always try to tilt the screen slightly so that it is not in direct sunlight, but rather in shade, to increase image contrast.
 A second way to look at the Sun is with a solar filter. Proper solar filters are designed to fit over the front of a telescope or binoculars. By dimming the Sun's rays before they enter the instrument, the dangerously high levels of solar radiation and heat are reduced, preventing permanent damage to both observer and optics.
Never place the filter between your eyes and the eyepiece, since it will be quickly destroyed by the magnified solar energy. Many less-expensive telescopes once came with solar filters that screwed into an eyepiece (a few still do!). They are extremely unsafe, sitting right at the focus point of the light rays. The tremendous heat produced there can crack the filter, instantly frying your eye. If you have this kind of solar filter, discard it immediately.
Projection is wonderful for showing the Sun to a group of people all at once, but usually fails to reveal the fine level of surface detail visible with a filter. Filters provide a more detailed view, though they cost more and allow only one person at a time to view.
Another safety warning: Never look through the finder scope when aiming a telescope at the Sun. In fact, you should cover the front of it with an opaque material just to be safe. Crosshairs exposed to sunlight can melt in just a few seconds, and burns or blindness can result from unintentional exposure of your eyes to light passing through the finder.
Instead, keep an eye on the telescope's shadow on the ground as you move the tube back and forth, up and down. When the tube's shadow is shortest, the telescope should be pointed at the Sun.
What Can You See?
Both viewing methods show the Sun's photosphere, the visible layer of the Sun that produces sunlight. Scattered across the photosphere are dark markings called sunspots. Scopes as small as a 60mm refractor will reveal them. A close look shows that larger sunspots have a darker, central area, called the umbra, surrounded by a lighter region called the penumbra. Single spots can form, but usually spots appear in groups and clusters.
Try keeping a daily sunspot log, noting their number, sizes, shapes, and grouping patterns with pencil diagrams. Track their migration across the Sun's face as it rotates on its axis once every 3-1/2 weeks.
Sunspots are not permanent features on the photosphere, but instead, change in shape and size from day to day. Galileo was first to notice that spots move across the Sun. From his observations in the early 17th century, he inferred that the Sun rotates about once a month. It is now known that the Sun's equator takes 25 days to turn once on its axis, while the poles require 36 days.
The number of sunspots is always changing, increasing, then decreasing over an 11-year period known as the sunspot cycle. During peak activity "solar maximum" there may be dozens of sunspots visible at the same time, while at solar minimum, there may be none at all.
The exact cause of sunspots remains a mystery, but astronomers know that they are associated with irregularities in the Sun's magnetic field. These irregularities lower the temperature of the Sun in their immediate area by as much as 1,500 degrees Celsius, forming sunspots. Appearance to the contrary, sunspots are not really dark. They only appear dark in contrast against their hotter, brighter surroundings. In reality, they are hotter than the surfaces of many stars.
Other Surface Features to Look For
Finally, when using a filter to Sun-watch, look carefully along the solar edge, or limb. Notice how it appears slightly dimmer than the center of the disk? This effect, called limb darkening, is caused by our looking through a thicker layer of the Sun's atmosphere toward the edges than toward the center. With sharp optics and a good eye, you might see some small, brighter areas along the limb. These are called faculae, and mark elevated regions of hot gases. Some observers may also notice that the Sun's surface looks "grainy," an effect called granulation. Each granule is a continent-sized cell of heated gas rising from the core of the Sun.
The Sun has a lot to offer those who want to enjoy the science and hobby of astronomy during daylight, too. And with solar max now upon us, it is a great time to meet the star of our sky show.
{ width: 160, height: 160, defaultImage: '', layers: 'Artimg-DealingDew' }

Dew forms on any surface that is sufficiently colder than the air temperature. The dew point varies with both temperature and humidity. Odd as it may seem, the temperature of an object exposed to the night sky rapidly becomes colder than the ambient air. This radiant cooling takes place when an object gives off more heat than it absorbs from the surrounding environment. If the temperature drops enough to reach the dew point, dew forms.
Dew is particularly troublesome on Schmidt-Cassegrain telescopes, with their exposed front corrector plate. Once dew forms, wiping it away does no good; it just keeps forming. To prevent dew, you must either slow down the radiant cooling (with a dew cap) or replace lost heat (with a heater), or both.
Dew Caps
A dew cap is a hollow tube that extends out in front of the objective lens (refractors) or corrector lens (Schmidt-Cassegrains). It shields the exposed optics from wide exposure to the cool ambient air, slowing heat loss. Reflector telescopes don’t need dew caps because the main mirror rests at the bottom of the tube, which acts as a dew shield. A dew cap works best if made from an insulating material. It will prolong viewing time and can prevent dew formation entirely.
Dew Heaters
A dew heater warms the telescope’s corrector plate to a temperature higher than the dew point. There are several different types:
Warm air blowers, such as home hair dryers, can rapidly warm up optics and evaporate dew. They work well for casual observing, but must be used repeatedly and can cause temporary image distortion.
Heated dew caps warm the air around the corrector, heating it by convection. This eliminates dew, but can cause "heat wave" optical effects, which distort the image.
Contact heaters are electric heating elements that directly warm the telescope tube or optical mounting cell, which conducts heat directly to the optics. They avoid heating the air or the dew cap, thereby minimizing heat waves and other undesirable thermal effects.
{ width: 160, height: 160, defaultImage: '', layers: 'Artimg-SeeingDark' }

You've probably noticed that when you first go outside from indoors on a starry night, you can see relatively few stars. But then, as your eyes adjust to the darkness, many more stars come into view. This phenomenon is called dark adaptation, and it is crucial for visual astronomy, especially for observation of faint objects, such as galaxies and nebulas.
There are many ways you can improve and maximize your night vision. But first we must understand how night vision works.
Dark Adaptation: A Complex Process
Dark adaptation begins as soon as you enter a dark environment, and it happens in several steps:
- The iris of your eye opens the pupil, the "black hole" in the center, to its maximum width, usually 5 to 7 millimeters. Though this is the most visible aspect of dark adaptation, it is only the first step.
- Next, a pair of chemicals in the eye, rhodopsin and iodopsin, begin to take effect. These two chemicals are always present in the eye, but they break down in the presence of light, so when the eye is exposed to bright light these chemicals have no effect. But when in the dark the concentration of these chemicals begins to grow and the rod cells and cone cells in the retina become more and more light sensitive.
- At first, most of the increase in night vision comes from the cones, which are densely concentrated in the center of the retina. They are highly sensitive to color and are important for distinguishing fine detail. After 7 minutes or so the cones have reached their maximum sensitivity, while the rods, which are insensitive to color but are more sensitive than cones to low levels of light, keep gaining in sensitivity for another 20-30 minutes.
At the end of a half-hour or so the eye has achieved almost all of its dark sensitivity, with a small increase continuing until about 1 hour or so.
The Rods Have It
When your eye is fully dark adapted, most of your night vision comes from the rod cells in the retina. But the rods are not color sensitive, which is why in the dark you can see only shades of gray. The bright colors you see in pictures of nebulas and galaxies are typically only visible in photographs (film being much more sensitive to colors than a dark-adapted eye).
Most people are aware that night vision is not in color, but few realize that you see less fine detail at night as well. This is because the rods are not as tightly packed as the cones, so they cannot distinguish detail nearly as well. To prove this to yourself you need only look at a tree about 50 feet away: In the daytime you can clearly make out the leaves in the tree; at night you can make out the outline of the tree, but not the individual leaves.
Ten Tips For Improving Your Night Vision
So now that you know how night vision works, here's how to maximize your ability to see in the dark.
1) Observe from a dark site. Any amount of light will reduce your dark adaptation, so get away from street lamps, porch lights, car headlights, and urban skyglow.
2) Avoid bright sunlight as much as possible during the day prior to an evening's observing session, especially later in the afternoon. Exposure to intense light can hamper your dark-adaptation for a long time! Wear sunglasses when you have to go outside.
3)  If you are in a light-polluted location consider wearing dark glasses or special red night-vision goggles at all times except when looking through the eyepiece. It may seem odd to wear dark glasses at night (and certainly don't do that when you're driving), but it can be a real help.
4)  When you need some light to see what you're doing, use a dim red flashlight, the dimmer the better. A red light with adjustable brightness is very handy because it allows you to dial down the brightness to the bare minimum required. (Red light works best because it is less efficient than white light at breaking down the iodopsin and rhodopsin that allow your eye to see in the dark.)
5) Your eyes adapt to darkness independent of one another, so if you have to look at something bright do so with one eye, saving the dark adaptation of your other eye.
6) 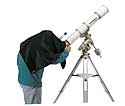 In light-polluted areas, do whatever you can to block ambient light from your eyes. For instance, consider using a dark shroud over your head to block out distracting light when at the eyepiece. Cupping your hand around your eye and the eyepiece helps, too.
7) When you take a break during a night of observing, say to go inside to warm up or grab a bite to eat, put on a pair of red goggles. If you don't need to see what you're doing, cover your eyes with a dark cloth and relax. Even though your eyes may seem fully dark adapted, after a half hour with your eyes completely sealed from light you may find that you gain a bit more acuity.
8) Use averted vision. The rod receptors, which are most sensitive to dim light, are more highly concentrated around the periphery of the retina than in the center. This means that you can see faint objects better by looking slightly off to the side of them rather than straight at them. Try it.
9) Breathe deeply. Avoid the tendency to slow your breathing rate or hold your breath when concentrating intently on a dim object. Reduced oxygen diminishes your night vision. Many experienced astronomers use the trick of "oxygen loading" before observing a particularly faint object, to enhance their visual acuity. Breathe deeply for 15 to 30 seconds just before looking into the eyepiece, and continue doing so as you observe. Don't go overboard, though. If you start feeling dizzy, breathe normally!
10) Avoid drinking alcoholic beverages before or during an observing session. Alcohol is a depressant and will decrease your visual acuity. Wait until after you're finished to crack open that cold one!
In astronomy the name of the game is seeing as much as you can possibly see. For that reason it pays to take a few extra steps to achieve and maintain your maximum dark-adapted night vision, particularly because it is so easy to do.


Why Buy From Orion
- 30 Day Money Back Guarantee
- Safe & Secure Shopping
- Next Day Shipping
- Easy Returns
- Sale Price Guarantee
- Free Technical Support

- 800-447-1001
- Telescope.com
- © 2002- Orion Telescopes & Binoculars All rights reserved
- DMCA/Copyright
- Terms and Conditions
- Privacy & Security
![]()


About Orion Telescopes & Binoculars
Since 1975 Orion Telescopes & Binoculars has been offering telescopes for sale direct to customers. Now an employee-owned company, we pride ourselves on an unswerving commitment to best quality products, value and unmatched customer care. Our 100% satisfaction guarantee says it all.
Orion offers telescopes for every level: Beginner, Intermediate, Advanced, and Expert. From our entry level beginner telescopes for amateur astronomers to our Dobsonian telescopes to our most advanced Cassegrain telescopes and accessories, you can find the best telescope for you. Because we sell direct, we can offer you tremendous value at a great price. Not sure how to choose a telescope? Orion's Telescope Buyer's Guide is a great place to start.
Orion binoculars are known for quality optics at a great price. We offer binoculars for every viewing interest, including astronomical binoculars, compact binoculars, waterproof binoculars, birding binoculars, and sport and hunting binoculars.
Orion's telescope and astrophotography accessories will enhance your telescope enjoyment without breaking the bank. Expand your viewing experience with accessories ranging from moon filters to power-boosting Barlow lenses to advanced computerized telescope mounts. Capture breathtaking photos with our affordable astrophotography cameras. And when you're stargazing, Orion's telescope cases and covers, observing gear, red LED flashlights, astronomy books and star charts will make your observing sessions more convenient, comfortable and meaningful.
At Orion, we are committed to sharing our knowledge and passion for astronomy and astrophotography with the amateur astronomy community. Visit the Orion Community Center for in-depth information on telescopes, binoculars, and astrophotography. You can find astrophotography "how to" tips and share your best astronomy pictures here. Submit astronomy articles, events, & reviews, and even become a featured Orion customer!
sales, new products, and astronomy.