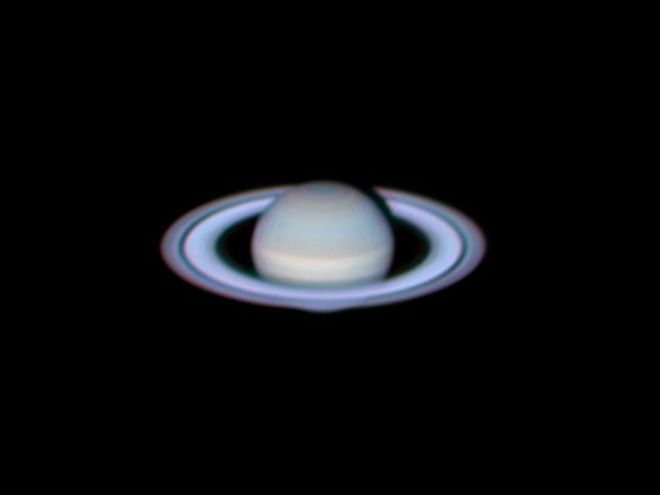
DOWNLOAD ORION'S FREE SOLAR ECLIPSE VIEWER'S GUIDE

Cart
0

{"closeOnBackgroundClick":true,"bindings":{"bind0":{"fn":"function(){$.fnProxy(arguments,\'#headerOverlay\',OverlayWidget.show,\'OverlayWidget.show\');}","type":"quicklookselected","element":".ql-thumbnail .Quicklook .trigger"}},"effectOnShowSpeed":"1200","dragByBody":false,"dragByHandle":true,"effectOnHide":"fade","effectOnShow":"fade","cssSelector":"ql-thumbnail","effectOnHideSpeed":"1200","allowOffScreenOverlay":false,"effectOnShowOptions":"{}","effectOnHideOptions":"{}","widgetClass":"OverlayWidget","captureClicks":true,"onScreenPadding":10}

 61 of 264 
Saturn
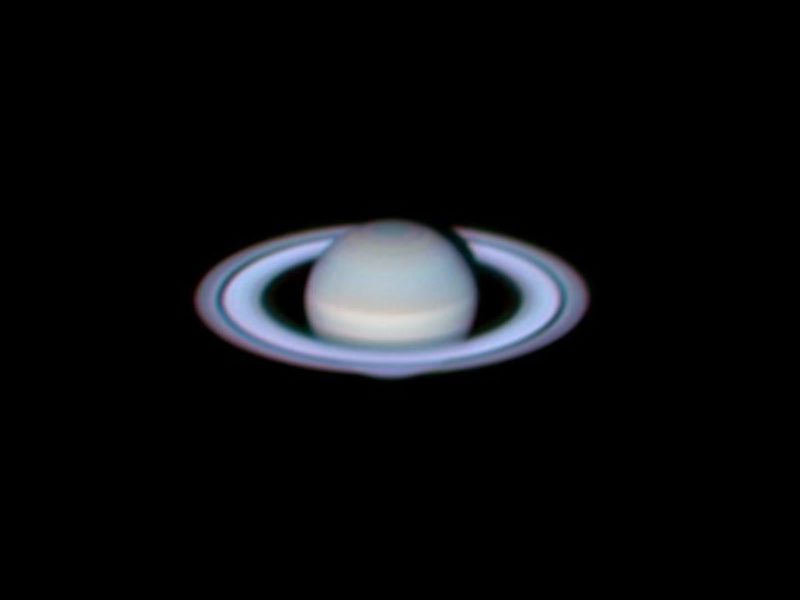
I love to take planetary picture in my front yard. However, I don't have much chance to take a picture due to a very limit sky condition at my home, about 4 miles west of Suvanabhumi Airport, Bangkok, Thailand. On that day, the sky altitude below 30 degrees are red color from light polution. However, I still begin my picture. I start to setup Orion Skyquest XT8g at 7pm., local time ( 7 from UTC). The setup time is only 10 minutes, most of time use for wiring and computer setup. The telescope is use only a few minutes! ORION SkyQuest XT8g ease all of telescope setup process. Just place a dobsonian base on flat and horizon area. Then cross check by a free app on my IPhone 4 for a bubble level. Place OTA on the base. Next, just start for star alignment. I used to setup EQ mount with a simple star drift. It waste my time for nearly half and hour to setup every time. But not on dobsonian goto from ORION! Unfortunately, I waste nearly 2 hours for cleaning my CCD camera, DMK 21 AU 618. It's nearly 2 years old. A small grain of dust could damage all of your pictures. I was found that all of pictures from a night after imaging process, are dirt in red/green/blue. It was from a grain of dust! So, I use my jewerly loop and cotton buds gentely wipe a grain of dust one by one. The first picture start nearly 9:30 PM. I begin with Jupiter. Then, Moon, Mars, and Saturn. Only if my sleepiness won't overcome me, I could get Venus and Mercury in the early morning of the next day. Additional, I use nearly 2 weeks find a solution on immage processing of Winjupos and others. I hope to complete others images soon. And, I hope that my picture will be one of your inspiration on your planetary image project. Hope you like my picture! Clear Skies!
Details
Date Taken: 03/13/2014
Photographer: Cherdphong Visarathanonth
Location: Prawet district,Bangkok,Thailand
Telescope: Orion SkyQuest XT8g Computerized GoTo Dobsonian Telescope
Other Camera: DMK21 AU618
Processing: FireCapture2.2,Winjupos10,Autostakkert2.0, Registax6, Photoshop CS
Exposure: 180s @ 60 fps Red/Green/Blue
Other Equipment Used: Orion Nautilus Filter Wheel 7x1.25, Orion shorty Barlow lense 2x, Chroma Tech RGB filter
Notes: This is a Saturn image. You can easily see the ring and division. For combination of all equipment, ORION SkyQuest XT8g play a major role. After best mirror collimation, some of ambient temperature must be adjust before picturing process begin. With the PEA on SyncScan, I can handle a 6 meters of focal length (for other pictures) with some simply additional adjust by hand controller! I also love the dual speed crayford focuser of this telescope. It help me on a very precisely fine tune of image sharpness. Very easy and advantage, if comparing to ordinary focuser! Actually, I want 5x barlow lense. However, I use ORION Shorty Barlow 2x due to a low brightness of Saturn. Then, ORION Nautilus Filter Wheel 7x1.25" is mount on the barlow. I use Chroma Tech Red/Green/Blue filters for minimize an image focus shift. Finally, the DMK 21 AU 618 is selected as a camera. The camera can reveal top of ORION telescope optic quality. Fire Capture 2.2 is used for control both of camera and filter wheel. Both of them are work well on ASCOM platform. I highly recommend to use the Nautilus filter wheel. ORION provide a completely support on manual and every necessary software. You don't have to guess or try on every unknown driver or ASCOM compatibility like some other products. You can find them all on a well categorize download module of ORION website. Fire Capture controls a series of imaging process. Begin with picturing of 180 s. @ 60 fps of Red, then pause 10 s, change filter to Green, then begin of 180 s @ 60FPS, . . . . continue until finish all filters. It really nice and simple to use this software to control all imaging process. I love it! After I get raw VDOs, the VDO must be process for derotation, which is a major of Winjupos 10. I derotate all of the VDO, then use AutoStakkert2.0 with drizzle 3x to increase image size and image stacking process. Sure that all of stacked images still have only grey color. I then recombine RGB picture on Winjupos 10 again. Then, I use Registax6 to sharpen image. And finally finish picture by Photoshop CS, stretch level, contrast, brightness and picture information.

{"closeOnBackgroundClick":true,"bindings":{"bind1":{"fn":"function(event, startIndex, itemCount, newItems) { QuickLookWidget.assignEvents(newItems); $(\".Quicklook > .trigger\", newItems).bind(\"quicklookselected\", function(event, source, x, y) { OverlayWidget.show(\'#_widget1147543718014\', event, source, x, y); }); }","type":"itemsloaded","element":".PagedDataSetFilmstripLoader > .trigger"},"bind0":{"fn":"function(){$.fnProxy(arguments,\'#_widget1147543718014\',OverlayWidget.show,\'OverlayWidget.show\');}","type":"quicklookselected","element":".Quicklook > .trigger"}},"effectOnShowSpeed":"","dragByBody":false,"dragByHandle":true,"effectOnHide":"fade","effectOnShow":"fade","cssSelector":"ql-category","effectOnHideSpeed":"1200","allowOffScreenOverlay":false,"effectOnShowOptions":"{}","effectOnHideOptions":"{}","widgetClass":"OverlayWidget","captureClicks":true,"onScreenPadding":10}