

Very soon after the first telescope was invented, someone got the idea of mounting two telescopes side by side. We are, after all, creatures with two eyes, and tend to see more, and be more comfortable, when using both our eyes. Originally called "field glasses," because of their military applications, they soon became adopted by nature lovers and amateur astronomers. In the late 19th century opticians started adding prisms to the design, resulting in more compact instruments with wider fields of view, and these instruments became known as "binoculars."
Although binoculars do impart a mild three-dimensional view to nearby objects, when used for astronomy any such effect is an optical illusion, though sometimes a powerful one. The main advantage for an amateur astronomer in using binoculars, rather than a small handheld telescope, is that they are relatively easy to hold steady, and the images often seem brighter and more detailed because of the image processing which goes on in our brains when presented with two channels of information. Binoculars are extremely easy to use, and make scanning the night sky a pleasant intuitive activity, without the need to fiddle with finders, mounts, and eyepieces.
In some ways, binoculars "don't get no respect." They're often looked down on as the astronomical telescope's poor relation. Yet they are a fine instrument in their own right, capable of observing objects which are simply too big to see properly in a telescope. One of the few astronomers to take binoculars seriously is Phil Harrington, whose book, Touring the Universe through Binoculars (Wiley), is the bible of binocular astronomy. They are also, to serious deep sky observers, an essential accessory in discovering starhopping paths through the stars. Many households already have a pair knocking around, or a reasonably good pair can be found at most sporting goods stores, so they are an inexpensive way to get started in exploring the sky.
Numbers and more numbers
Binoculars have a numbers game all their own. Different types are described by a pair of numbers with an "x" in between: 7x35, 10x50, 20x80, etc. The first number is the magnification: 7 times, 10 times, 20 times. The second number is the aperture of each half of the binocular in millimeters: 35 mm, 50 mm, 80 mm. They usually will be labeled with a field of view, either in degrees or how many feet they will show at 1000 yards (one of the strangest units I know of!) Another important number is their "eye relief," which measures how far behind the eyepieces you must put your eyes to catch all the light. If you need to wear glasses while using binoculars, choose a pair with at least 15 mm eye relief. Finally, there is their "exit pupil," the diameter of the cylinder of light coming out the back of the binoculars. This is calculated by dividing the aperture by the magnification; it's a very important number, and I'll say more about it later.
Other factors
I mentioned that all modern binoculars have prisms in their optical design. These are of two different kinds, but both serve the same purpose, to turn right side up the telescope's typical inverted image. Porro prisms give many binoculars their characteristic "Z" shape; they are relatively simple to make and pass light well. Roof prisms result in "straight through" optical tubes: more compact, but also more expensive to make and, until recently, less efficient at passing light. The glass from which the prisms are made also has an effect, better binoculars using BAK-4 glass. A quick way to check a binocular in a store is to hold it about 15 to 20 inches away from your eyes and look at the exit pupils (the circles of light leaving the eyepieces). If these are clean circles, the binoculars have good prisms; if they're cut off into a diamond shape, the prisms are too small or made from the wrong glass.
Most optical instruments nowadays have their glass to air surfaces coated to reduce reflection and increase light throughput. But binoculars differ in how many surfaces are coated and with what kind of coating. "Coated" by itself means little; "fully multicoated" means that all glass to air surfaces are coated with multiple layers of coating.
Because binoculars have two telescopes, there must be a way of focusing them independently, because most peoples' eyes differ a bit from left to right. The best binoculars allow both halves to focus together, while one eye has an independent adjustment. Avoid at all costs binoculars labeled "fixed focus" or "universal focus" as these will be poor performers in general, and totally useless for astronomy.
Binoculars on your computer
It's easy to select objects for binocular viewing. Users of Starry Night� Pro 6 and above can easily add field-of-view indicators to their Starry Night� display.
- Open the FOV tab.
- Expand the Binoculars layer.
- Initially, this list will be blank. To add equipment and their corresponding field-of-view indicators, choose Edit.
- Press the "From List..." button in the lower right corner of the dialog box. Starry Night� version 6 now has a database of over 300 Orion, Meade, Celestron and Vixen scopes, binoculars, SBIG, Apogee, FLI and Starlight Express CCD chips and more from which to choose.
- Simply select your binoculars from the list to add to your equipment list.
- If your equipment is not listed, press the "New" button in the lower left corner. A dialog box will open, which allows you to name your piece of equipment, and enter its relevant information.
To turn the outline of the indicator on/off, simply check/uncheck the box to the left of the indicator box where it appears on your equipment list.
Starry Night� will simulate what you might be seeing through various binoculars and will help you determine which binoculars might be best for the objects you're hunting.
Binoculars for astronomy
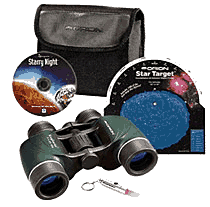 As with other aspects of astronomical equipment, with binoculars aperture is a primary consideration. While any binocular will be a tremendous advance over the unaided eye, a 50mm aperture is probably the minimum you should consider in a binocular specifically for astronomy for an adult. For a child, a 7x35 is more manageable, and the Starry Night� Binocular Stargazing Kit which includes such a binocular along with some really good learning tools would be great for any kid.
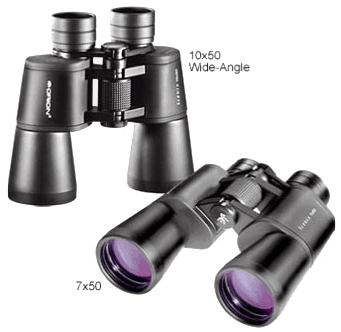
If you look through Orion's web site, you'll see 50mm binoculars at a variety of prices and two main magnifications: 7x50 and 10x50. Which magnification? It depends on your age. As we grow older, our eyes lose their ability to open wide. Someone under 30 years old usually has eyes which can accept an exit pupil 7 mm in diameter, such as a 7x50 binocular provides. Someone over 50 years old has eyes which won't open much above 5 mm, so a 5 mm exit pupil, such as a 10x50 produces, will be more suitable. Another factor comes in as well: with a bit more magnification, the sky background will be darkened more and the magnification boost will make small objects easier to see. For that reason, I generally recommend 10x50 as the best size for general astronomy use.
So, what about the different prices? With binoculars, you pretty much get what you pay for. The more expensive models are generally better made from more expensive materials, and will generally last a lot longer. A good compromise on an entry level binocular is the Orion Scenix.
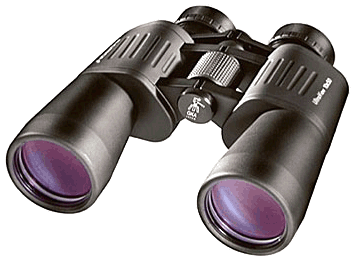
A few years ago, I decided to treat myself to a somewhat better binocular, and bought a Celestron Pro 10x50, which has become my constant observing companion. Celestron discontinued that model, but its twin lives on as the Orion UltraView.
Here there be giants!
While 10x50 binoculars are probably the most useful everyday tools for most amateur astronomers, some of us get hooked on the two-eyed view, and long for something bigger and better. Yes, aperture fever lurks in the world of binoculars too! When you move to giant binoculars, you lose a bit of the easy hand-held use of small binoculars, though the performance of any binocular can be improved by mounting it on a tripod. But what views you gain!
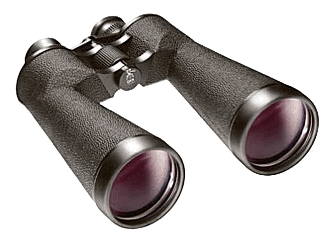
My first giant binocular was an Orion Little Giant II 15x70. Despite its size, this binocular is remarkably light in weight and very well balanced, so that I found I could use it while sitting down and braced without a tripod, almost as convenient to use as my 10x50s. I particularly like taking this binocular with me when traveling to southern destinations.
Recently I had the opportunity to try out the giant of giants: an Orion GiantView 25x100 Explorer. Although it says "Tripod optional" in the photo, don't believe it! These are two 4-inch refractors linked together on a solid longitudinal axis, the whole unit weighing in at over ten pounds. They come packed in a solid carrying case, and are absolutely gorgeous to look at. But it's the views through them which are really astounding.
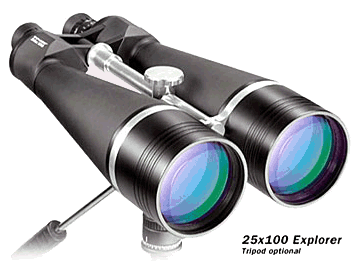
The unit I tested had been kicking around the Starry Night� office for a while, and Pedro hesitatingly said they might be out of collimation. Collimation? I've collimated my Newtonian reflectors many times, but had always believed that binocular collimation was something which required special tools. However, a little research on the internet indicated that giant binoculars like this are very sensitive to misalignment, but quite easily put right once you know the secret. The secret is to find out where the adjustment screws are located.
My first look through the binocular confirmed that things were out of whack: the two images were out of alignment beyond anything my eyes could accommodate. My internet guide told me that the adjustment screws were hidden beneath the rubber grip on the prism housings, just in front of the name plates. Prying the rubber up with a screwdriver revealed the screw heads, and some scratches that showed that I wasn't the first person to venture into this region. It seems that, in the land of the giants, collimation is pretty routine. Collimation is done in daylight with the binoculars focused on a distant object, moving your eyes back from the eyepieces and then forward again, tweaking the screws gently, until the two images merge cleanly and comfortably. Not all that hard really.
Once collimated, the views were outstanding. I concentrated on really large objects under my dark country skies, and was especially impressed with the Andromeda Galaxy and its two companions, the Pleiades, and, especially, the Double Cluster in Perseus. The latter gave the illusion of three-dimensionality which makes these binoculars so addictive. The heavy axis joining the two halves has a sliding tripod adapter on it, making balancing these giants on a tripod very easy. The only difficulty is that at 25 power, it's sometimes hard to point them accurately. I've heard of people mounting unit-power finders on them to get them pointing in the right direction!
February 2007
|


{entityCount: 1}


